Install Host Shield on Windows
Installation Requirements
Prerequisites
- Windows Server 2019, Windows Server 2022, or Windows Server 2025. See the Coverage Map for per-version feature support.
ACCESS_KEY: The agent access key.REGION:us1,us2,us4,au1,eu1,me2,in1. For more information, see Sysdig SaaS regionCOLLECTOR: Use the collector address for your region. For more information, see SaaS Regions and IP Ranges.- Administrator permissions to perform the operations.
Coverage Map
| Platform | Threat Detection and Response | Vulnerability Management | Posture Management |
|---|---|---|---|
| Windows Server 2019 | ✅ | ✅ (Host Only) | ✅ |
| Windows Server 2022 | ✅ | ✅ (Host Only) | ✅ |
| Windows Server 2025 | ✅ | ❌ | ❌ |
Install the Windows Host Shield
You can install the Windows Host Shield using an MSI, which supports both GUI and CLI operation. Download the MSI package from the Sysdig download center.
GUI Installation
You can execute the MSI using a GUI and the installation process will prompt you to accept the EULA and enable the following applications Vulnerability Management and Posture Management.
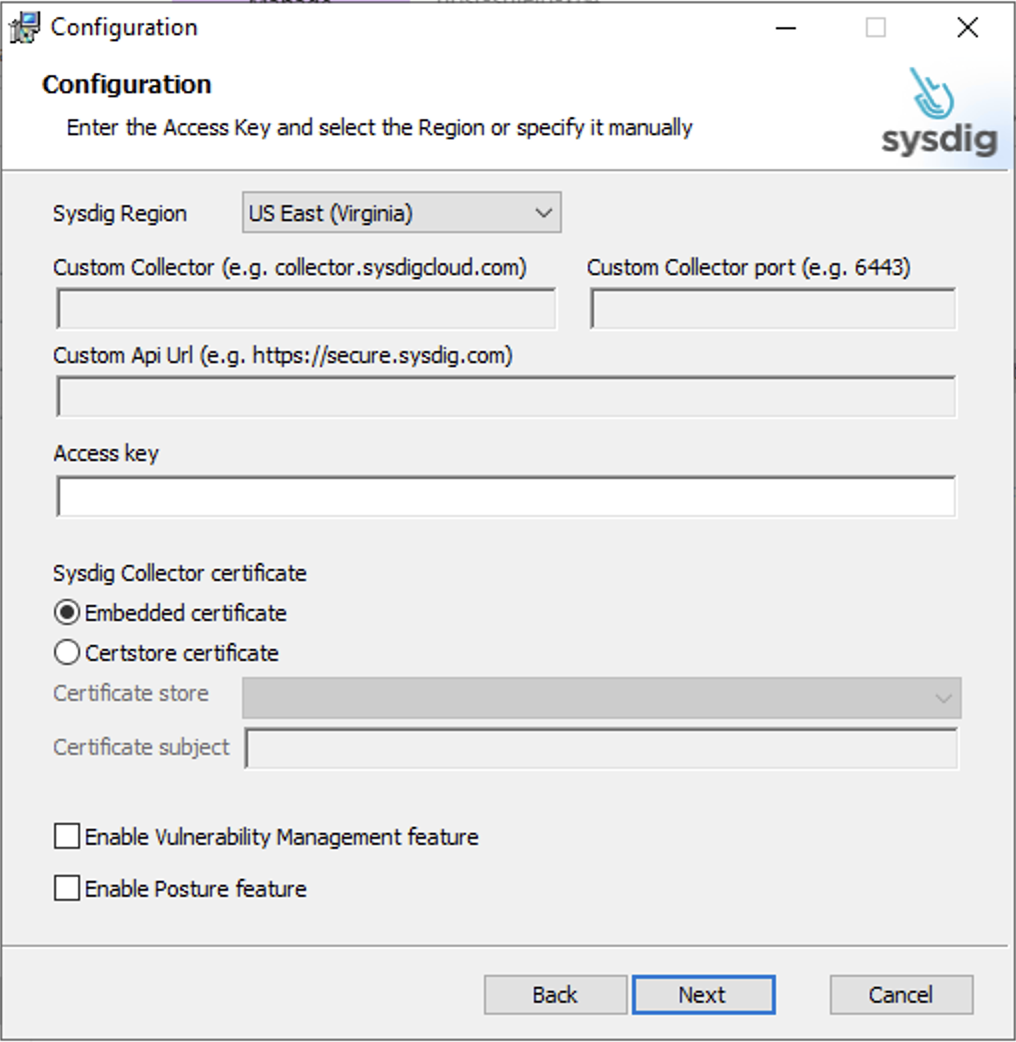
CLI Installation and Configuration
Run the MSI in silent mode via CommandLine or PowerShell:
msiexec /i sysdig-host-shield.msi REGION=<region> ACCESS_KEY=<AGENT_ACCESS_KEY> VM_FEATURE_ENABLED=False POSTURE_FEATURE_ENABLED=False ACCEPT_TERMS_CONDITIONS=True /qn
Tags
Add custom tags to categorize and filter hosts. The tag format depends on how you deploy the Host Shield:
MSI installation: Pass tags to
msiexecas comma-separatedkey:valuepairs. Tags can also be entered in the MSI GUI wizard.msiexec /i sysdig-host-shield.msi REGION=us1 ACCESS_KEY=<AGENT_ACCESS_KEY> TAGS="env:prod,team:backend" ACCEPT_TERMS_CONDITIONS=True /qnhost-shield.yaml: Define tags as akey: valuemap.tags: env: prod team: backendShield Helm chart (
values.yaml): Define tags as akey: valuemap undercluster_config.cluster_config: tags: env: prod team: backend
Using Certificate Storage
Windows stores certificates locally in a storage location called the certificate store. This store may contain multiple certificates issued by different Certification Authorities (CAs).
To configure Sysdig Host Shield for certificate storage, set the following environment variables:
COLLECTOR_CERT=Certstore: Enables certificate storage usageCOLLECTOR_CERTSTORE_NAME=<store_name>: Specifies the certificate store to use. Choose from:MY: Personal storeROOT: Trusted Root Certification AuthoritiesCA: Intermediate Certification AuthoritiesSPC: Software Publisher Certificates
COLLECTOR_CERT_SUBJECT=<certificate_subject>: Specifies the Common Name (CN) of the certificate. This can be a full or partial string match.
Example Configuration:
COLLECTOR_CERT=Certstore
COLLECTOR_CERTSTORE_NAME=MY
COLLECTOR_CERT_SUBJECT=SysdigAgentCert
Using Custom Collector
If you’re not using one of the following SaaS Regions, you must provide REGION=custom and the following variables:
COLLECTOR_URL: Specifies the custom collector host (for example,your.custom.host.com)COLLECTOR_PORT: Specifies the custom collector port (for example,6443)API_URL: Specifies the custom api url (for example,https://your.custom.host.com)
By setting ACCEPT_TERMS_CONDITIONS to True, you acknowledge and expressly agree that your use of or access to the Sysdig software is governed by the applicable terms and conditions located at Sysdig Legal Terms unless otherwise stated in a Sysdig Order Form or other written mutual agreement between Customer and Sysdig.
Proxy Settings
If your environment requires internet access through a proxy server, you can configure proxy settings in the host-shield.yaml file. These settings ensure that Sysdig Host can communicate with Sysdig.
proxy:
  http_proxy: http://customer-proxy
  https_proxy: http://customer-proxy
After applying the changes, restart the Host Shield Windows service by running the following command from the PowerShell terminal:
$ Restart-Service SysdigHostShield
Upgrade
This section describes how to upgrade the Sysdig Host Shield on Windows. Sysdig recommends upgrading at least once every three months to receive the latest features, enhancements, and CVE fixes.
Before You Upgrade
- Make sure the antivirus and EDR exclusions described in Antivirus and EDR Exceptions are still in place.
- Make sure you still have access to the values used at install time (
ACCESS_KEY,REGION, custom collector settings, tag values), in case you need to reinstall.
In-Place Upgrade
Download the latest MSI package from the Sysdig download center and run the installer in place. You do not need to uninstall the previous version first.
GUI upgrade: double-click the new MSI and complete the wizard.
CLI upgrade (silent):
msiexec /i sysdig-host-shield.msi ACCEPT_TERMS_CONDITIONS=True /qn
An in-place upgrade reuses the configuration file from the original installation, so you do not need to repeat properties such as ACCESS_KEY or REGION. You must always pass ACCEPT_TERMS_CONDITIONS=True, as accepting the terms and conditions is mandatory on every install and upgrade. Supply any other property only when you want to change its value. See Configuration Persistence.
The installer stops the SysdigHostShield service, replaces the binaries, and restarts the service. A reboot is not required.
Configuration Persistence
The following configuration is preserved across in-place upgrades:
%ProgramFiles%\Sysdig\Shield\Config\host-shield.yaml(proxy settings, custom configuration)- Certificate storage settings (
COLLECTOR_CERT,COLLECTOR_CERTSTORE_NAME,COLLECTOR_CERT_SUBJECT) ACCESS_KEY,REGION, and collector settings configured at the original install
If you need to change any of these values during the upgrade, pass them to msiexec as you would at install time. New values supplied on the command line override the existing configuration.
Service Restart
The SysdigHostShield service is stopped and restarted automatically by the installer. You can manually restart it at any time:
Restart-Service SysdigHostShield
Rollback
If the upgrade causes issues, you can roll back to the previous version:
Uninstall the current Sysdig Host Shield from Settings > Apps > Installed apps. To uninstall from the command line instead, run the following (this requires the original MSI file used to install):
msiexec /x sysdig-host-shield.msi /qnReinstall the previous MSI package using the install procedure described in CLI Installation and Configuration.
After reinstall, verify that your host-shield.yaml, certificates, and tags reflect the expected values.
Troubleshooting Failed Upgrades
If the upgrade fails or the SysdigHostShield service does not start after upgrade, check the following:
Installer logs. Run the MSI with logging enabled to capture details:
msiexec /i sysdig-host-shield.msi /qn /L*v "%TEMP%\sysdig-host-shield-install.log"Service logs. The Host Shield writes logs under
%ProgramFiles%\Sysdig\Shield\Logs\. Inspect the most recent files for errors.Antivirus or EDR interference. Confirm that the exclusion for
*:\Program Files\Sysdig\Shield\**is active. See Antivirus and EDR Exceptions.Code signing or installer integrity. Re-download the MSI from the Sysdig download center if the local copy may be corrupted.
Network connectivity. Ensure outbound port
6443is reachable and not blocked by a local firewall.Certificate storage. If
COLLECTOR_CERT=Certstorewas configured, confirm the certificate referenced byCOLLECTOR_CERT_SUBJECTis still present in the configured store.
If the issue persists, contact Sysdig Support and include the installer log and the most recent Host Shield log files.
Antivirus and EDR Exceptions
Sysdig Windows Host Shield may conflict when coexisting with Antivirus software or Endpoint Detection and Response (EDR) sensors. To prevent termination of the Sysdig Windows Host Shield processes, it is recommended to set up exclusions for the Host Shield root installation directory.
Carbon Black Cloud
- From the Carbon Black Cloud Console go to Enforce > Policies.
- Select the desired Policy and click on the Prevention tab.
- Add a new
Permissionby clicking on the+sign. - Add a new application path in the
Permissionssection and provide the directory exclusion*:\Program Files\Sysdig\Shield\**. - Check
Bypassoption box forPerforms Any Operation. - Click Confirm.
Windows Defender
- Open Windows Security > Virus & threat protection.
- Under Virus and threat protection settings, select Manage Settings.
- Under Exclusions select Add or remove exclusions.
- Click on the Add an exclusion button and choose Folder.
- Browse the drive where the Sysdig Windows Host Shield was installed, and select the
Program Files\Sysdig\Shielddirectory.
