Risk
Supported Data Sources
The Risks module presents findings from the following connected data sources:
- Kubernetes
- AWS Cloud Accounts
- Google Cloud Platform
- Microsoft Azure
Prerequisites
By default, Sysdig SaaS users assigned to the following roles are granted READ access to the Risks page:
- Standard User
- Advanced User
- Team Manager
- Service Manager
If you have custom user roles that should be given read access, or if you want to define a group of users who should not have access to the Risk page, you must create a custom role and assign Risks permission to it.
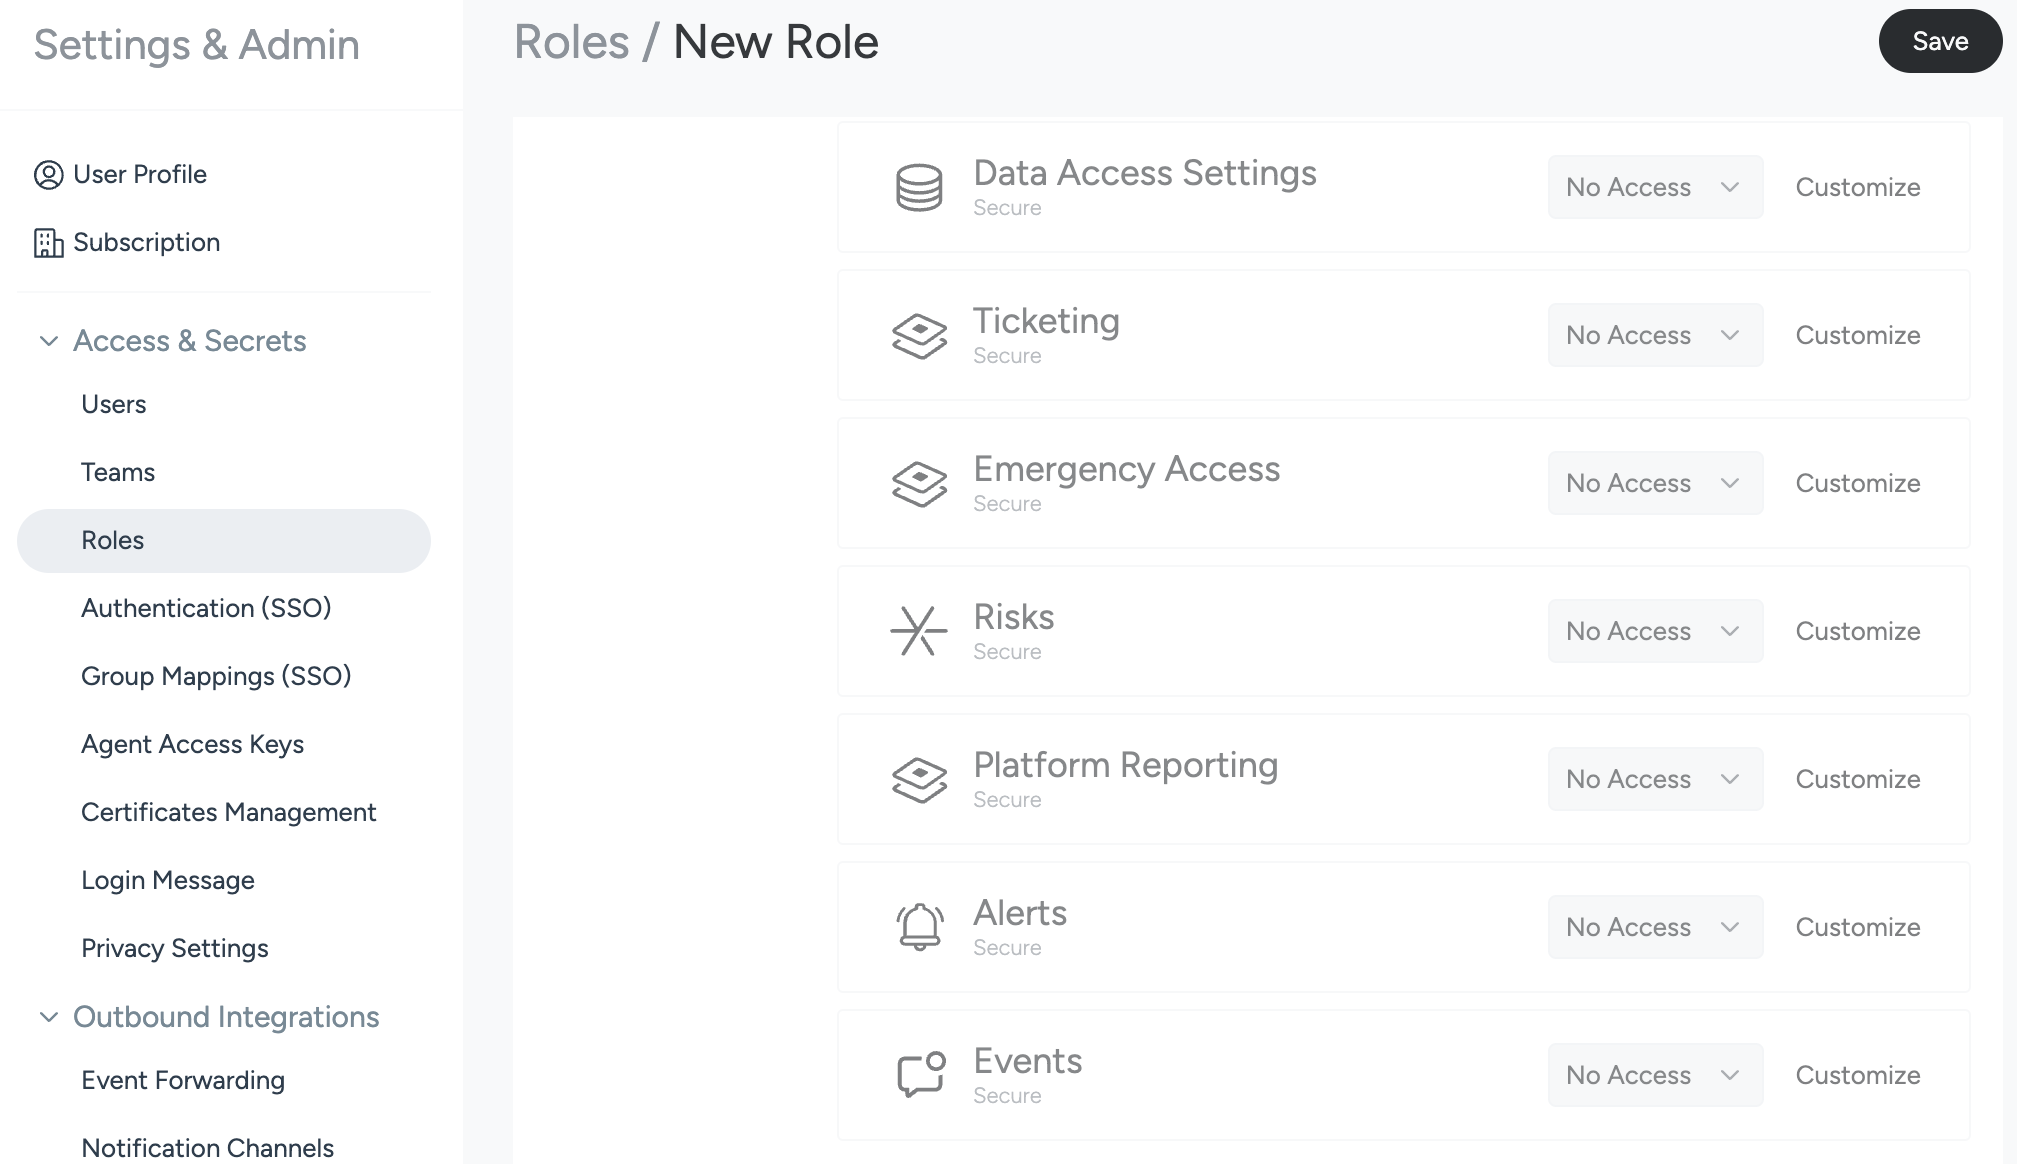
For more information, see Custom Roles.
Access Risks
Log in to Sysdig Secure and click Risks.
The Risks page appears.
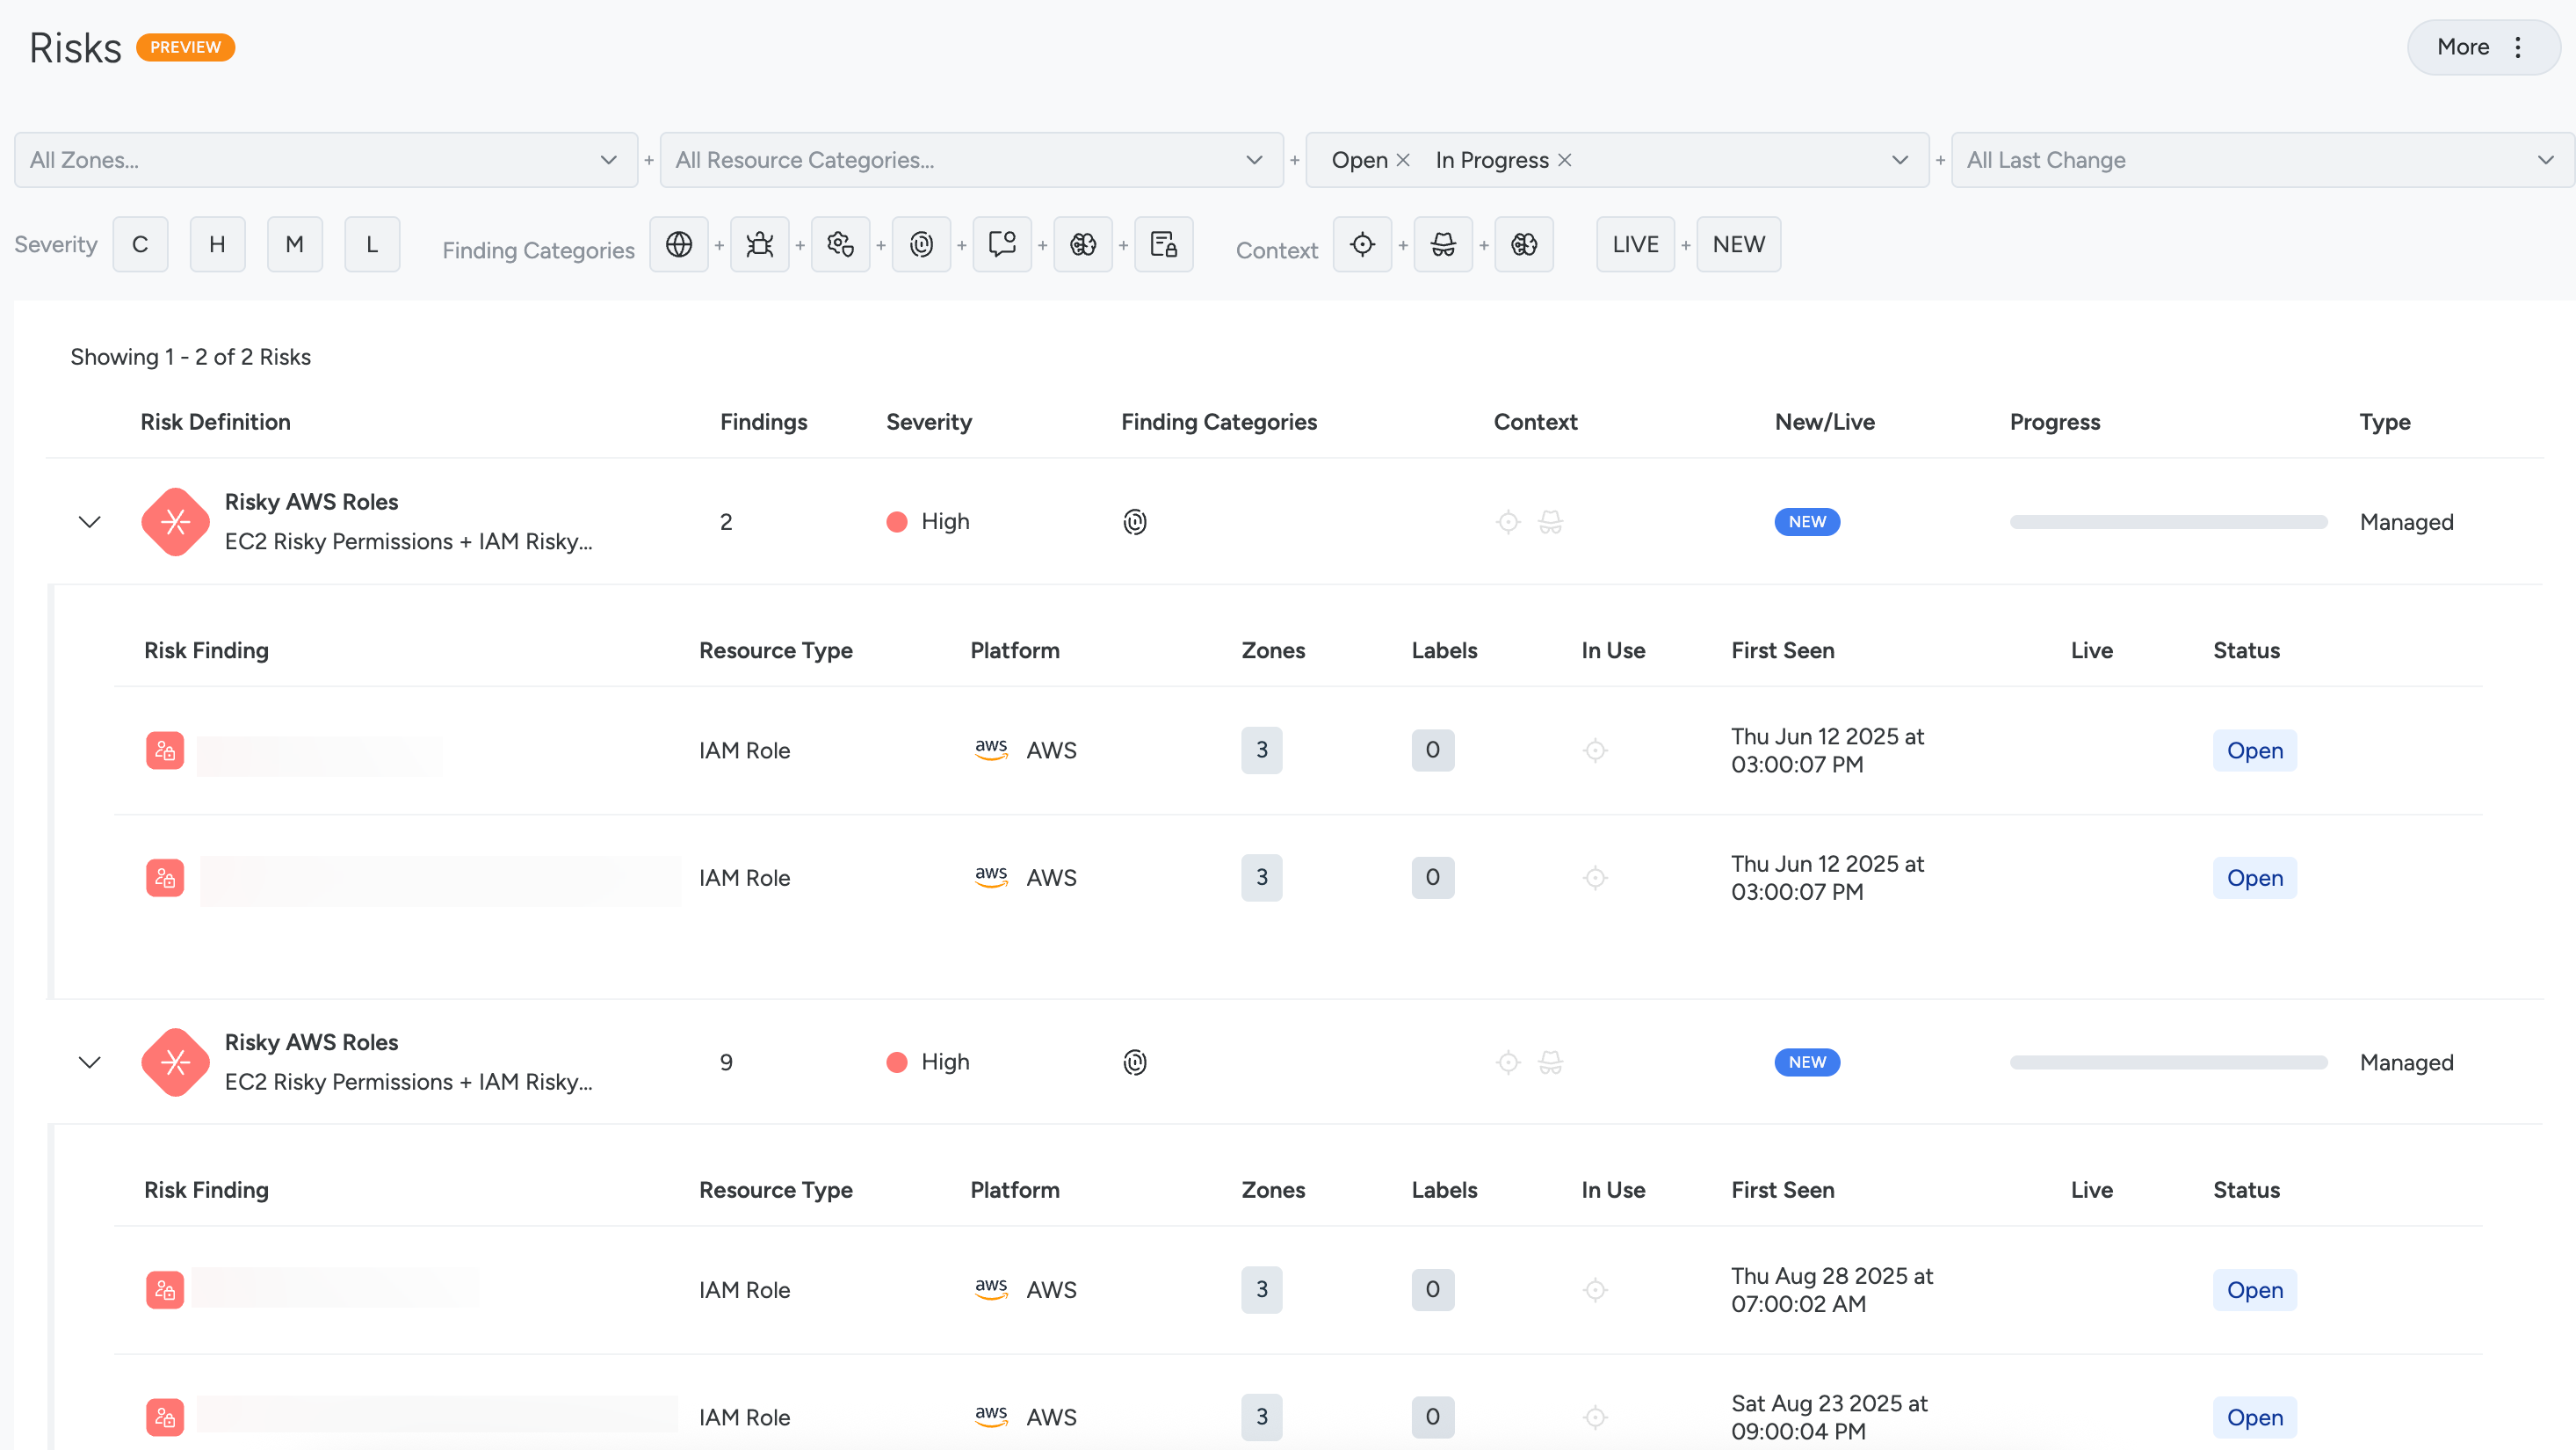
Navigate the Risks Page
On the Risks page:
- Select the More button at the top right corner to:
- Navigate to the Automations
- Go to the Create Query page.
- Create a New Custom Risk.
- Click a Risk Definition in the table to expand the row and see the specific Findings.
- Click a Finding row to open a Risk Findings panel containing a preview of the Attack Path, a summary of the finding, and additional details about the associated findings and impacted resources.
Filter Risks
Use the filters at the top of the Risks page to drill into the detected Risk Findings. Not all filters listed below are shown by default; click the + Add button to enable them. Click the Reset button to remove any applied filters and set the filters shown to the default state.
Search
Filter for Risk Findings with the given string in the name of the Risk Definition.
Zone
The Risk page is filtered to reflect your Team Scopes, including zones. Filter by detected zones using the drop-down. For setup details, see Zones.
Severity
Sysdig has established three tiers to gauge the Severity of identified issues.
Tier 1: Severity levels
In Tier 1, risks are categorized based on their severity levels. A risk’s severity matches the highest tier of one of its findings:
- Critical: is assigned when findings include a high-confidence detection or a critical vulnerability from an In Use package.
- High: is assigned when a critical vulnerability has an exploit.
- Medium: is assigned when Compute has access to storage, critical unused permissions exist, or an insecure storage configuration accepts HTTP.
- Low: is assigned if none of the above conditions are met.
Use the filter buttons to focus on specific severity levels. Risk Definitions at the same severity level are sorted by additional criteria described below.
Tier 2: Prioritizing between Risks of the same severity
In Tier 2, risks tagged Live are prioritized higher. This means they have an affected resource with a high-confidence event that occurred within the past three hours. The number of component findings comprising risks also play a crucial role in prioritization.
Tier 3: Prioritizing between Risks of same severity and finding count
In Tier 3, risks are prioritized by the number of affected resources. The higher the number of impacted resources, the higher the priority for mitigation efforts.
Understand the Risk Definition Table
The Risks table is organized through a number of columns.
Risk Definitions
Out of the box, Sysdig delivers a range of finding combinations called Risk Definitions. These are defined using SysQL, and generate Risk Findings on any resources that match the query. For certain Risk Findings, multiple resources may be affected and will be visualized as part of the Risk Finding’s attack path. However, any given finding has only one “anchor” resource – the first resource matched by the SysQL query. This is the resource displayed in the table on the Risks page when expanding a Risk Definition.
Examples
| Risk Definition | Associated Finding Types | Anchor Resource Type |
|---|---|---|
| Exposed Workload with Critical In Use Exploitable Vulnerability |
| Workload |
| Publicly Exposed EC2 with Critical Vulnerability and High Confidence Detection |
| AWS EC2 |
| Publicly Exposed S3 Accessed by Suspicious IP |
| AWS S3 |
| Publicly Exposed S3 with High Confidence Detection |
| AWS S3 |
| Publicly Exposed EC2 has Access to S3 Bucket(s) through IAM Role with Critical Permissions |
| AWS EC2 |
| Exposed Workload Contains AI Package |
| Workload |
| Risky AWS IAM User |
| AWS IAM Role |
| Potentially Compromised User |
| AWS User |
Sysdig regularly adds new managed Risk Definitions to surface problematic combinations of findings.
Risk Definitions assess data coming from CSPM, KSPM, Cloud Log Ingestion, CIEM, Vulnerability Management, and Agent-Based Threat Detection. Risk definitions require some or all of these components to be deployed to be evaluated. For example:
| Type of Resource or Finding | Sysdig Feature | Installation |
|---|---|---|
| Kubernetes clusters | KSPM (Compliance) | KSPM |
| AWS cloud resources | CSPM (Cloud compliance) | Agentless |
| AWS high-confidence event detection | CSPM + Threat Detection (Cloud compliance + Threat Detection) | Agentless |
| Insecure Identity findings | CSPM + CIEM (Cloud compliance + Identity and Access) | Agentless |
| Packages in runtime with vulnerabilities | Compliance + In Use | In Use |
Finding Categories
Finding Categories refer to the different types of security issues that contribute to a risk. Current categories include:
- Exposed: An affected resource is exposed to the public internet.
- Vulnerability: A vulnerability was detected in a package or image.
- Configuration: A Posture control failed in a Compliance check.
- Identity: Identity and Access (CIEM) permissions irregularities were detected.
- Detection: A high-confidence event was detected from a Sysdig Threat Intelligence or Threat Detection policy. These are managed by the Sysdig Threat Research team, contain only high-severity rules, and have a low level of false positives.
- AI: A finding related to an AI package or workload.
- Sensitive Data: An affected resource contains Personally Identifiable Information (PII), Protected Health Information (PHI), or financial data.
Context
Filter based on vulnerability findings with specific context.
- In Use: Packages which are executed at runtime and contain vulnerabilities.
- Has Exploit: Vulnerabilities detected that have a known method of exploitation.
New/Live
The New/Live column indicates the status of the Risk Definition:
- Live: A high-confidence event was detected within the last 3 hours. A high-confidence event refers to an event that is detected by a Sysdig Threat Intelligence or Threat Detection policy.
- New: A Risk is tagged as New if previously we had no affected resources match this risk, and now at least one does. A Risk is considered New for 7 days.
Type
You can filter Risk Definitions by Managed or Custom. The former are created by Sysdig, and the latter are created by users through the UI.
Understand the Risk Findings Table
Select a Risk Definition to open the Risk Findings table.
Risk Finding Status
Risk findings status defaults to Open, and may be changed to In Progress. Sysdig will move the status to Closed when the system no longer detects the issue.
Labels
Filter for Risks where the affected anchor resource has the specified label(s).
Resource Type
Filter by anchor resource type, such as Compute, Environment, Identity, Kubernetes, or Storage.
Risk definition tag
Filter for Risks where the definition has the specified tag(s).
Review the Affected Resource
Open a Risk Definition to review the affected resource.
Review the findings for critical issues.
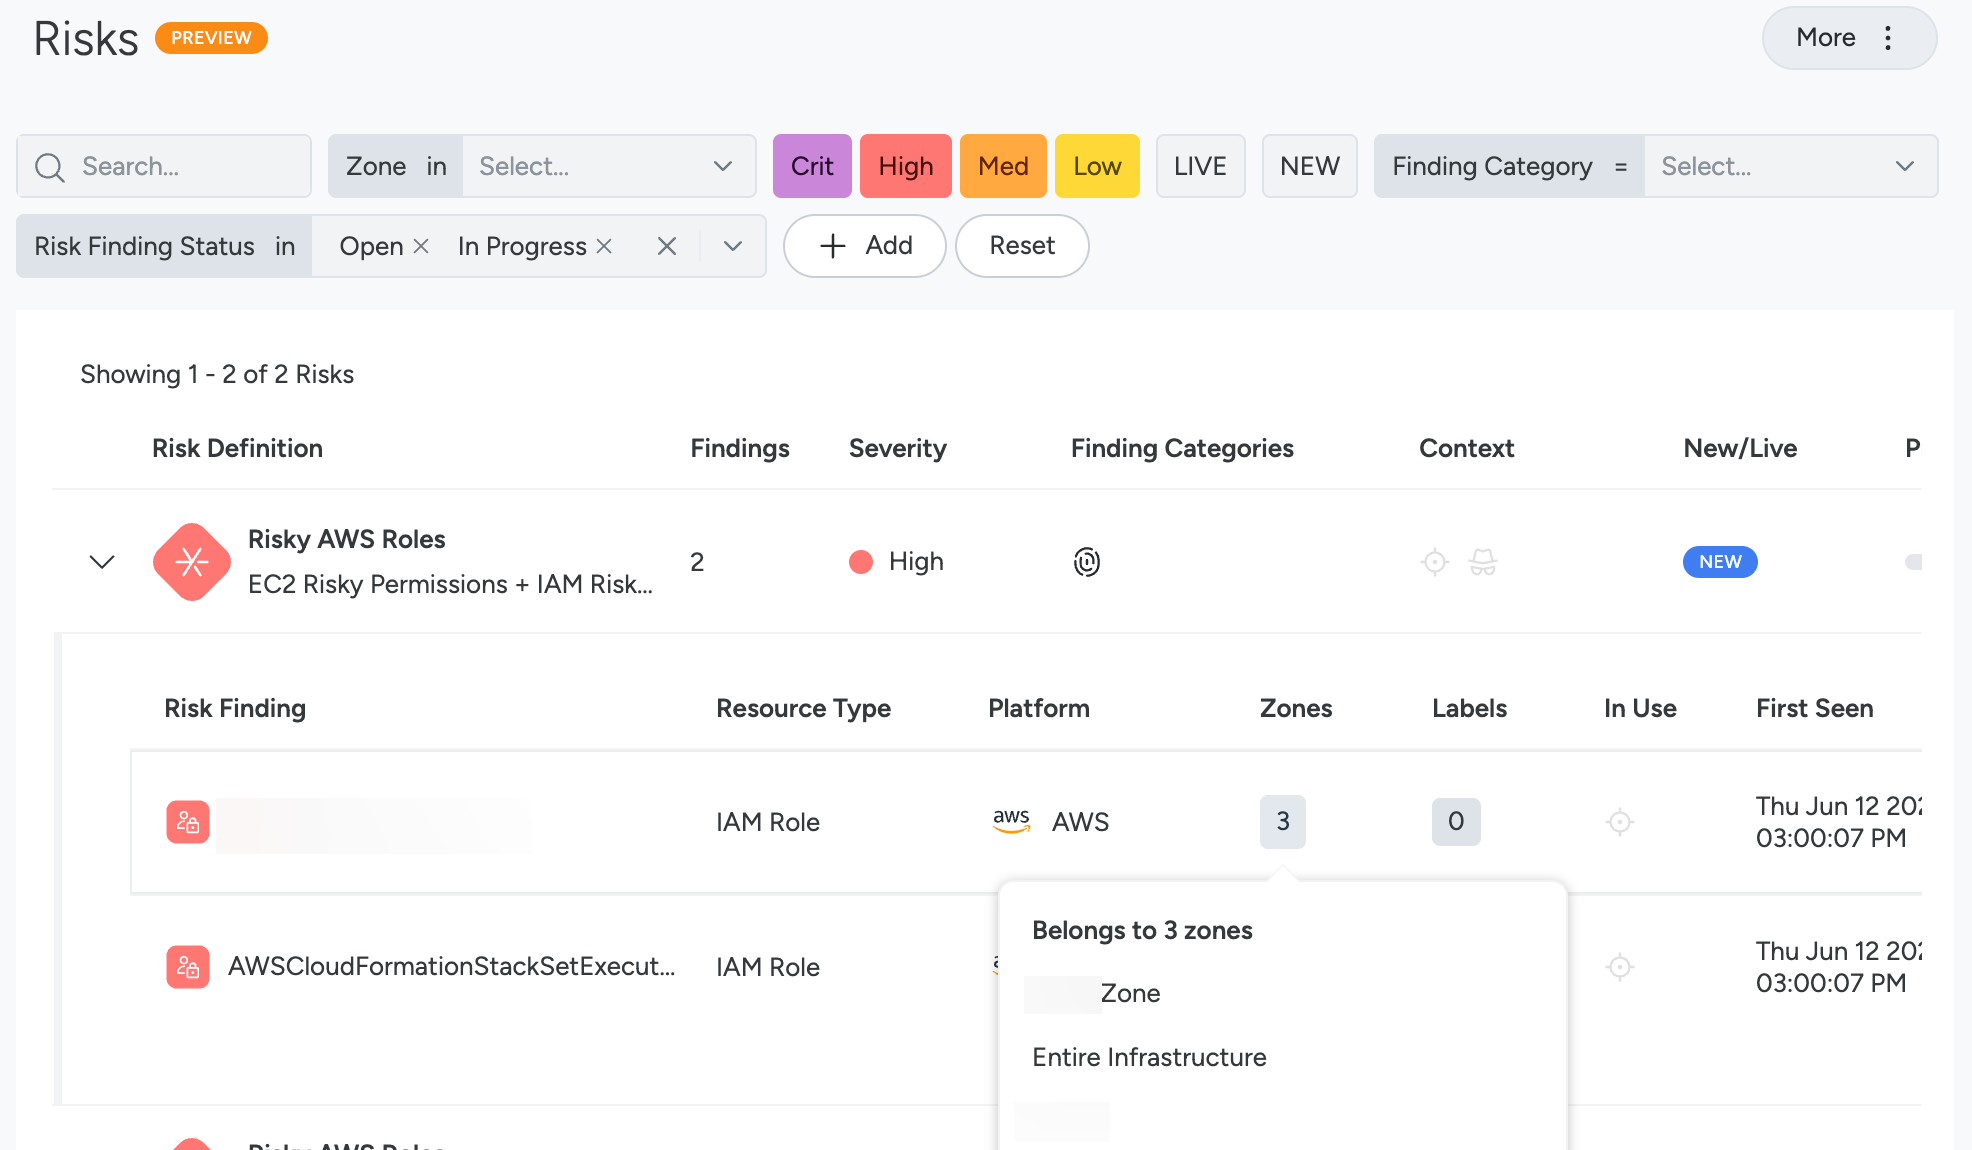
Hover over zone findings to:
- Get a list of the affected zones for that resource.
- Use arrow links to the zone pages.
- Copy zone information, for example, to paste in the Inventory filter bar.
Click an affected resource to open the Risk Finding drawer, including the Attack Path visualization, the Findings tab, and Impacted Resources tab.
Optionally, you can change the status to In Progress to indicate that the finding is under review.
The default status is Open. Only Sysdig can move the status to Closed when the system can no longer detect the issue.
Review the Attack Path
Select a Risk Finding to open its detail drawer.
The Highlights tab of the drawer includes a preview of the attack path, as well as the risk status, risk description, anchor resource details, and risk summary.
Select Explore to enlarge the Attack Path pane.
You can use the using the + icon or the full-screen icons to explore the attack path.
Click on each icon for details and relevant mitigation steps.
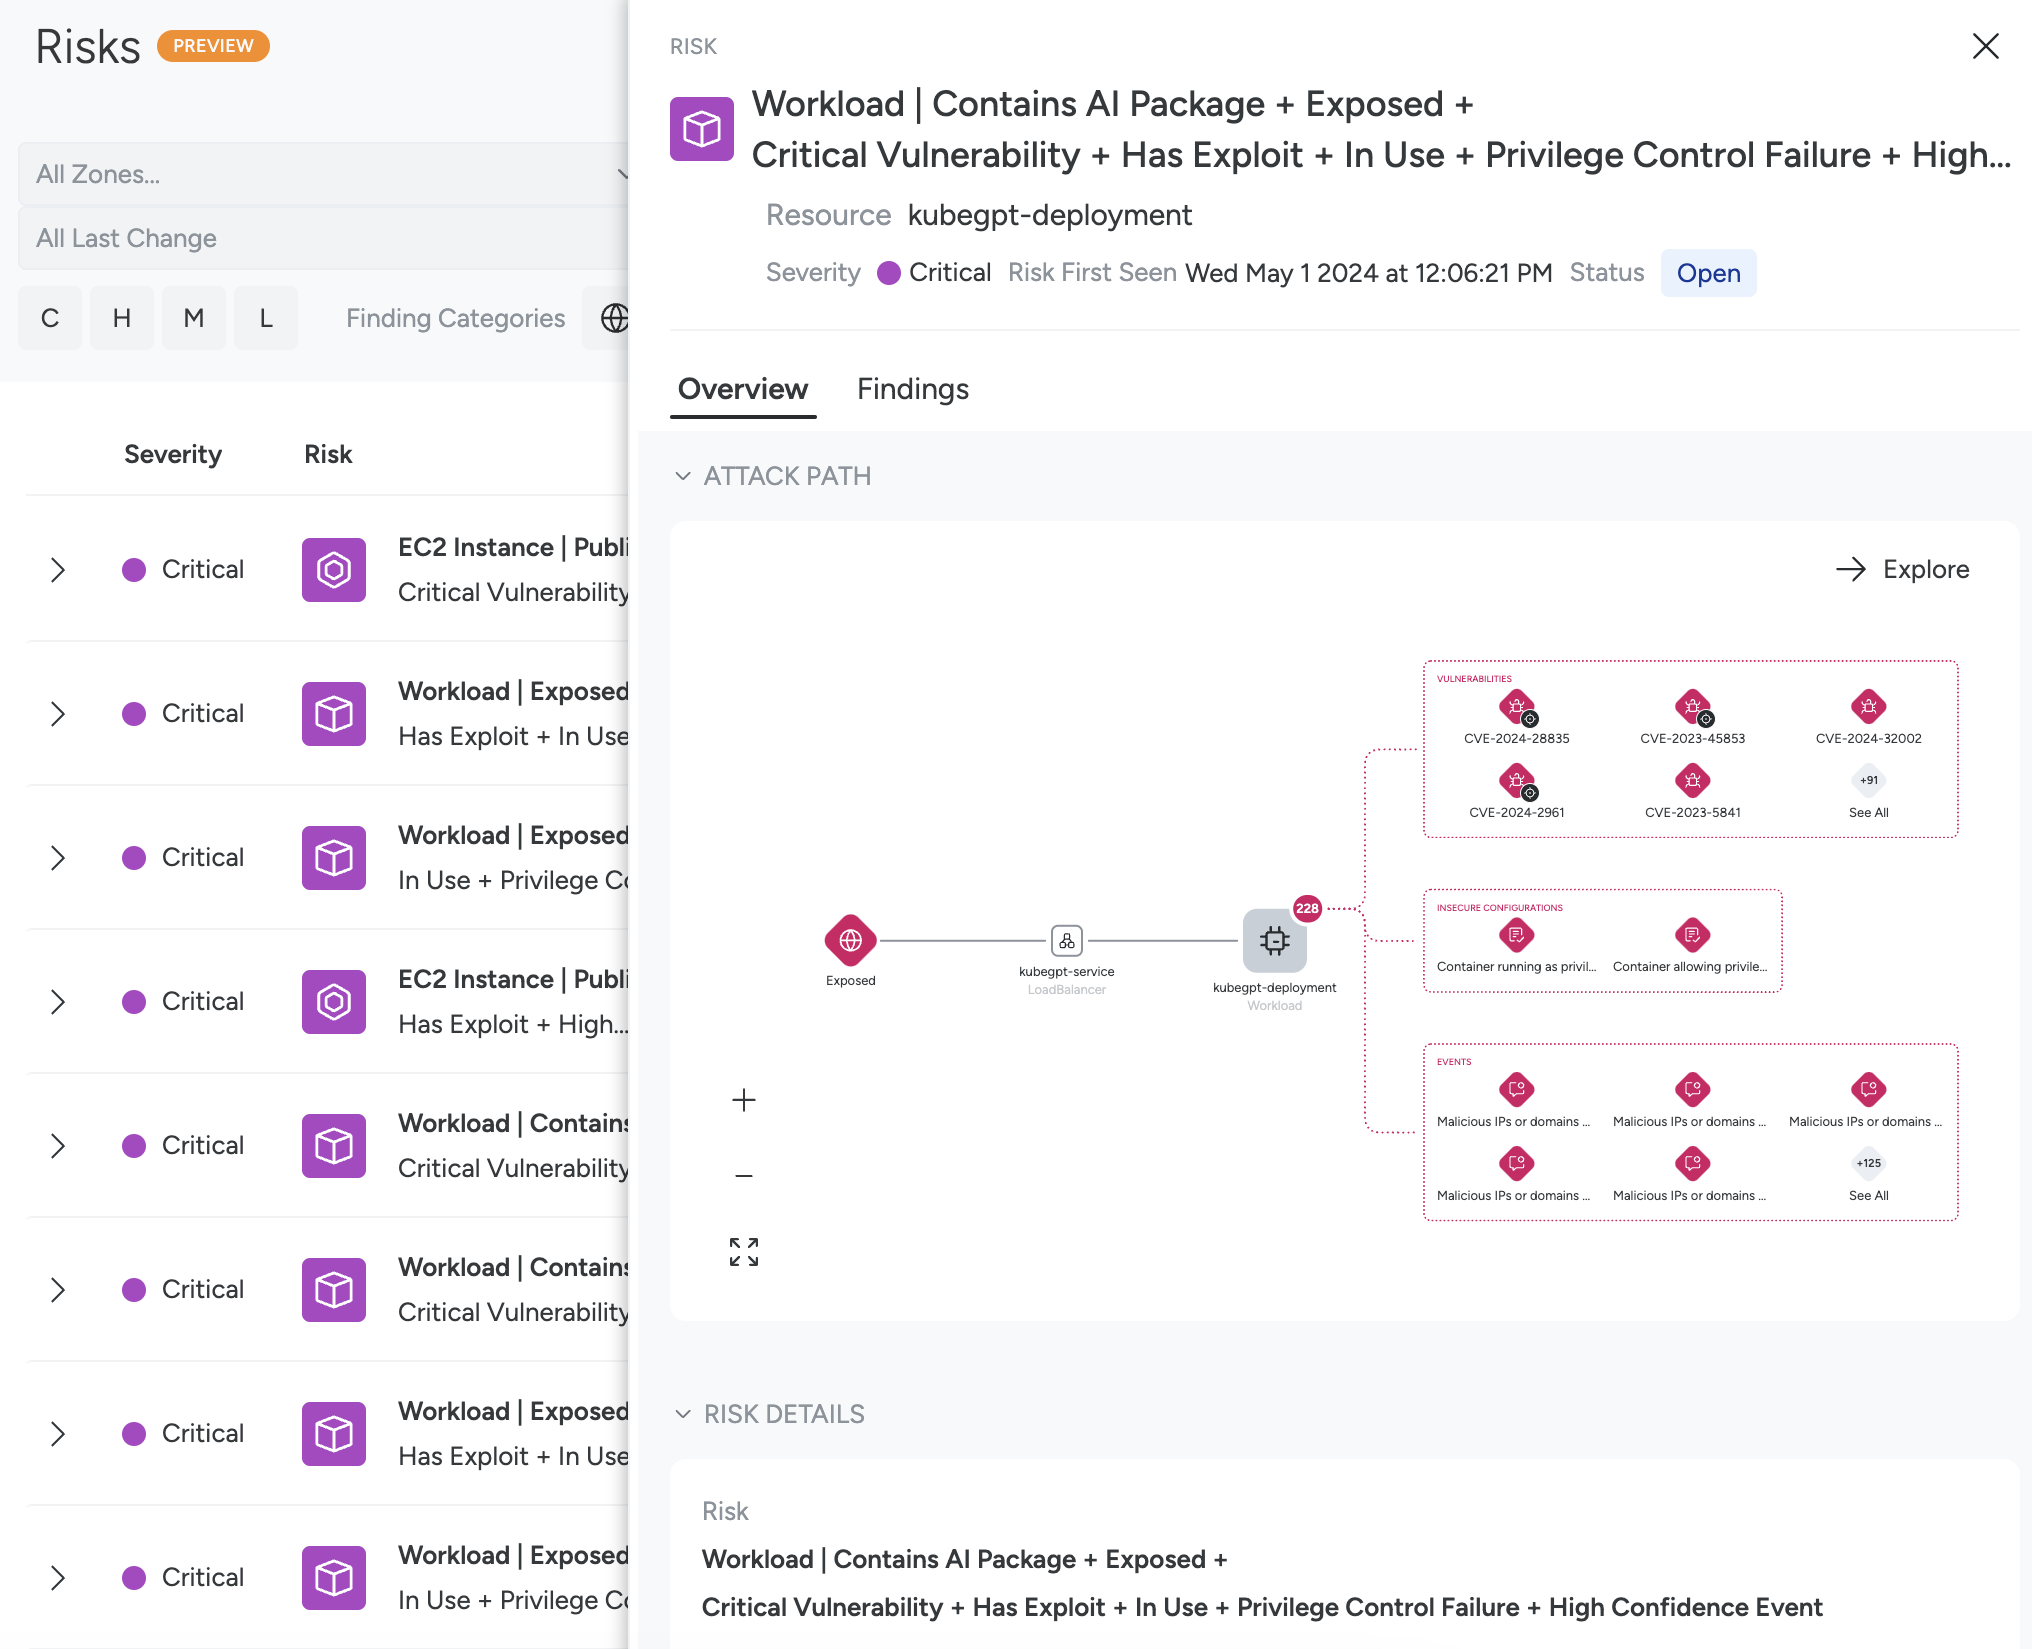
Example
For example, in the image above, you can see:
Public Exposure: The resource is exposed to the internet and details on the Load Balancer icon explain why.
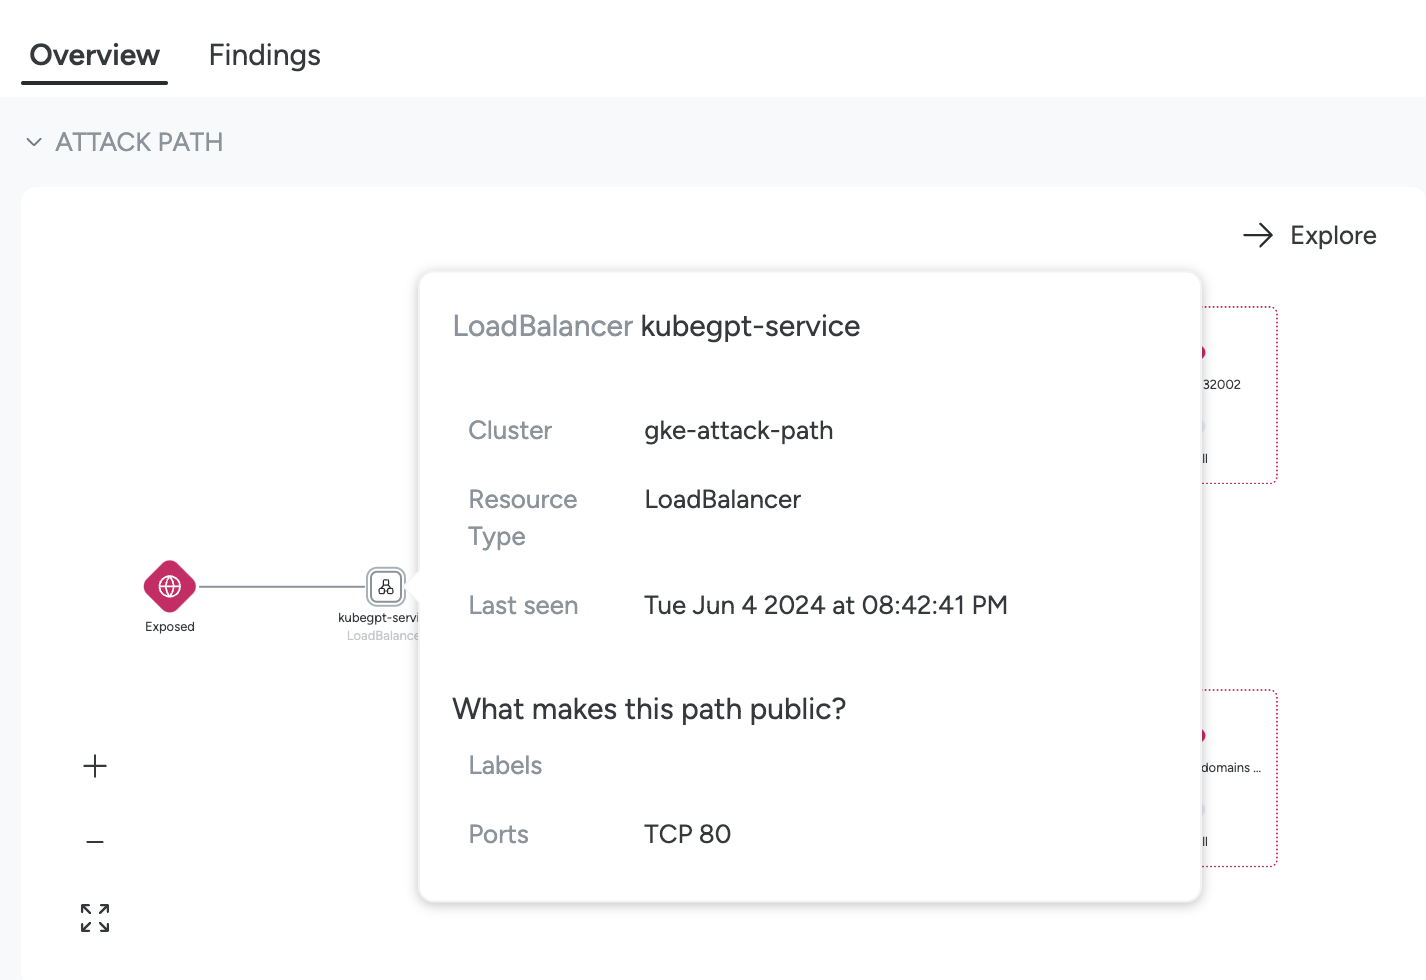
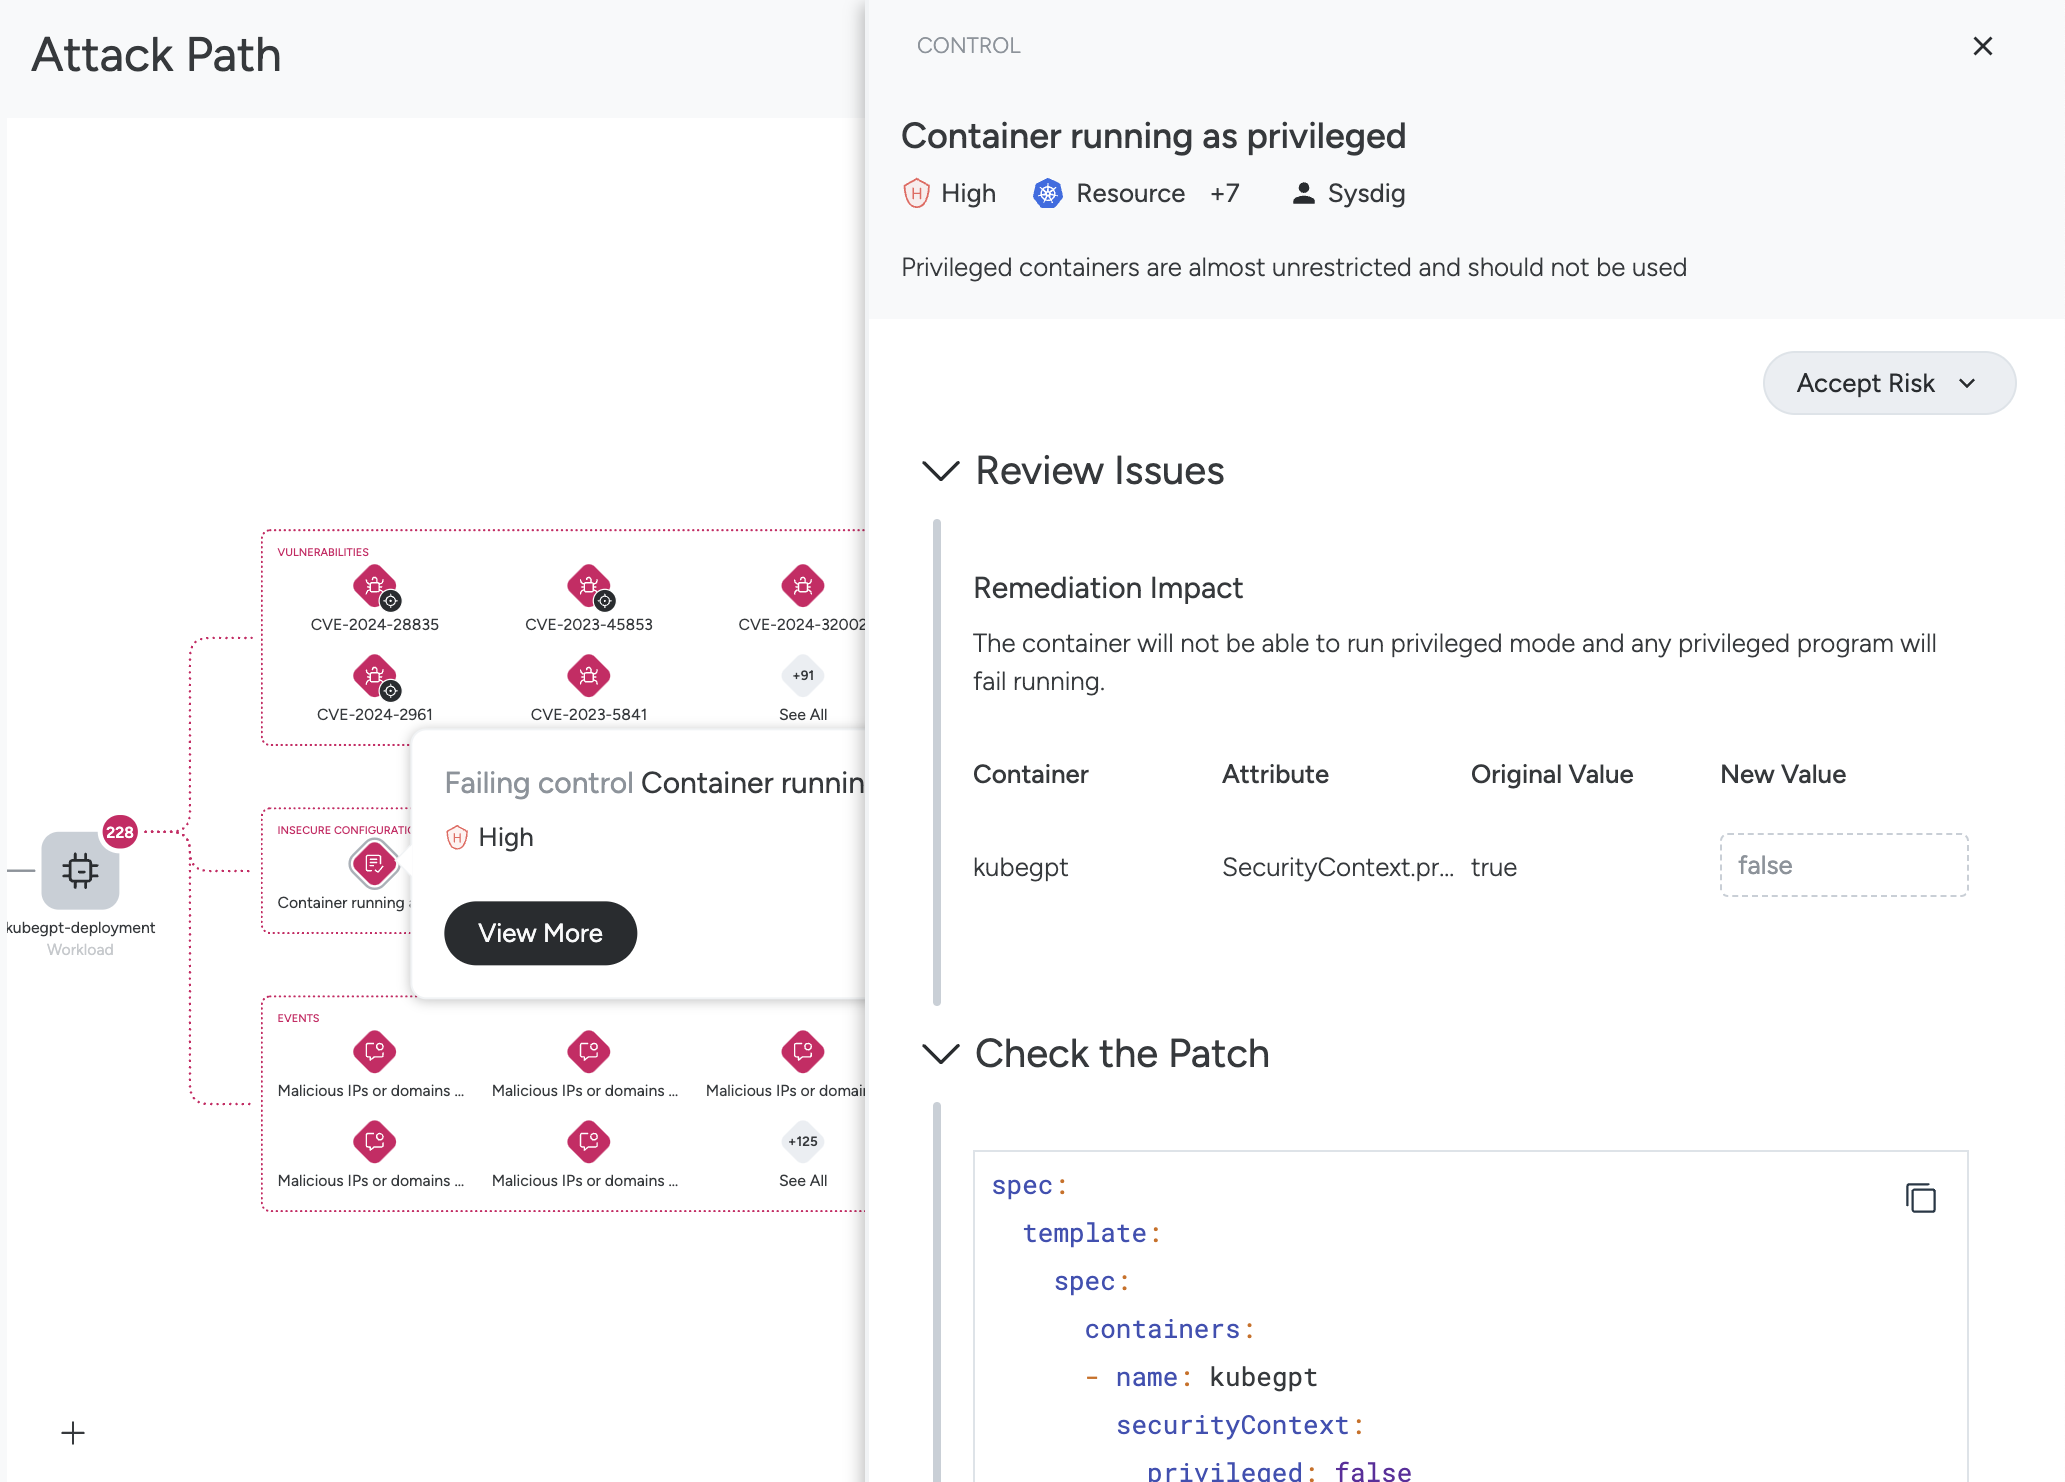
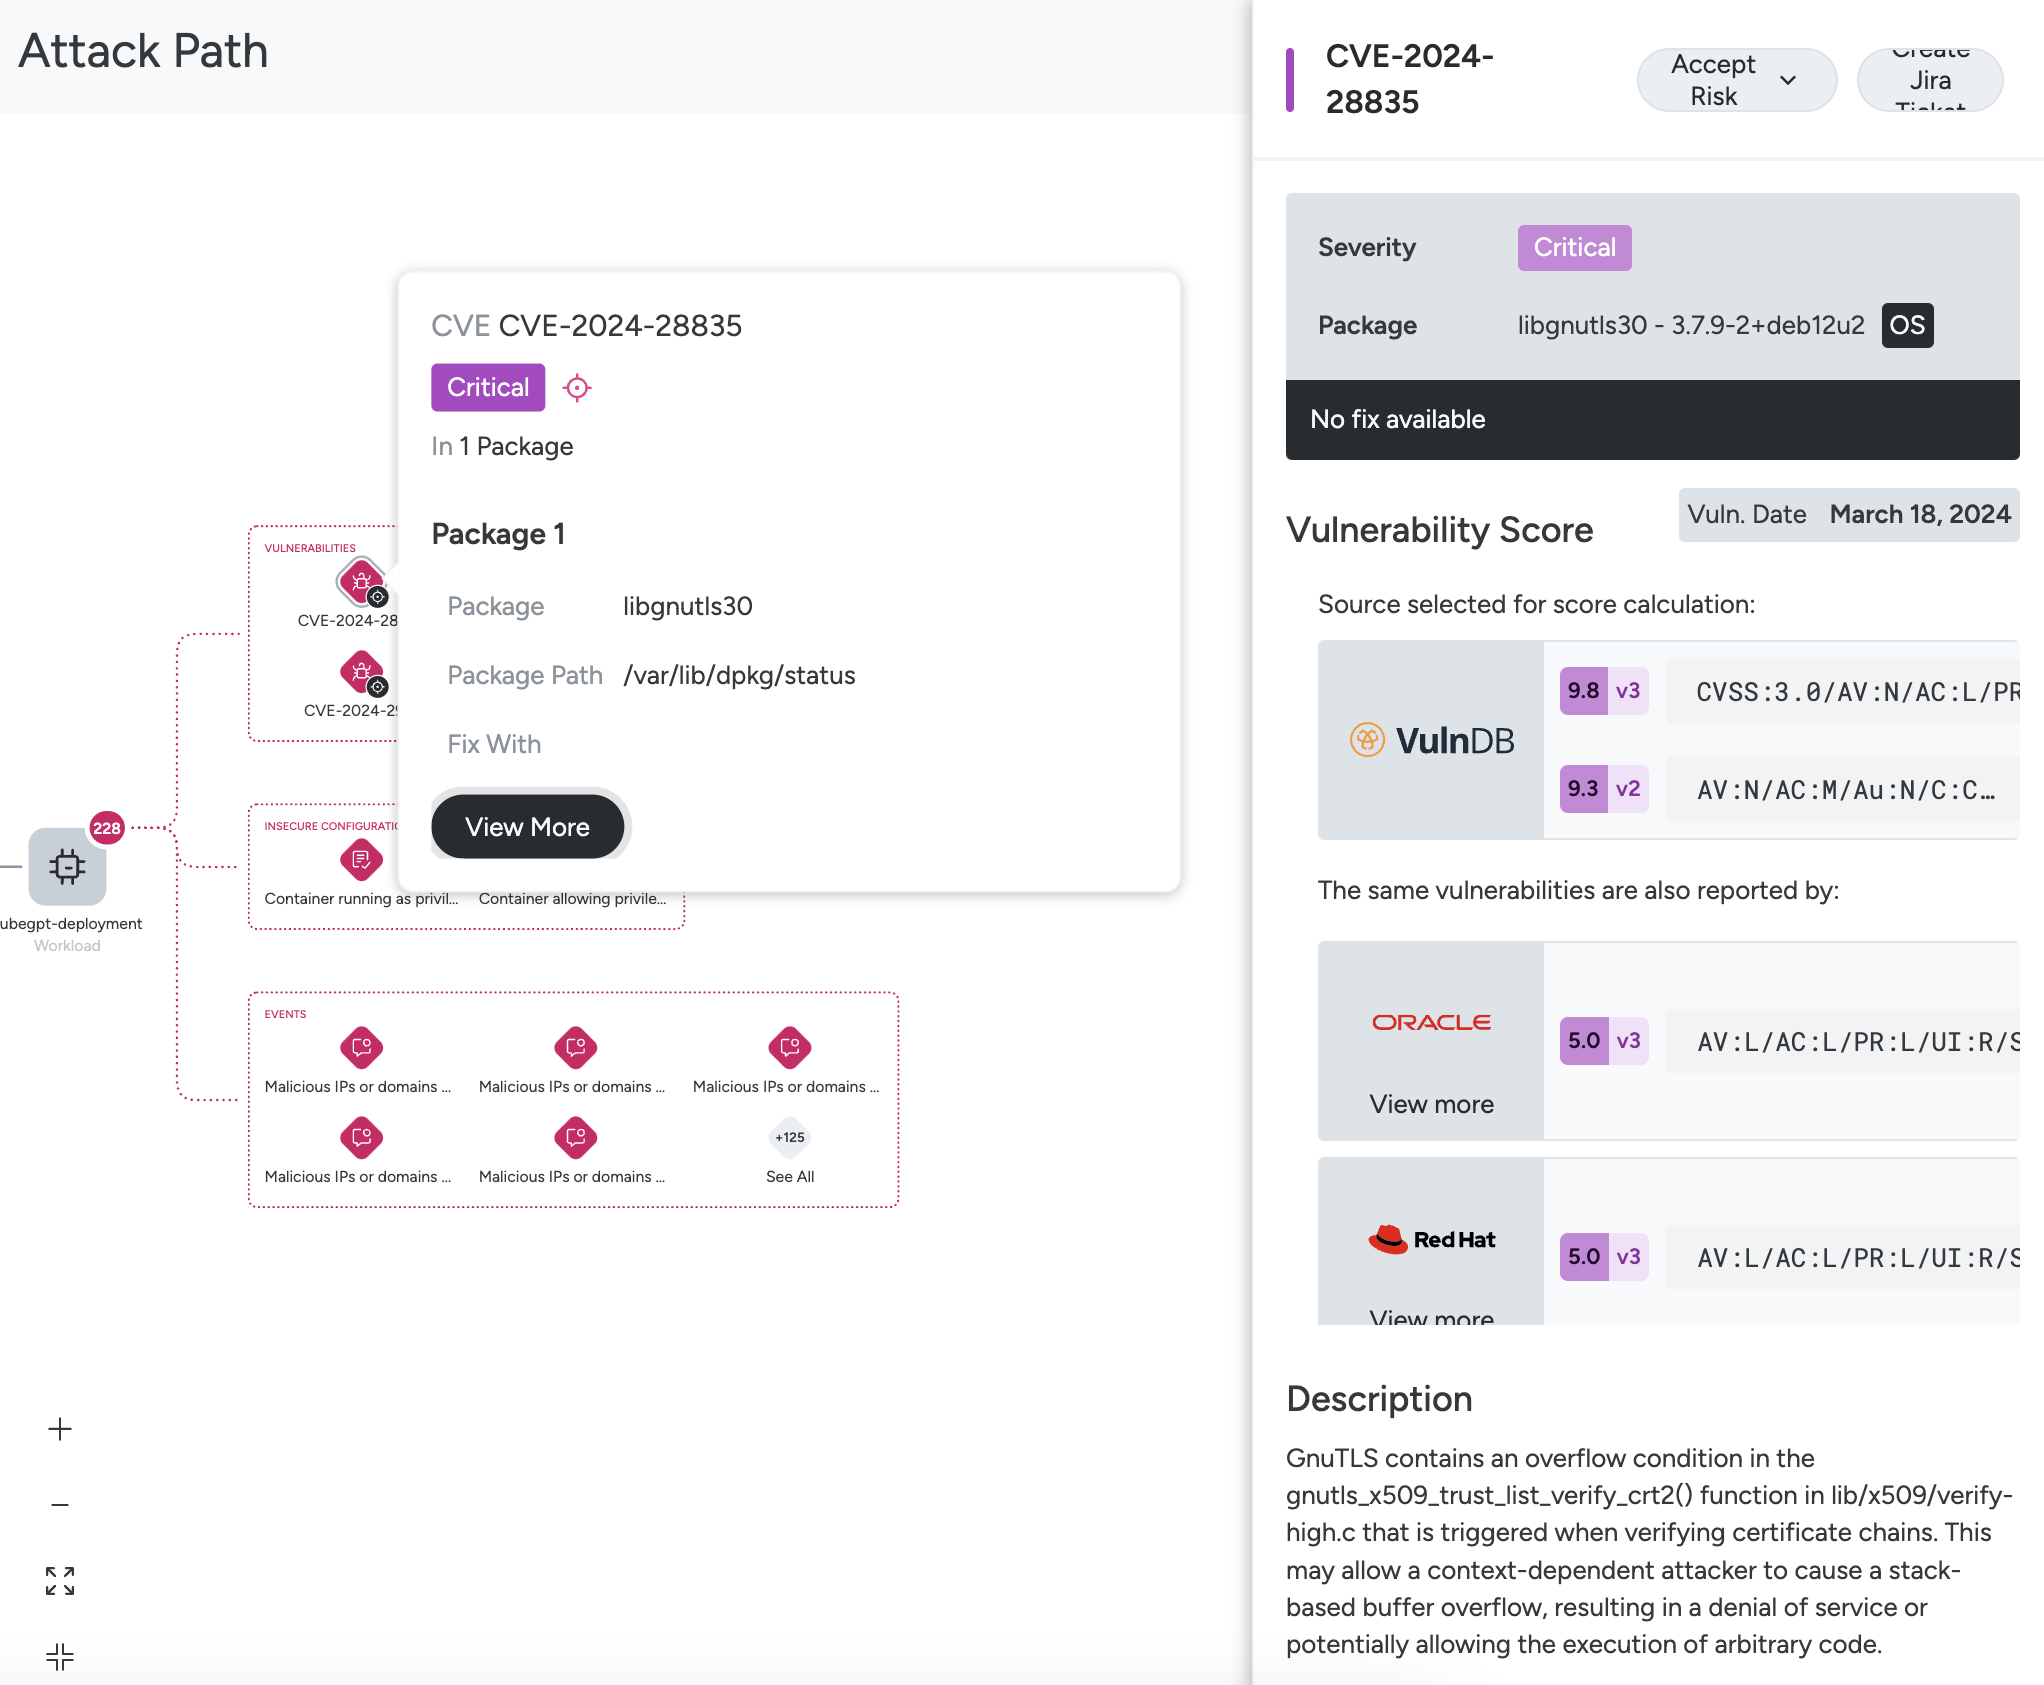
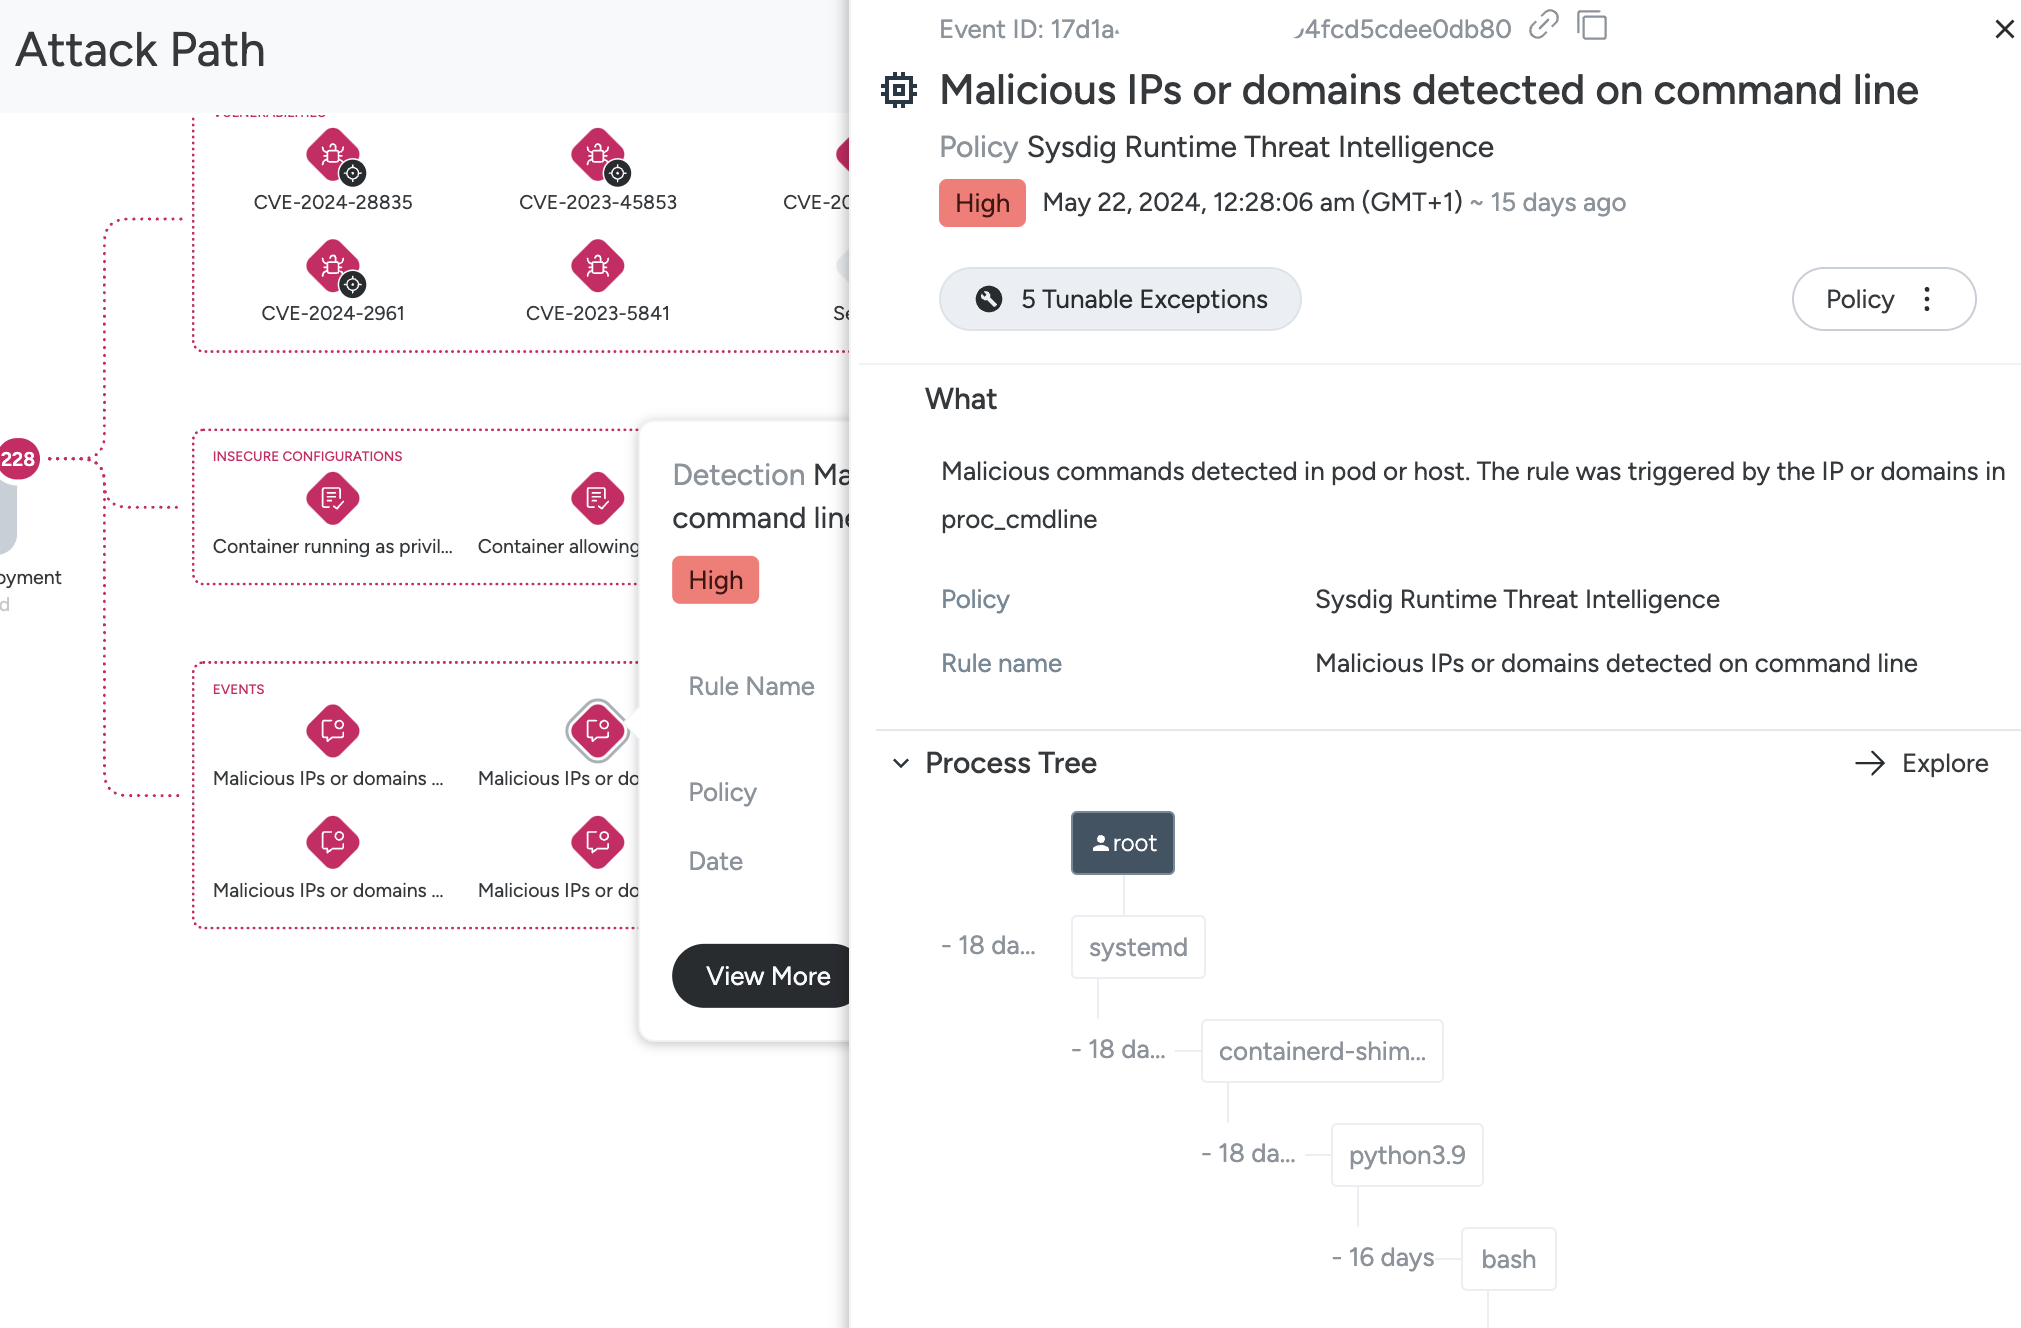
Workload: The workload has a large number of findings, organized by Insecure Configurations, Vulnerabilities, and Events.
- Select an Insecure Configuration icon to see the explanation, and click View More to manage the Control as you would in the Compliance module.
You can accept risks, apply code to update the control, create a pull request, and other posture-related actions.
- Select one of the Vulnerabilities icons to see the explanation, and click View More to review the full package and CVE details and to manage as you would in the Vulnerabilities module.
- Select an Event icon to see the explanation and click View More to review the full details and manage as you would in the Runtime Events module.
Review the Findings
The All Findings tab helps you understand all findings comprising a particular Risk Finding. Sysdig highlights the highest-impact component findings and suggests fixes to reduce the most risk with the least effort.
Select a Risk Finding to open its detail drawer and select the All Findings tab.
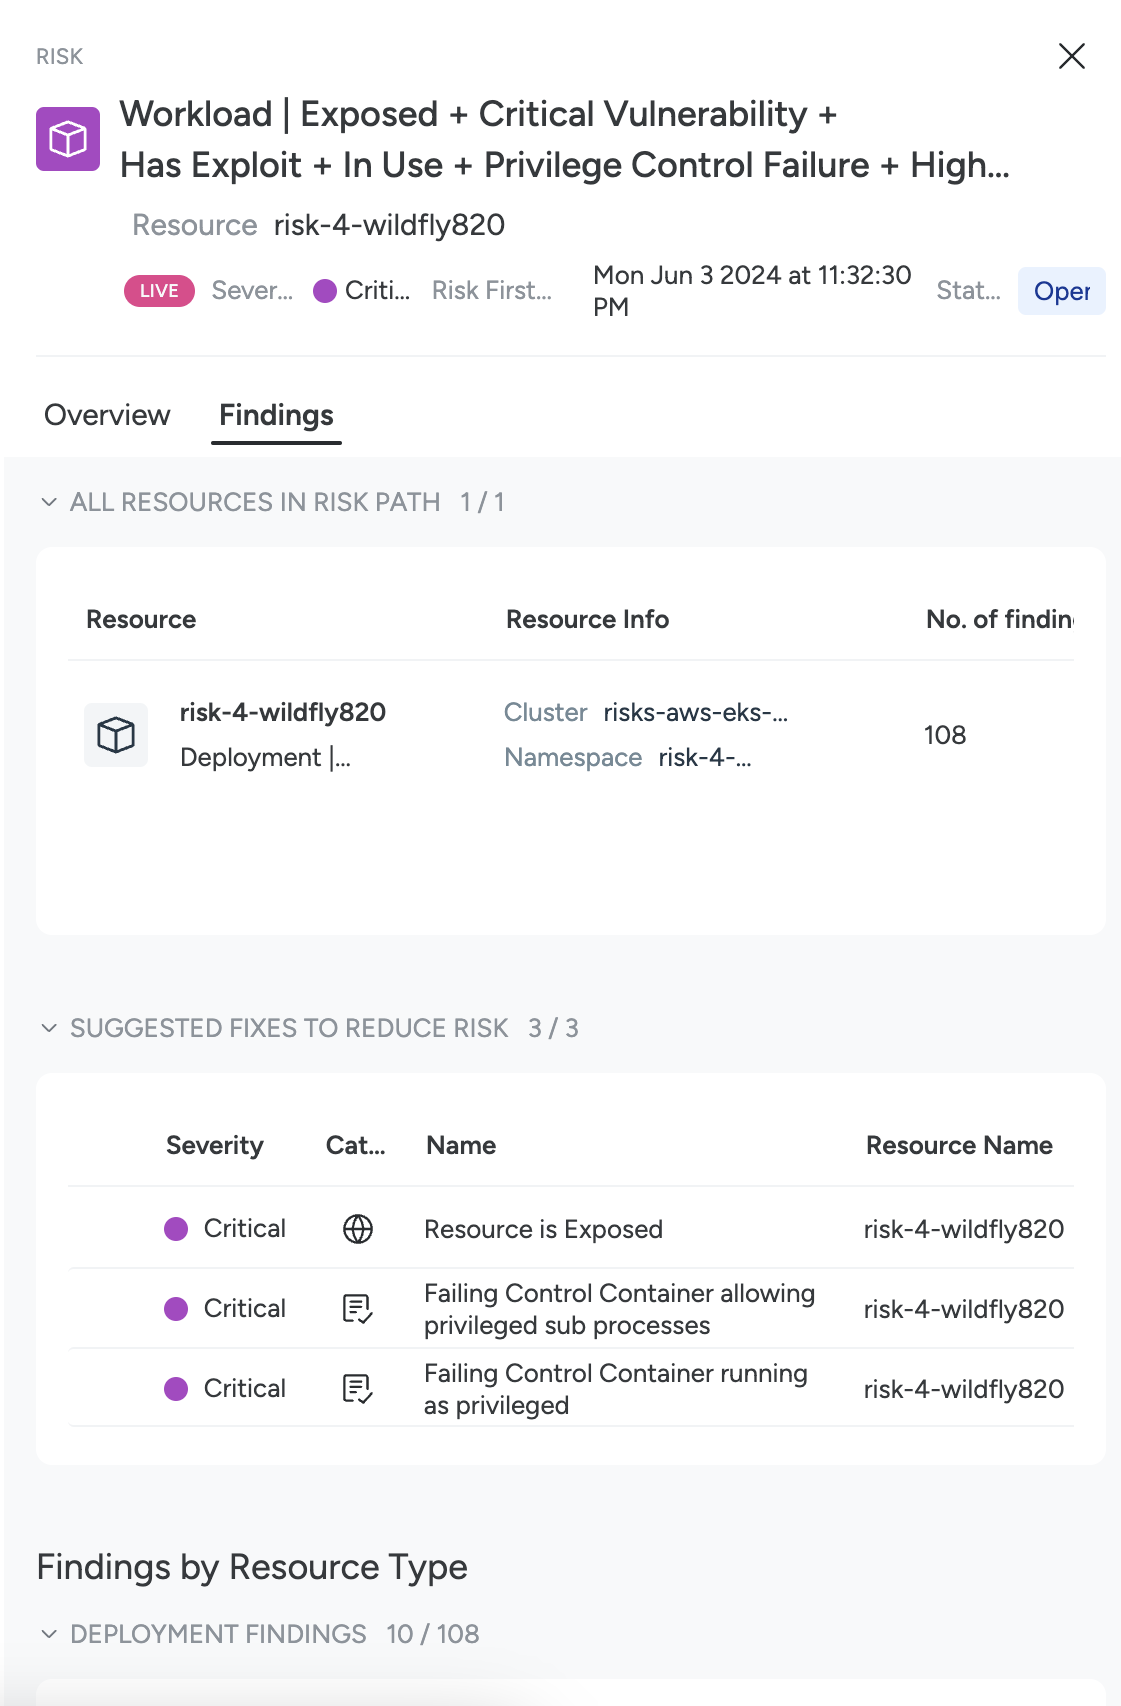
Review Suggested Fixes to Reduce Risk.
These are the most impactful fixes suggested by Sysdig.
Review Findings by Resource Type.
This provides a comprehensive list of all the findings associated with this Risk on all the resources in the Risk path, divided by Resource Types.
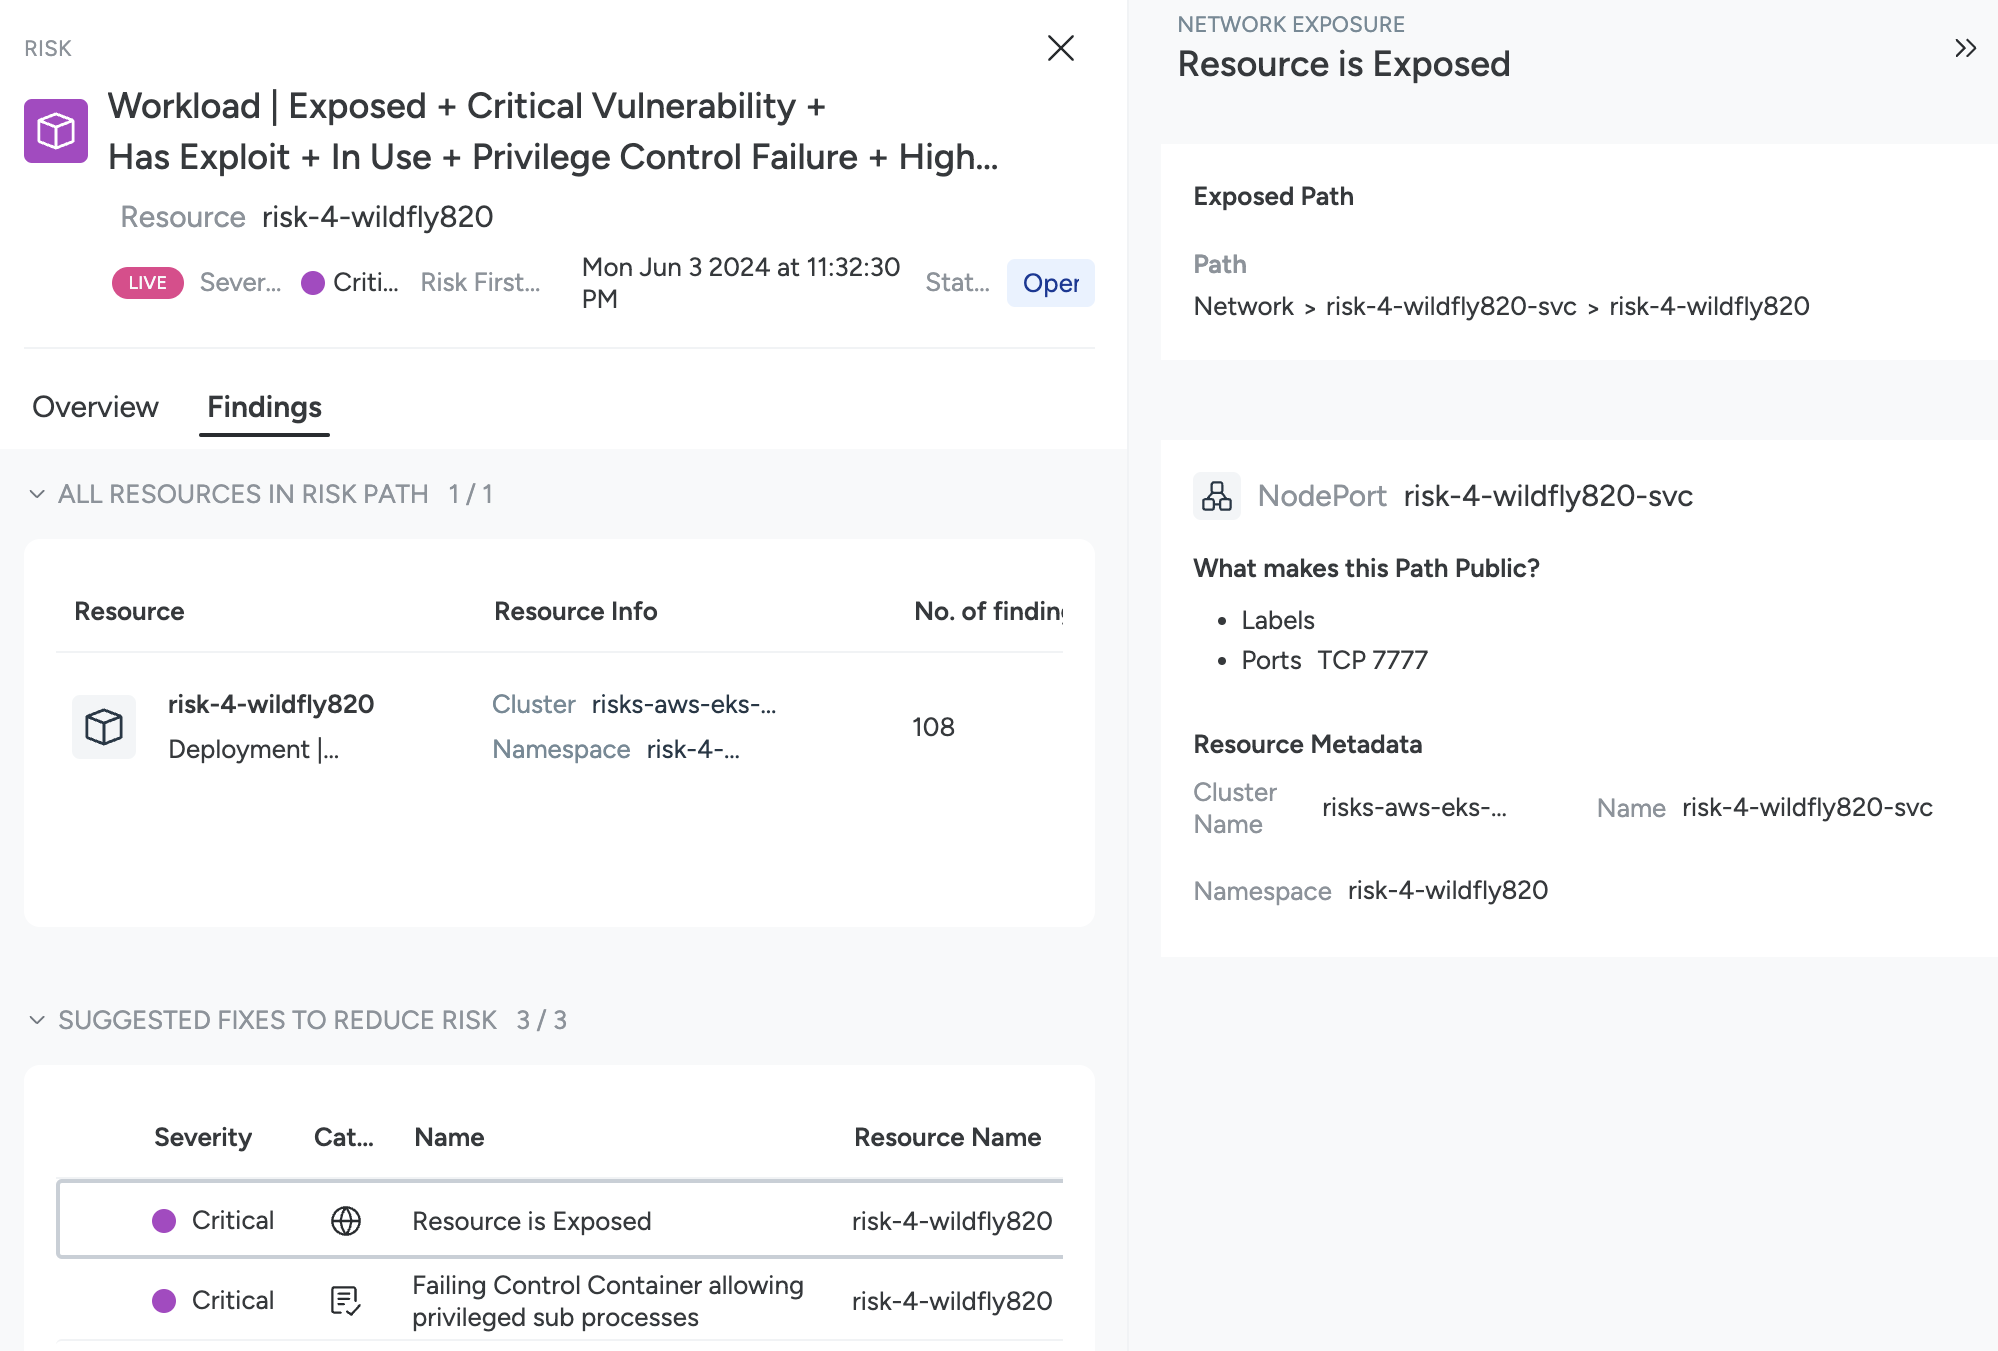
Select any row to open a drawer showing finding details, including remediation guidance.
Review the Impacted Resources
The Impacted Resources tab helps you understand all resources involved in a specific Risk Finding. Click a resource in the table to open its resource details drawer, with a comprehensive view of everything Sysdig knows about the resource.
Use Case: Compromised AWS IAM User
Overly permissive credentials can lead to lateral movement and privilege escalation, resulting in cloud breaches. The Risks module helps prevent attacks by detecting anomalous or suspicious user actions and enabling real-time incident response. You can use the Potentially Compromised User identity finding to correlate user activities to cloud breaches.
- Potentially Compromised User: Misconfigured identities and secrets, combined with certain operation patterns, often indicate a breach. Sysdig flags these as potentially compromised, helping you start investigating promptly. You can then determine to mark it as Compromised User. Potentially Compromised is the finding that is triggered when Sysdig detects anomalous or suspicious user actions. It indicates that you should investigate this user.
See Risk Definitions to understand the findings and impacted resources.
- Compromised User: You have the capability to flag a user as Confirmed Compromised and it serves as a clear signal that the incident has been thoroughly triaged and is not a false positive. You can then take appropriate actions, such as deleting access keys, or deactivating or deleting the user.
Sysdig provides recommendations for each option, guiding you through the necessary steps to address the compromise. You see these recommendations when a user is flagged as Potentially Compromised, and they remain the same even if you mark the user as Compromised.
Additionally, you can also view potentially compromised users in the Identity module.
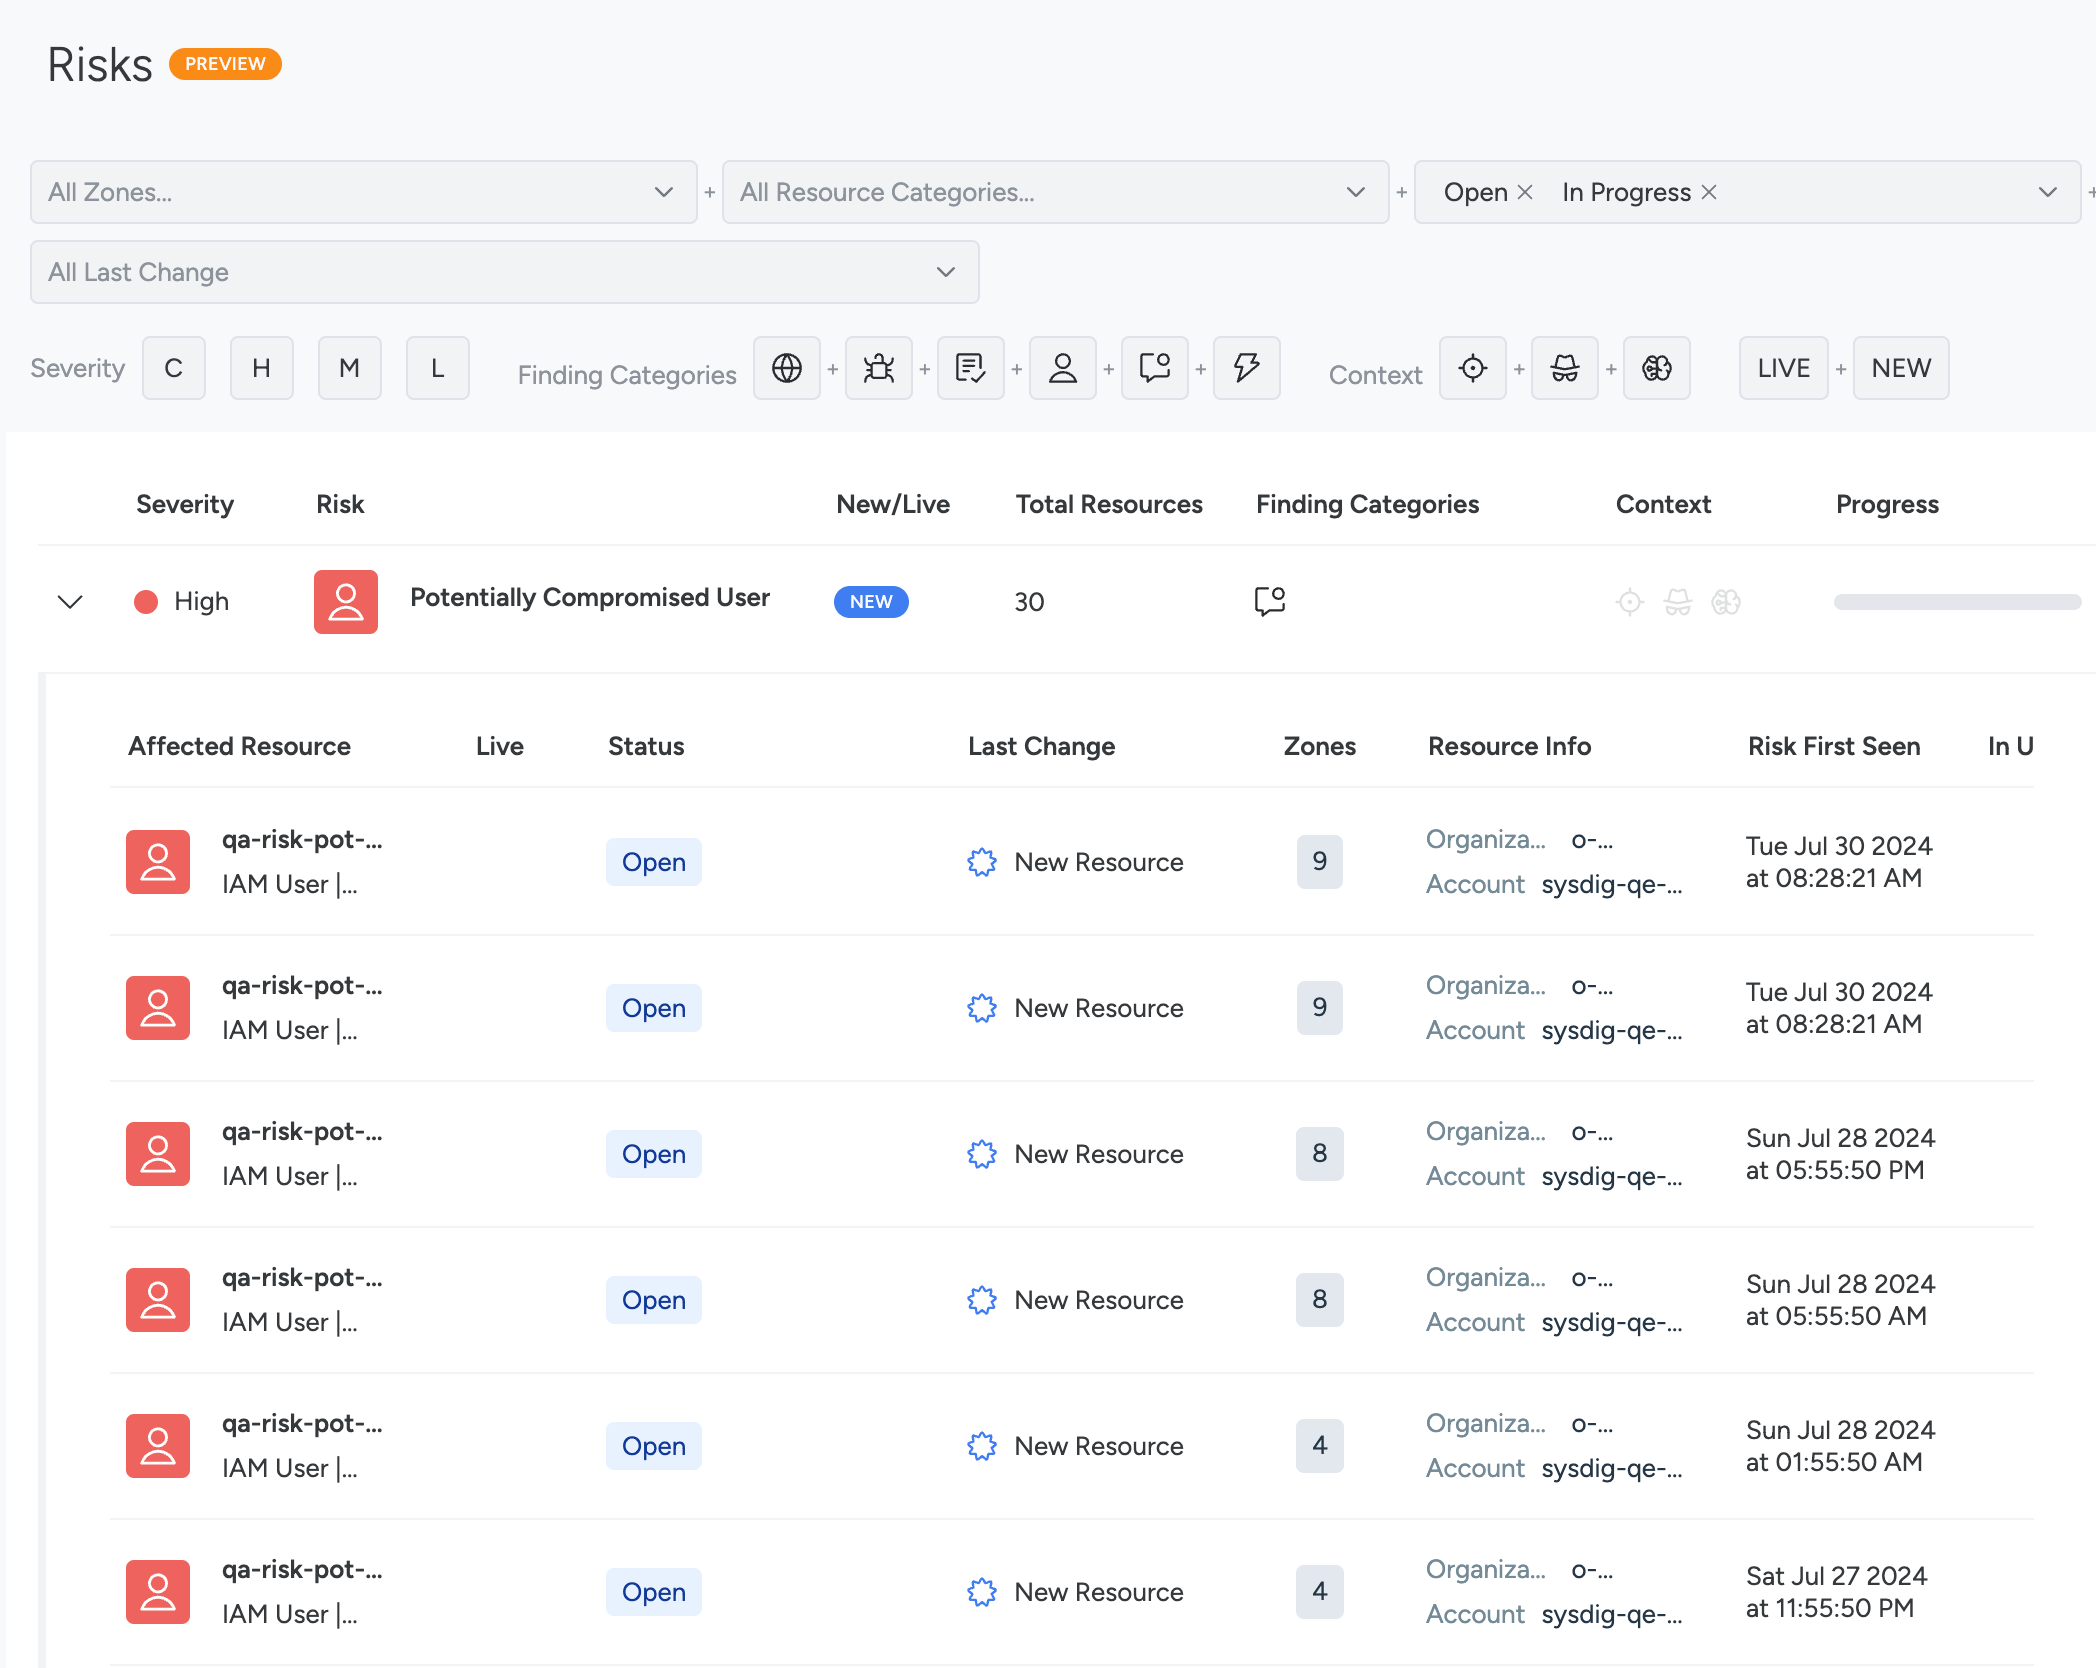
Correlate Risk Findings to Identities
When a potential identity breach occurs, Sysdig Risks page shows the detected risk. Click the Compromised User to see affected resources.
Additionally, you can also view incidents related to potentially compromised users in the Events Feeds.
Triage the Affected Resources
You can then triage the event as follows:
- Click one of the resources to open the Risk Details panel.
- Click the Findings tab.
You can see all the resources in the risk path and findings by resource type. Clicking Resources takes you to the Inventory page.
Click one of the IAM User Findings or the user under Suggested Fixes to Reduce Risk.
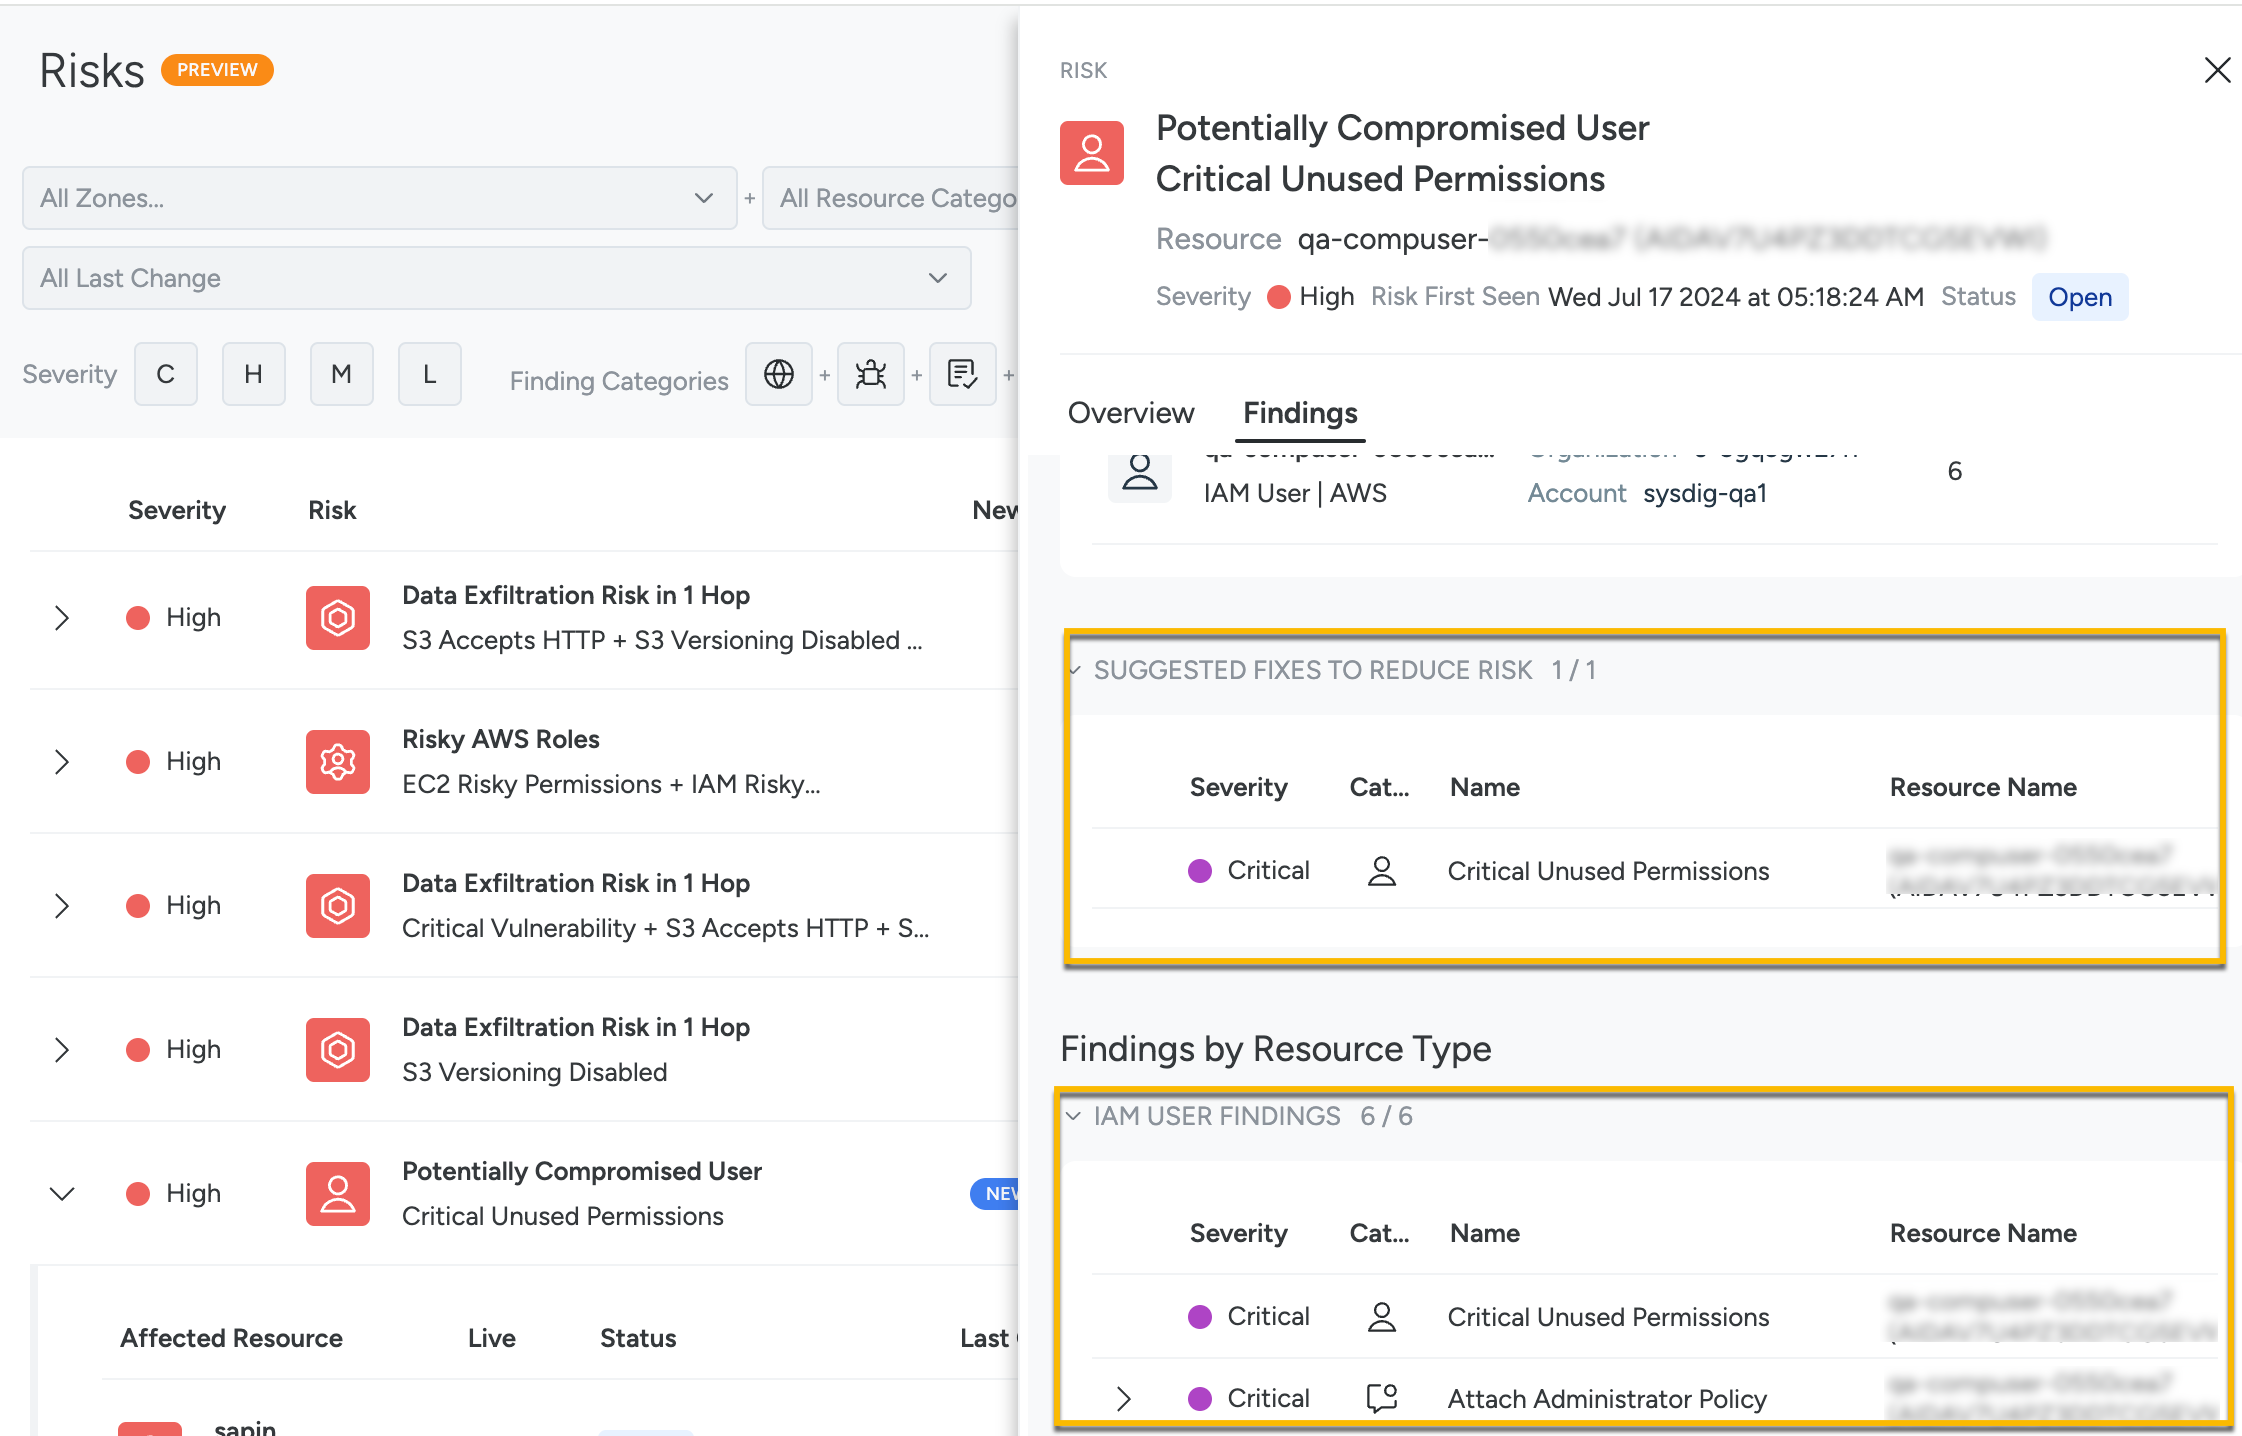
The Policy Details page appears. On this page, you can review the policy, rules, AWS user details, cloud account details, IP address, and API calls to gain insight into the affected resource.
Click on an Event finding in the IAM User Findings section.
On the Event Details panel, click Investigate.
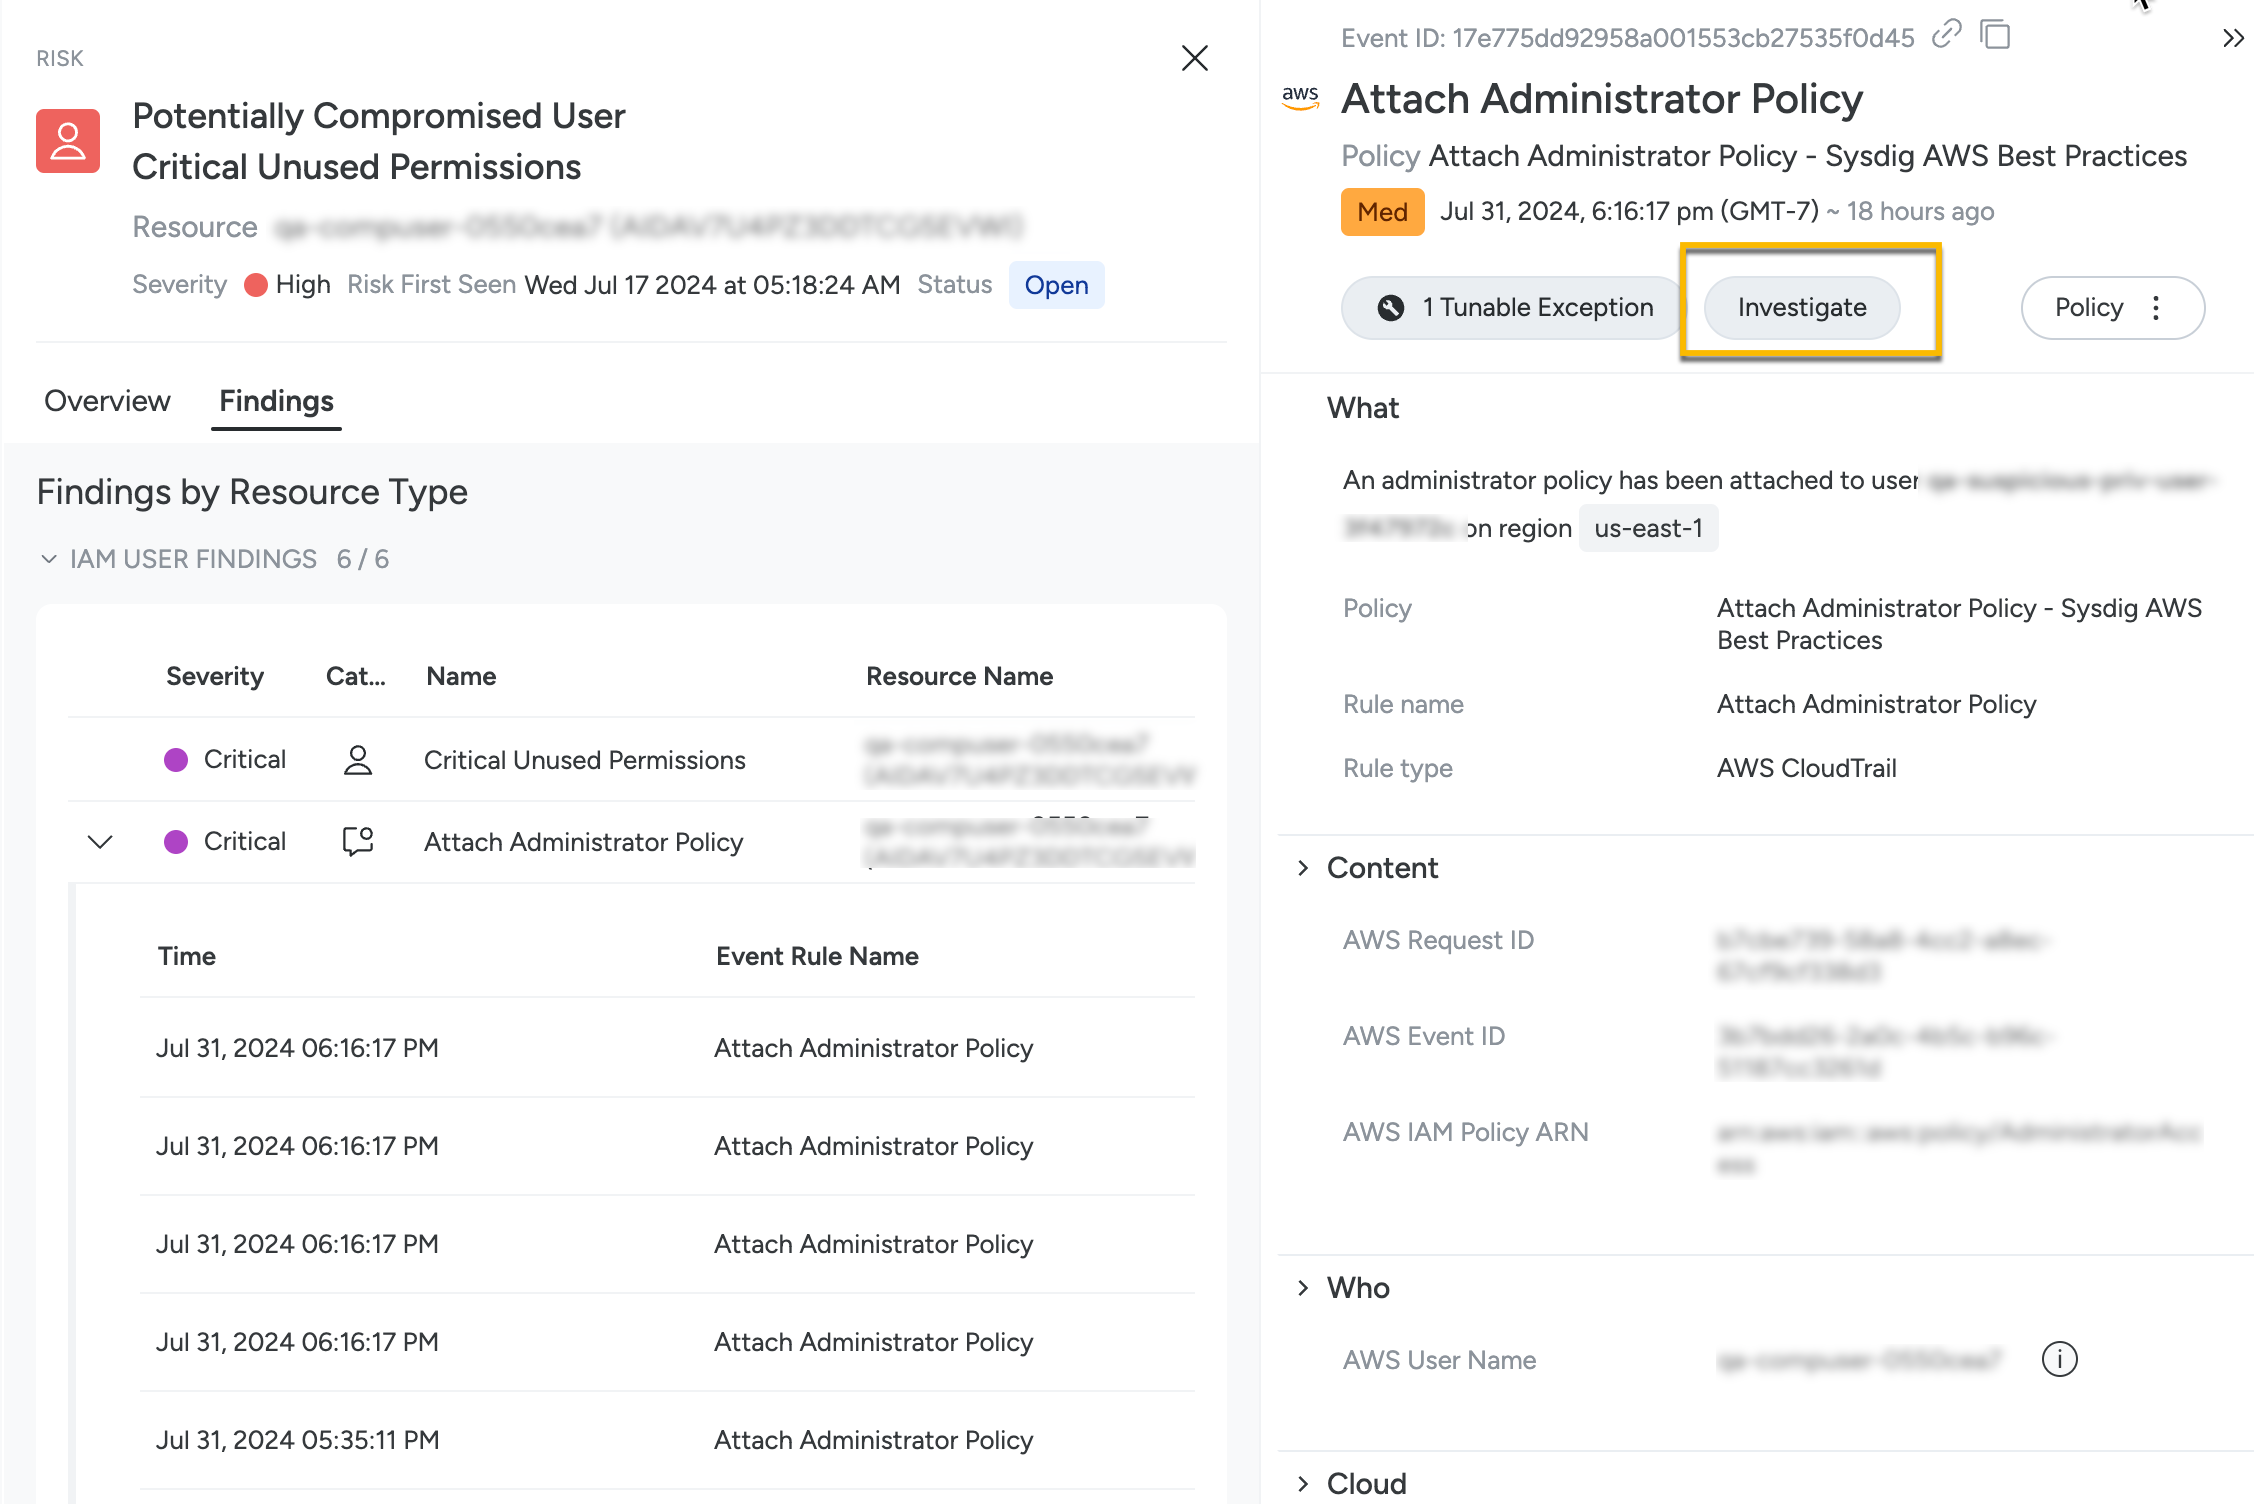
You are directed to the Identity 360 panel for that user, where you can see the cloud account, IP address, AWS region, user in question, and the user activities.
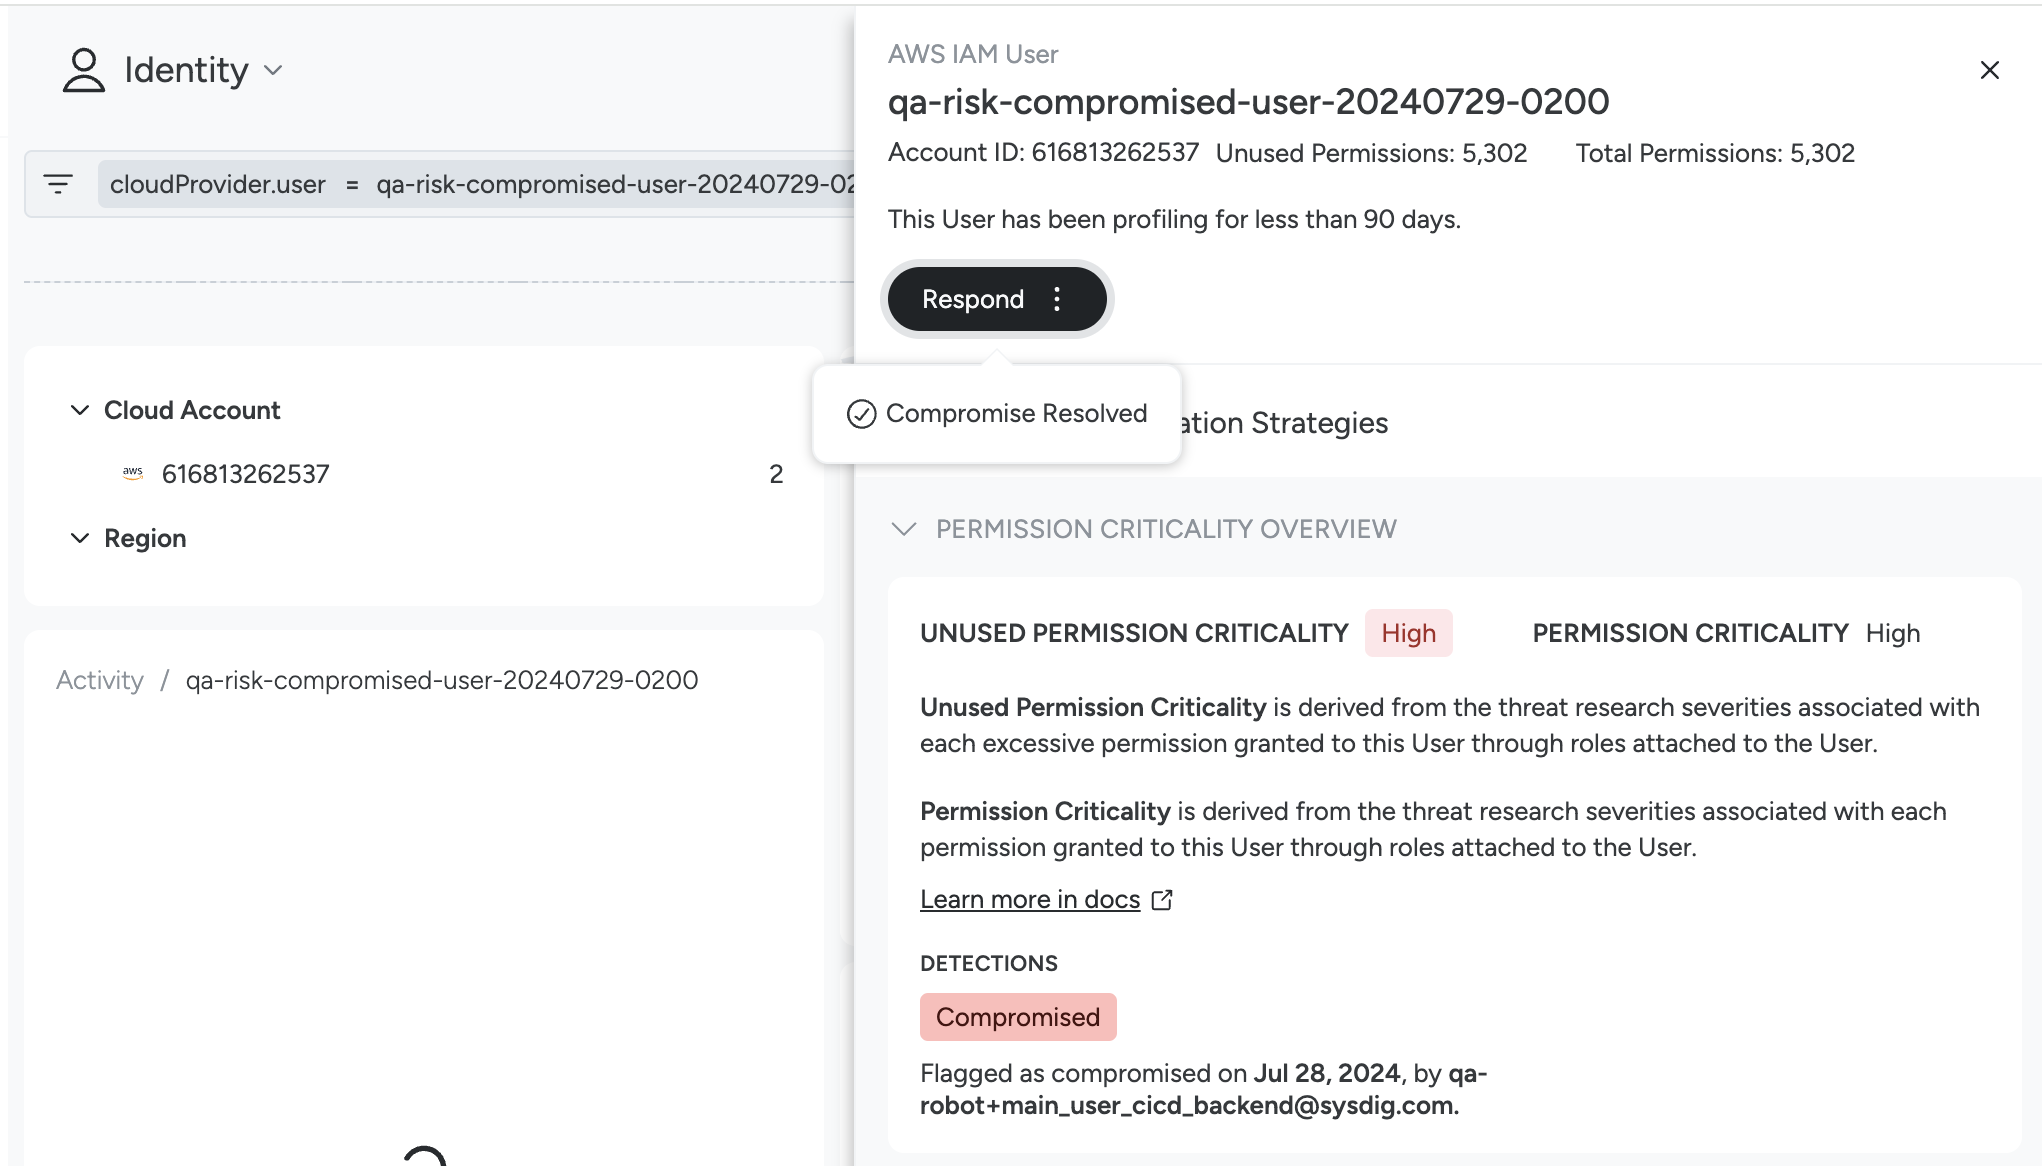
Click the user to:
- Summary: View a summary of unused permissions, total permissions, criticality of permissions and unused permissions. The criticality is determined by the excessive permission granted to the user through the roles attached to the User. The details panel also shows when the user was last active, User ARN, and account ID.
The Summary tab also shows that if the user is Compromised or Potential Compromised.
Sysdig does not automatically mark a user as Compromised. After you review a Potentially Compromised User in the Identity 360 panel, you can use the status actions to keep the user’s state and the associated Risk finding in sync:
Respond:
- Mark as Compromised – confirm that the user is compromised.
- Mark as Compromise Resolved – indicate that you have completed remediation and the compromise has been addressed.
- Remove Potentially Compromised flag – clear the flag if you determine it was a false positive; this also clears the associated Potentially Compromised User Risk finding.
- Remove Compromised Flag – revert a user from Compromised back to Potentially Compromised when appropriate.
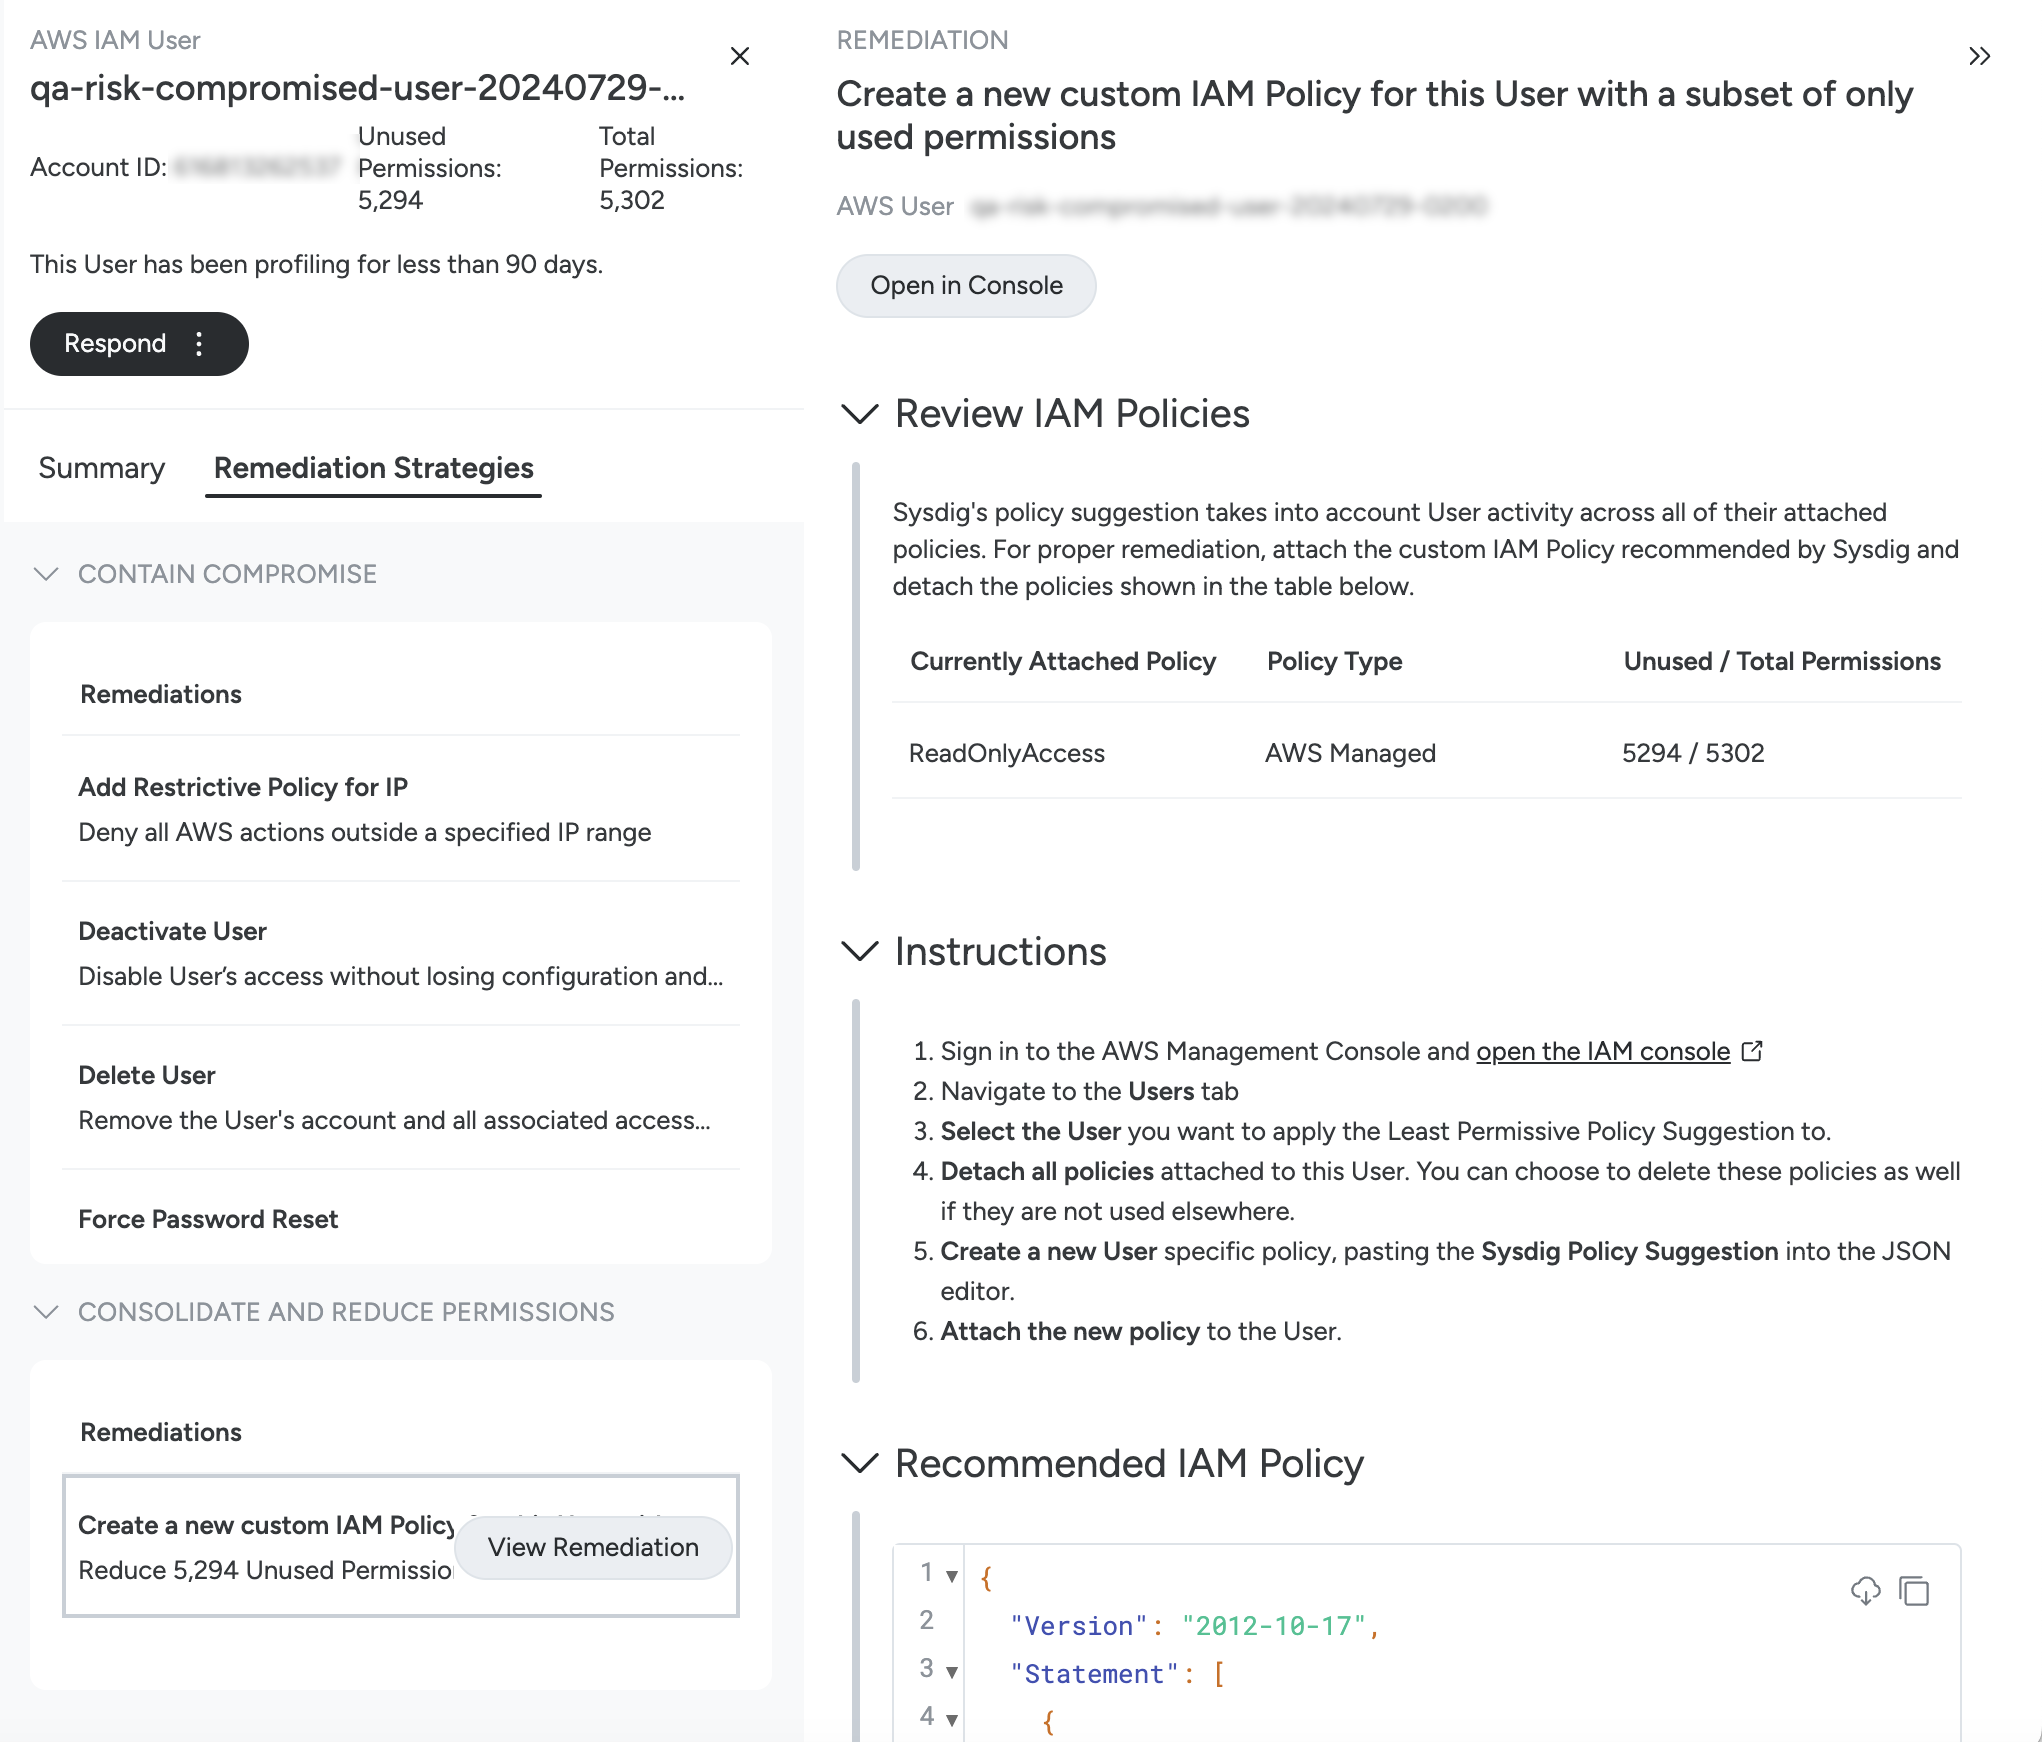
Remediation Strategies: Provides two high level strategies to mitigate the risk.
In the Identity 360 panel for a Potentially Compromised or Compromised user, the Remediate tab shows the Contain Compromise remediation strategy, including the following options: * Add Restrictive Policy for IP * Deactivate User * Delete User * Force Password Reset * Delete & Create New Access Keys
- Consolidate and Reduce Permissions : Create a new custom IAM Policy for the User with a subset of only used permissions.
Select a strategy you prefer.
For example, if you decide to delete the user, mouse over Delete User and click View Remediation.
- View the remediation instructions for both AWS Management Console and AWS CLI.
- Click Open in Console to open the AWS Management Console to perform the actions given in the remediation instructions.
Optionally, you can perform the operations using the AWS CLI.
If you want to consolidate and reduce the permissions assigned to the user, click View Remediation button next to the Create a new custom IAM Policy for this User with a subset of only used permissions option.
- Review the IAM policies and instructions to create a new IAM policy.
- Click Open in Console to open the AWS Management Console to perform the actions given in the remediation instructions.
Return to Sysdig Secure UI and mark the AWS IAM user as Compromise Resolved, as given in step 5.
Risks Terminology
| Term | Definition |
|---|---|
| Finding | A resource and its condition or behavior. For example, a cloud resource and its misconfiguration, or a container with a vulnerability. |
| Finding Categories | The different types of security issues that contribute to a risk. Current categories include:
|
| Finding Type | An instance of a finding category. For example: Finding Category = Insecure Config Finding Types = Failed control “S3 bucket accepts HTTP”, failed control “EC2 is permissive” Finding Category = Insecure Identity Finding Types = Role with unused critical permissions, User without MFA |
| High-Confidence Event | An event detected from a Sysdig Threat Intelligence or Threat Detection policy. These are managed by the Sysdig Threat Research team, contain only high-severity rules, and have a low level of false positives. |
| Live | A high-confidence event was detected within the last 3 hours. |
| Risk Definition | The explicit combination of findings that, when matched, will generate a risk finding. This can be either a Managed or Custom definition. |
| Severity | Significance of a risk, expressed in terms of the combination of consequences to the business and the likelihood of those consequences. |
| Zones | A business group of resources, defined by a collection of scopes of various resource types. For example: Dev- all my development resources. |