Manage Threat Detection Rules
The main interface for managing Threat Detection rules in Sysdig is the Rules Library.
The Rules Library includes all created rules that can be referenced in policies. Out of the box, it provides a comprehensive runtime security library with specific rules developed by the Sysdig Threat Research team, Falco open source community rules, and international security benchmarks such as CIS or MITRE ATT&CK.
To access the Rules Library:
- Log in to Sysdig Secure.
- Select Policies > Rules > Rules Library.
Explore the Rules Library
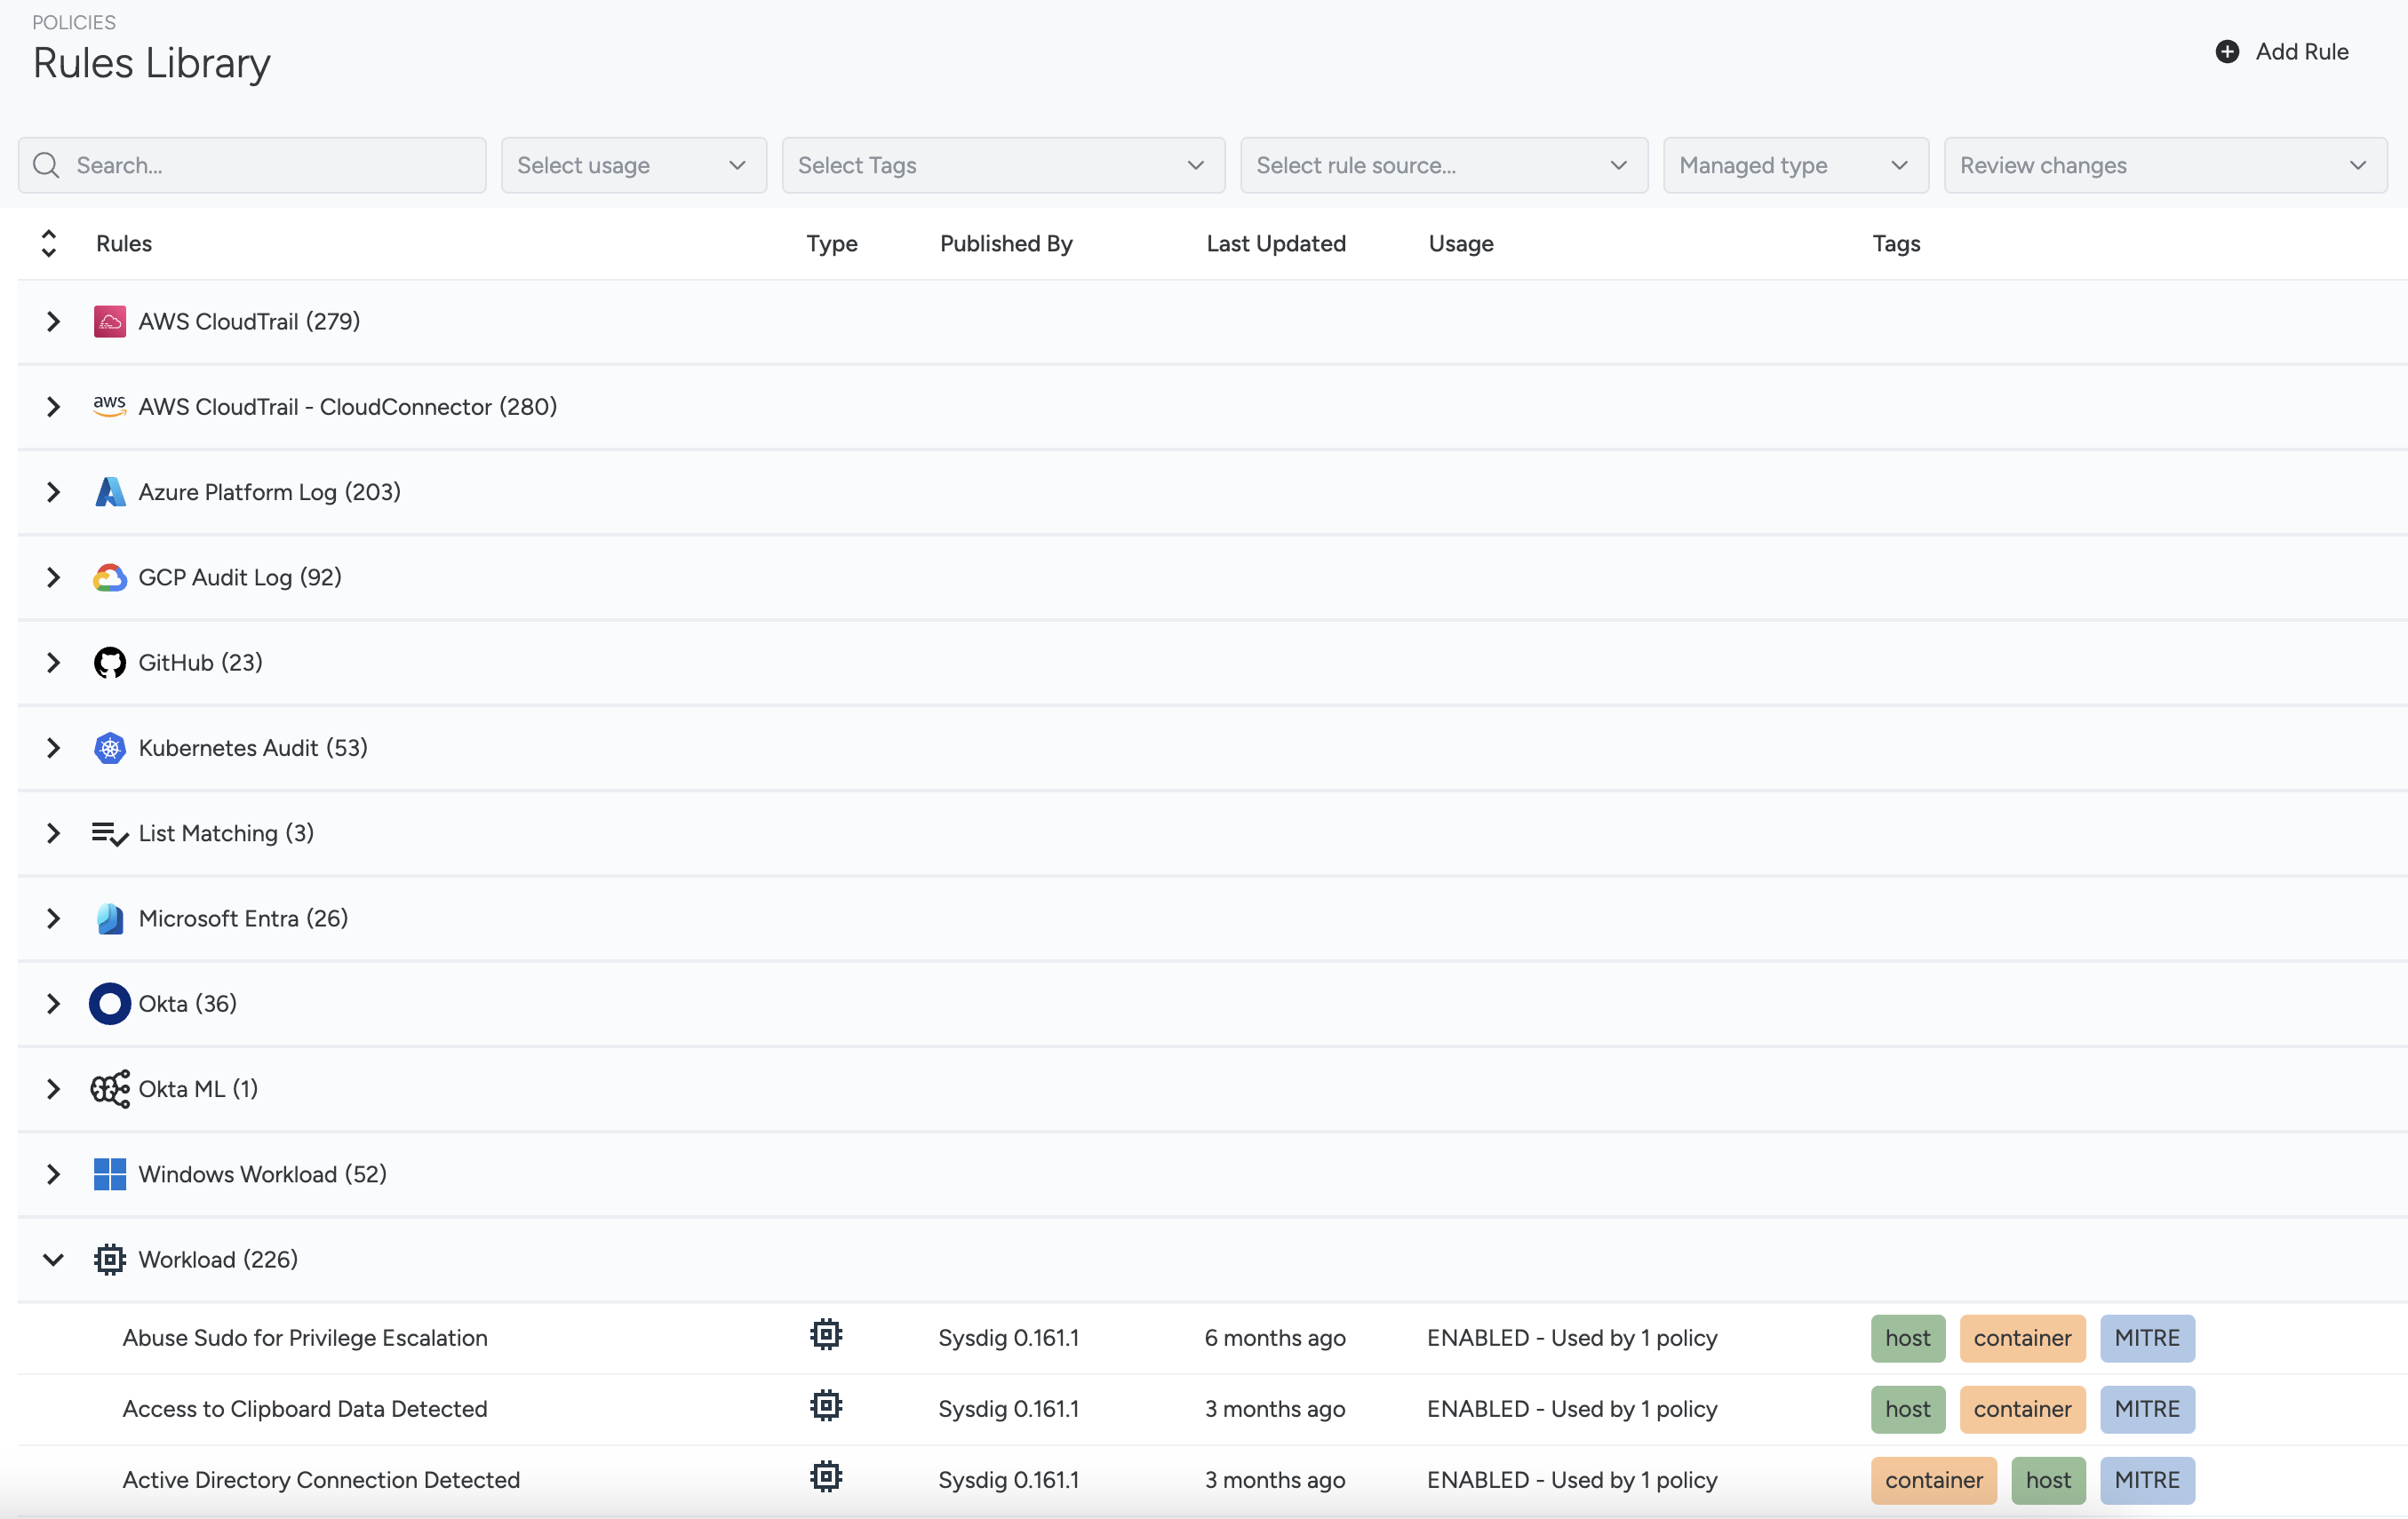
All available rules are displayed in a table, grouped by rule type. You can:
- Filter them using the available filters.
- Change the order by interacting with the columns.
- Expand or collapse the different groups.
- Open the rule details by clicking on a table row.
Using the button in the top right, you can also add custom rules. See the dedicated section to learn more about this.
Filtering rules
You can use various filters to find rules in the Rules Library.
The first set of fields on the left allows you to search based on one or more values:
Rule name
Type
Usage, defining whether a rule is Enabled in at least one policy, Disabled in all policies, or Not Used in any policy at all
Managed Type
MITRE Tags
Tags
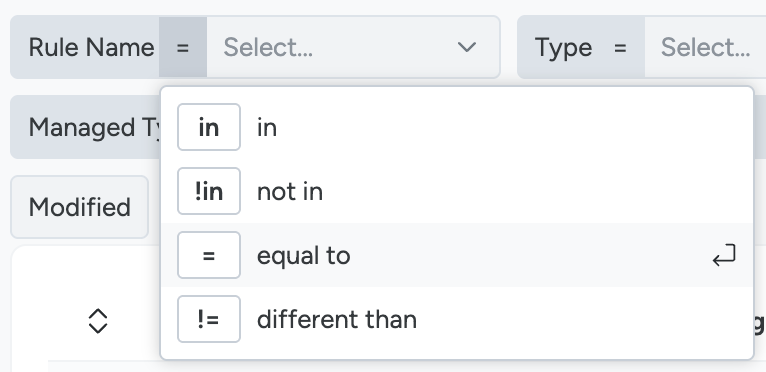
You can also use different operators by clicking on them (
=,!=,in,!in).
Using the second set, you can also filter by:
- New, to find newly created rules
- Updated, for rules changed in the last 7 days
- Modified, selecting only rules that have exceptions or appends
These attributes are all part of the rule detail and explained in the section about it.
Sorting
By clicking the “Type” column header, you can change the order of the groups, which is alphabetically ascending by default.
By interacting with the other headers, you can reorder the rules within each group. By default, rules are sorted alphabetically by name.
Only one sorting criterion can be applied at a time.
Review the Rule Detail
From the Rules Library list, select a rule to see its details, displayed in a panel on the right.
From this panel, you can see 4 sections:
Rule summary, containing the main rule information and shown in the panel header:
- Rule Name: The name of the rule.
- Type: The policy type. For example, List Matching or Kubernetes Audit.
- Rule ID: Used when managing the rule using APIs or Terraform.
- Managed Type: Indicates whether the rule was created by Sysdig (Managed) or by a user in the UI (Custom).
- Updated badge: Indicates that the rule has been changed recently (in the last 7 days).
What, which contains:
- Last update, showing when the rule was last updated
- The View as Diff action, explained in the dedicated section
- A main body with the rule content, displayed as
YAMLand explained in the dedicated section - The author, on the right:
- Secure UI, when the rule is custom or has been customized by a user
- Sysdig stateful, when it’s part of Sysdig’s managed behavioral analytics rules. These are managed by the Threat Research Team. In this case, an authoring version is also included, referencing a rule version as in the Behavioral Analytics changelog.
- Sysdig, when it’s part of Sysdig’s managed Falco rules. These are managed by the Threat Research Team. In this case, an authoring version is also included, referencing a rule version as in the Falco rules changelog.
- Tuner, when the rule was customized by the Sysdig Runtime Policy Tuner. See more in the dedicated page.
If a rule has been extended, multiple sections will be displayed to differentiate the content managed by different authors.
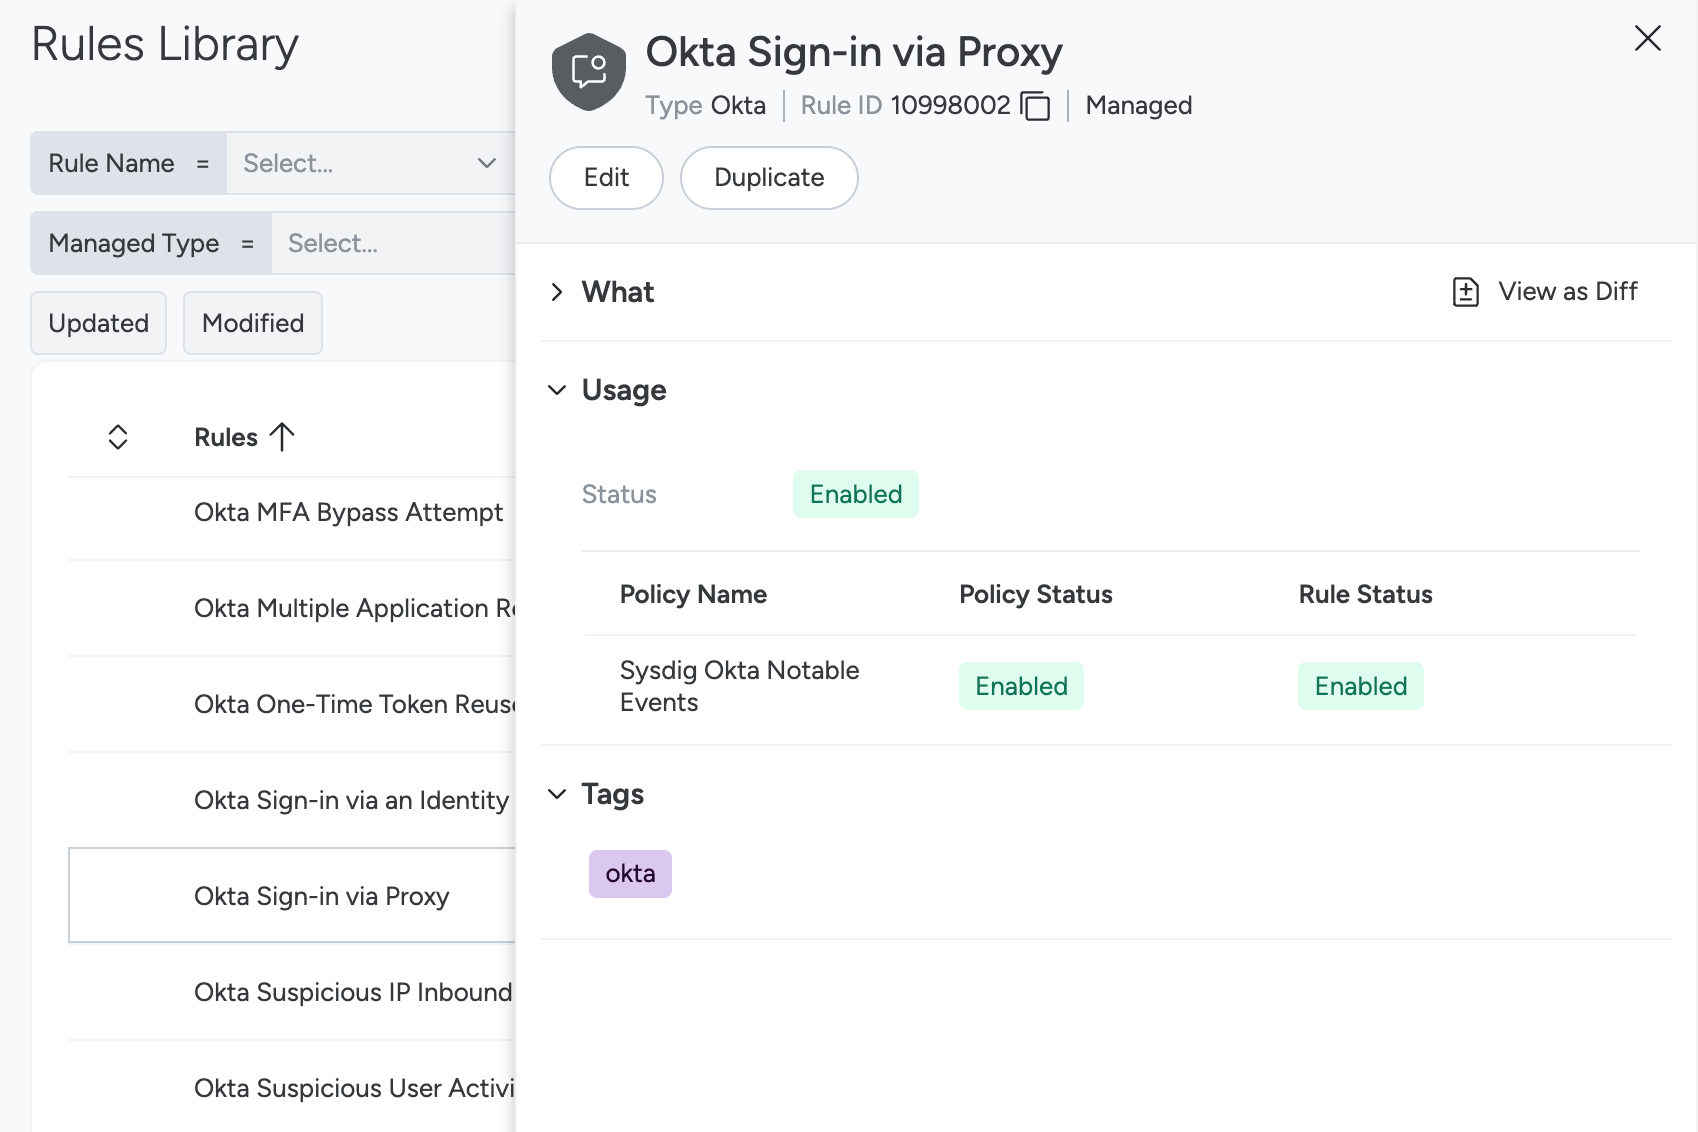
Usage, showing whether and in which policies the rule is used, and whether it’s enabled in any of them. The overall status is:
- Enabled: The rule is actively used, as it is enabled in one or more policies that are enabled.
- Disabled: The rule is not active. It is referenced in one or more policies, but none are active, or the rule isn’t active in any of them.
- Not Used: The rule is not included in any policy.
You can see the details of the policies that include the rule and their status in the table below.
Tags, attached to this rule.
You can also find actions available in the Rule Detail:
- Edit, to review the rule content. Refer to the dedicated paragraph to understand what can be edited and how.
- Duplicate, to clone a rule and customize it. This copies the rule content to a new rule and is available for all rule types that can be customized. Refer to Add Rule to learn more. This is a useful action for customizing a managed rule to your needs. However, once you do this, you will need to maintain it like any other custom rule.
- Delete, available for custom rules. This cannot be completed if the rule is used by any policy.
View rule history
The rule history view is supported only on Falco rules. The feature is not available on Behavioral analytics and List matching rules.
To view the rule changelog:
Select Policies > Rules > Rules Library and select a rule.
The Rule Details panel opens on the right.
If the rule has changed, you will see a “View as Diff” button on the top right of the “What” section.
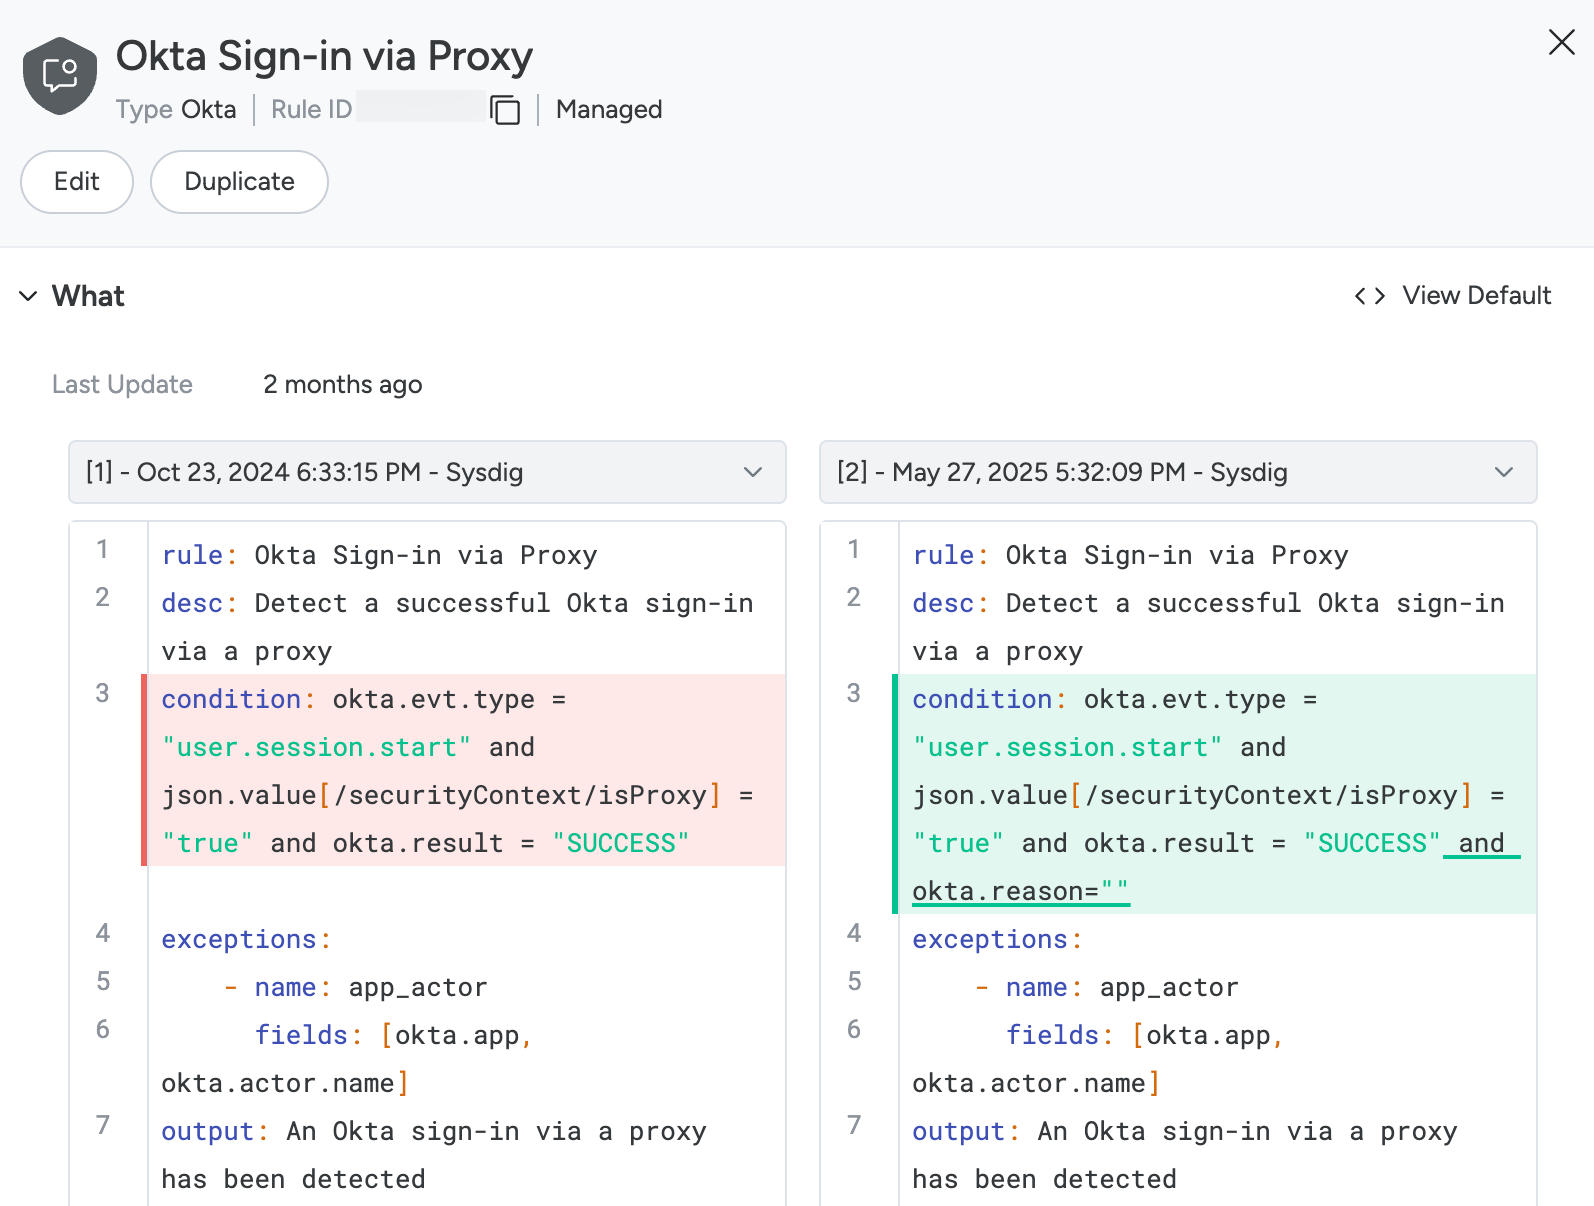
By default, you will see the current definition on the right and the previous on the left. Use the dropdowns to select different versions and compare the differences.
Select View as Default to return to the default view.
Add a Rule
To add a rule, you have two options:
- Start from scratch by clicking the “Add Rule” button in the top right.
- Clone an existing rule using the “Duplicate” function from the Rule Detail. See more in the dedicated paragraph.
You can currently create custom rules in two families:
- List matching rules, including:
- Container
- File System
- Network
- Process
- Syscall
- Falco rules, including:
- AWS CloudTrail
- AWS GuardDuty
- Azure Platform Log
- GCP Audit Log
- GitHub
- Kubernetes Audit
- Microsoft Entra
- Okta
- Linux Workload
Regardless of the selected type, you will need to provide the following details:
- Name
- Description
- Tags
Then, depending on the rule family and type, you will complete the rule definition. Refer to the dedicated section to learn more about it.
Edit & Customize a Rule
To edit a rule:
Select Policies > Rules > Rules Library and select a rule.
The Rule Details panel opens on the right.
From there, you can:
Edit the rule definition by clicking the Edit button:
- For a managed Falco rule, you can append a condition, append the output, create custom exceptions, or add values to existing exceptions.
- For a custom rule, you can edit its entire definition.
In both cases, you can do this using a form that shows all the parameters in the rule definition or using the YAML format.
For Falco rules, edit the Lists and Macros included in the rule, which are highlighted by a grey, rounded background, by clicking on them:
- You can append to Lists and Macros provided by Sysdig, as explained in the dedicated paragraph.
- You can edit custom Lists and Macros. See more in the dedicated section.
For more information about the content that can be modified and how, see the Rule definition paragraph.
Work with Exceptions
Exceptions help reduce false positives and allow behaviors that should not trigger an event—either because they are expected and normal, or because they are unexpected and temporarily accepted—to reduce noise until they are addressed.
Exceptions are tied to rules. To work with them, select a rule and edit it. See the dedicated section to understand how.
For Falco rules, both managed and custom, you can define new exceptions or add values to existing exceptions.
For AWS Behavioral Analytics, you can add values to managed exceptions.
Each exception defines the set of fields and operators that an event can be tuned with, along with values.
Exceptions can also be written in the condition in the form of and not clauses, but this would make the condition lengthy and harder to maintain.
Exceptions provide syntactic sugar to accomplish the same thing with a simpler and more straightforward structure.
An exception consists of:
- A name
- A set of fields
- A set of operators, one associated with each field
- A list called “values”, with each item containing a set of values (one per field and operator)
Example:
 - name: sample_exception
   fields: [proc.name, container.image]
   comps: [=, in]
   values:
     - [my-proc, [nginx, alpine]]
     - [my-other-proc, [debian]]
is equivalent to and not ((proc.name = "my-proc" and container.image in ("nginx", "alpine")) or (proc.name = "my-other-proc and container.image = "debian")) in the condition
When the exception evaluates to true, the rule will not trigger an event. You can read more about it in the official Falco documentation.
To work on exceptions, you first need to select the Falco rule for which you want to create an exception:
Select Policies > Rules > Rules Library and select a rule.
The Rule Details panel opens on the right.
Click Edit.
If you’re in Form View, click Open Exception Editor. If you’re in YAML View, follow the manage rule exceptions in YAML section.
Create a Custom Exception
- Click Create Custom Exception.
- Define a name for the exception.
- Select the fields you want the exception to apply to and the corresponding operators.
- For each field, add a combination of values for which you don’t want the rule to trigger.
Add Values to an Exception
If you have a predefined exception, you can add other combinations of values.
- From an existing exception, click the pencil icon on the right.
- At the bottom, select Add.
- Populate the values for each parameter.
These parameters will define a new condition under which the rule will not produce an event.
Falco Lists and Macros
The default Falco rules have a variety of Macros and Lists embedded in them. These types of elements are useful for defining sets of values (lists) and common conditions (macros) that you can use in multiple rules, such as a list of trusted images or an outbound TCP connection macro.
The managed rules contain these elements for you to add well-known items in your environment. These elements all start with user_known, such as the user_known_ips list and the user_known_cron_jobs macro.
A List is an element that you can reference within a comparison operation. Read more in the Falco documentation. A Macro is a logical operation and is therefore surrounded by logical operators. Read more in the Falco documentation.
From the Lists and Macros pages (Policies > Rules > Falco Lists and Falco Macros), you can see all defined elements. Like the rules, elements published by Sysdig are provided, and you can only append to them. If an element is published by both Sysdig and Secure UI, it means that it has already been customized with an append, and the append can be edited. Elements published by Secure UI are custom and can be edited. Using the Add action at the top, you can add additional custom elements.
Customize Lists and Macros
You can customize Lists and Macros in two ways:
- Directly from the respective pages (Policies > Rules > Falco Lists and Falco Macros) by opening an element.
- From a rule detail by opening it directly (Policies > Rules > Rules Library, then select a rule) or from the events detail. You can visually identify rules using Lists and Macros by looking for elements in the condition with a grey background. Click on the element to customize it.
The element content appears. For custom elements, you can Edit the definition, excluding the name.
<img src="/image/rule_db_condition.png" width="500" />
For managed elements, you can Append content if it hasn’t been done already, or Edit Append if it has.
Add Custom Lists and Macros
From the Lists and Macros pages (Policies > Rules > Falco Lists and Falco Macros), click Add in the top right.
From there, define a name and content.
Remember that Lists are comma-separated sets of elements, while Macros are complete logical operations, similar to rule conditions.
Rule Definition
The first attribute of the rule definition is its type. It is defined by a combination of the engine the rule operates in and the raw event it applies to. It uniquely identifies a language, meaning a set of fields, conditions, and outputs that are available, either statically defined or customizable.
The main body content depends on the rule type and is explained in the following sections:
- Behavioral Analytics: All rules marked as Observation type, having
awscloudtrail_statefulas the rule source, or published by Sysdig stateful (top right corner of the rule definition). - List matching rules: All rules of type List Matching.
- Falco-based rules: All other rules.
Rule Types Capabilities
The following table summarizes what actions can be performed on each rule type:
| Rule Type | View content | Custom | Exceptions |
|---|---|---|---|
| Falco - AWS CloudTrail | ✓ | ✓ | ✓ |
| Falco - AWS GuardDuty | ✓ | ✓ | ✓ |
| Falco - Azure Platform Log | ✓ | ✓ | ✓ |
| Falco - GCP Audit Log | ✓ | ✓ | ✓ |
| Falco - GitHub | ✓ | ✓ | ✓ |
| Falco - Kubernetes Audit | ✓ | ✓ | ✓ |
| Falco - Microsoft Entra | ✓ | ✓ | ✓ |
| Falco - Okta | ✓ | ✓ | ✓ |
| Falco - Linux Workload | ✓ | ✓ | ✓ |
| Falco - Windows Workload | ✓ | - | ✓ |
| Drift | From policy | - | ✓ |
| FIM | From policy | - | ✓ |
| Malware | From policy | - | ✓ |
| ML | From policy | - | - |
| Behavioral Analytics - AWS CloudTrail | From policy | - | Add values only |
| Behavioral Analytics - Linux Workload | ✓ | - | - |
| List Matching - Container | ✓ | Edit only | - |
| List Matching - File System | ✓ | Edit only | - |
| List Matching - Network | ✓ | Edit only | - |
| List Matching - Process | ✓ | Edit only | - |
| List Matching - Syscall | ✓ | Edit only | - |
Notes:
- View content - From policy: The rule is embedded in the policy. Refer to the policies to manage these rules.
- Custom - Edit only: You can only customize the existing ones, cannot create new ones.
- Exceptions - Add values only: It’s only possible to add values to predefined exceptions.
Falco-Based Rules
Falco rules are composed of different elements:
Name: Falco rules are identified by a name, which uniquely represents a rule for each type. The name cannot be changed once the rule is created, as multiple elements can refer to it.
Description: Describes what the rule aims to detect and how.
Condition: Describes a boolean condition using the Falco language.
When this condition is matched, a raw event is transformed into a detection.
The condition is written using Falco fields, which extract information from the raw event, and operators.
Each rule type has different fields available. You can find them here.
Note that not all operators are supported. Fields of type LIST support only in, exists, and intersects.
You can read more about it in the Falco documentation.
Output: Constitutes the main part of the detection, as it contains all the details of What happened.
This text can be enriched with values extracted from the raw event by using the Falco fields available for the rule type, prepending the field name with %.
Priority: Defines the importance of a detection (i.e., the gravity of the condition being met). This should not be confused with the Policy’s Severity, which applies to a specific context.
Tags: Categorizes the event, usually by attack phases or according to a framework like MITRE ATT&CK.
Exceptions: Defines when the event should not trigger, suppressing false positives and reducing noise. Read more in the dedicated section.
Additional information about writing these rules is available in the Falco documentation.
Behavioral Analytics
Behavioral Analytics rules are more complex rules that match against multiple events with common attributes happening in a well-defined period of time and/or order. These rules are defined and managed by the Sysdig Threat Research team. They’re currently available for AWS CloudTrail and Linux Workloads.
As with Falco rules, the description explains what is matched and how, so you can understand the detection. In Linux Workload Behavioral Analytics, there is also a Falco-compatible output.
Unlike Falco rules, the only customization available in AWS Behavioral Analytics rules is appending exception values.
List Matching Rules
List matching rules trigger an event when an activity of a given type matches against a specified list of attributes.
Every list matching rule contains:
- Name
- Description
- Tags
Refer to Falco-based rules to learn more about them.
Then, the remaining attributes depend on the rule type and the activity it detects:
- Container matches containers being started whose image (or components of it, like the name only, the repository, etc.) is (
If Matching) or is not (If Not Matching) in the provided comma-separated list. - File System matches files being opened, whose path is (
If Matching) or is not (If Not Matching) in the provided path lists, based on the open mode (Read only or Read and Write). - Network matches incoming and/or outgoing connections (
Allowwill not match) if the Server port is (If Matching) or is not (If Not Matching) in the provided TCP and UDP port lists. - Process matches new processes being executed if their name is (
If Matching) or is not (If Not Matching) in the provided list. - Syscall matches syscalls executed if their name is (
If Matching) or is not (If Not Matching) in the provided list.
Rules Editor
The rules editor is an advanced tool. We suggest using the other pages unless you’re confident with the Falco language.
The Rules Editor lets you freely create custom Falco elements like rules, lists, and macros, modify them and create appends, as you would do when using Falco directly, through a YAML ruleset.
To access the Rules Editor interface, select Policies > Rules > Rules Editor:
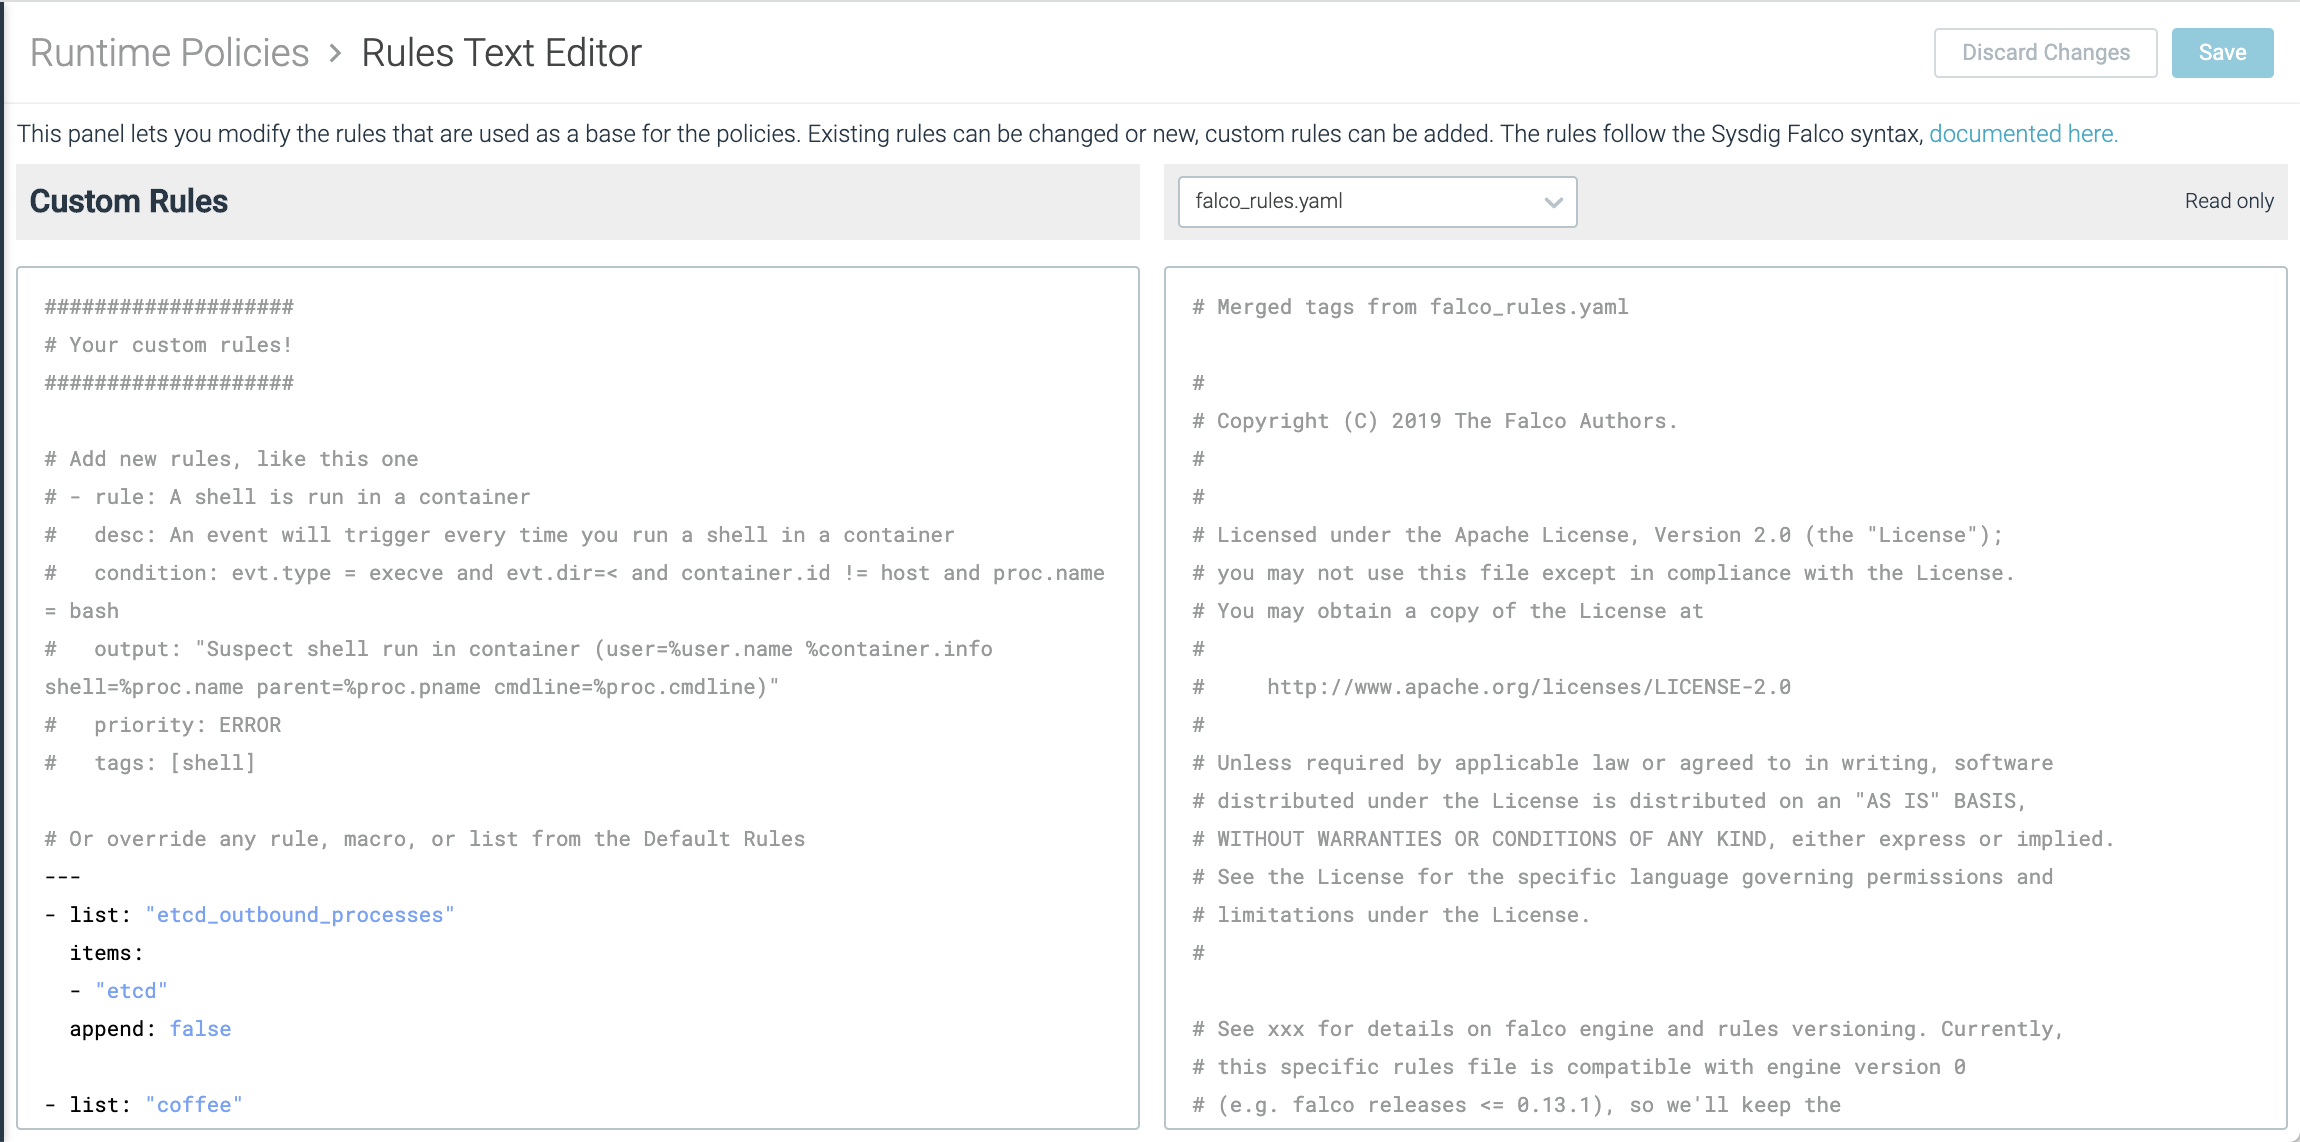
The right panel displays the various rulesets provided by Sysdig. You can select them by using the dropdown.
On the left side, you can see the custom elements you created.
The editor supports basic capabilities, like a find and replace function, accessible with Ctrl + F/Cmd + F or code completion upon writing.
Manage Rule Exceptions in YAML
To define a custom exception in YAML, you can just reference an existing rule, by its name, source and add the exception, specifying also append: true.
To learn more about exceptions, see the dedicated section.
- rule: my custom rule
  exceptions:
    - name: cmdline_writer
      fields: [proc.cmdline, fd.directory]
      comps: [startswith, =]
  source: syscall
  append: true
The exception above doesn’t have values. It’s possible to add them in the same element or separately, with another append, as you would do with managed exceptions.
Append Values to an Exception
You can append values to the exception by specifying the rule name, the source and the exception name, without redefining the entire exception, just specifying also append: true.
- rule: my custom rule
  exceptions:
    - name: cmdline_writer
      values: [httpd, /etc/shadow]
  source: syscall
  append: true
After appending the values, you would get the same result as:
- rule: my custom rule
  exceptions:
    - name: cmdline_writer
      fields: [proc.cmdline, fd.directory]
      comps: [startswith, =]
      values: [httpd, /etc/shadow]
  source: syscall
  append: true