Manage Threat Detection Policies
Rules define what should be detected. Policies define where those rules apply and with which consequences, such as the severity, the notifications, and the policy actions. To learn about rules, see Manage Threat Detection Rules.
This page covers what you can configure on a threat detection policy and which policy types each option applies to. Sections that apply only to some policy types open with an Applies to line.
Managed and Custom Policies
There are three Threat Detection policy management types:
- Managed Policy: These policies are created and managed by the Sysdig Threat Research Team. Sysdig updates them regularly.
- Managed Ruleset: Create a Managed Ruleset by duplicating a managed policy. Managed Ruleset policies still get updates, but are more flexible.
- Custom Policy: Create a Custom Policy from scratch or by converting existing policies. You have full control, but are responsible for keeping rules up-to-date.
This table shows what you can edit in each type.
| Setting | Managed Policy | Managed Ruleset | Custom Policy |
|---|---|---|---|
| Enable or disable | ✅ | ✅ | ✅ |
| Scope | ✅ | ✅ | ✅ |
| Actions and notification channels | ✅ | ✅ | ✅ |
| Runbook link | ✅ | ✅ | ✅ |
| Enable or disable individual rules | ✅ | ✅ | ✅ |
| Name, description, severity | ❌ | ✅ | ✅ |
| Add or remove rules | ❌ | ❌ | ✅ |
| Updated by Sysdig | ✅ | ✅ | ❌ |
| Can be deleted | ❌ | ✅ | ✅ |
Not every policy type offers all three management types:
| Policy type | Management types |
|---|---|
| All other policy types | Managed Policy, Managed Ruleset, and Custom Policy |
| Windows Workload | Managed Policy only |
| Drift Detection | Custom Policy only |
| Workload ML, AWS ML, and Okta ML | Custom Policy only |
| AWS Behavioral Analytics | Managed policies, which you can’t duplicate or convert |
Edit a Managed Policy
Managed Policies are created by Sysdig, and are available out of the box. These policies detect various malware, data exfiltration, intrusions, DDoS attacks, and more.
Managed policies have the following attributes:
They exist across all accounts, their names cannot be changed or deleted.
They are loaded with a pre-defined enabled or disabled status, based on most common usage, but you can manually Enable or Disable them.
You can edit their Scope and Action.
To edit a Managed Policy:
Log in to Sysdig Secure and select Policies > Runtime Policies.
Select a policy of the type Managed Policy from Runtime Policies list to expand the policy details and access the icons to edit, copy, or delete the policy.

Click the edit (pencil) icon.
Configure the available parameters.
In a Managed Policy, you can toggle the enablement, change the scope, add a Runbook link, enable or disable individual rules, and change the notification settings.

Save your changes.
To make other changes, such as to the name, description, or severity, you must duplicate the policy so that it becomes a Managed Ruleset. See Create a Managed Ruleset Policy.
Create a Managed Ruleset Policy
Duplicate a Managed Policy to create a Managed Ruleset. This allows you to create multiple policies based one set of rules, but scoped to different environments, and with different actions and additional attributes. This is useful when you need different scopes or actions, such as notification channels, for the same set of rules within a Managed Policy.
Managed Rulesets have the following attributes:
You can edit the Name, Description, Severity, Scope, and Action.
As with the default Managed policies, Managed Rulesets are updated by the Sysdig Threat Research team.
To create a Managed Ruleset:
Log in to Sysdig Secure and select Policies > Runtime Policies.
From the Runtime Policies list, select a Managed Policy, or a Managed Ruleset, and click the duplicate/copy icon in the details panel.
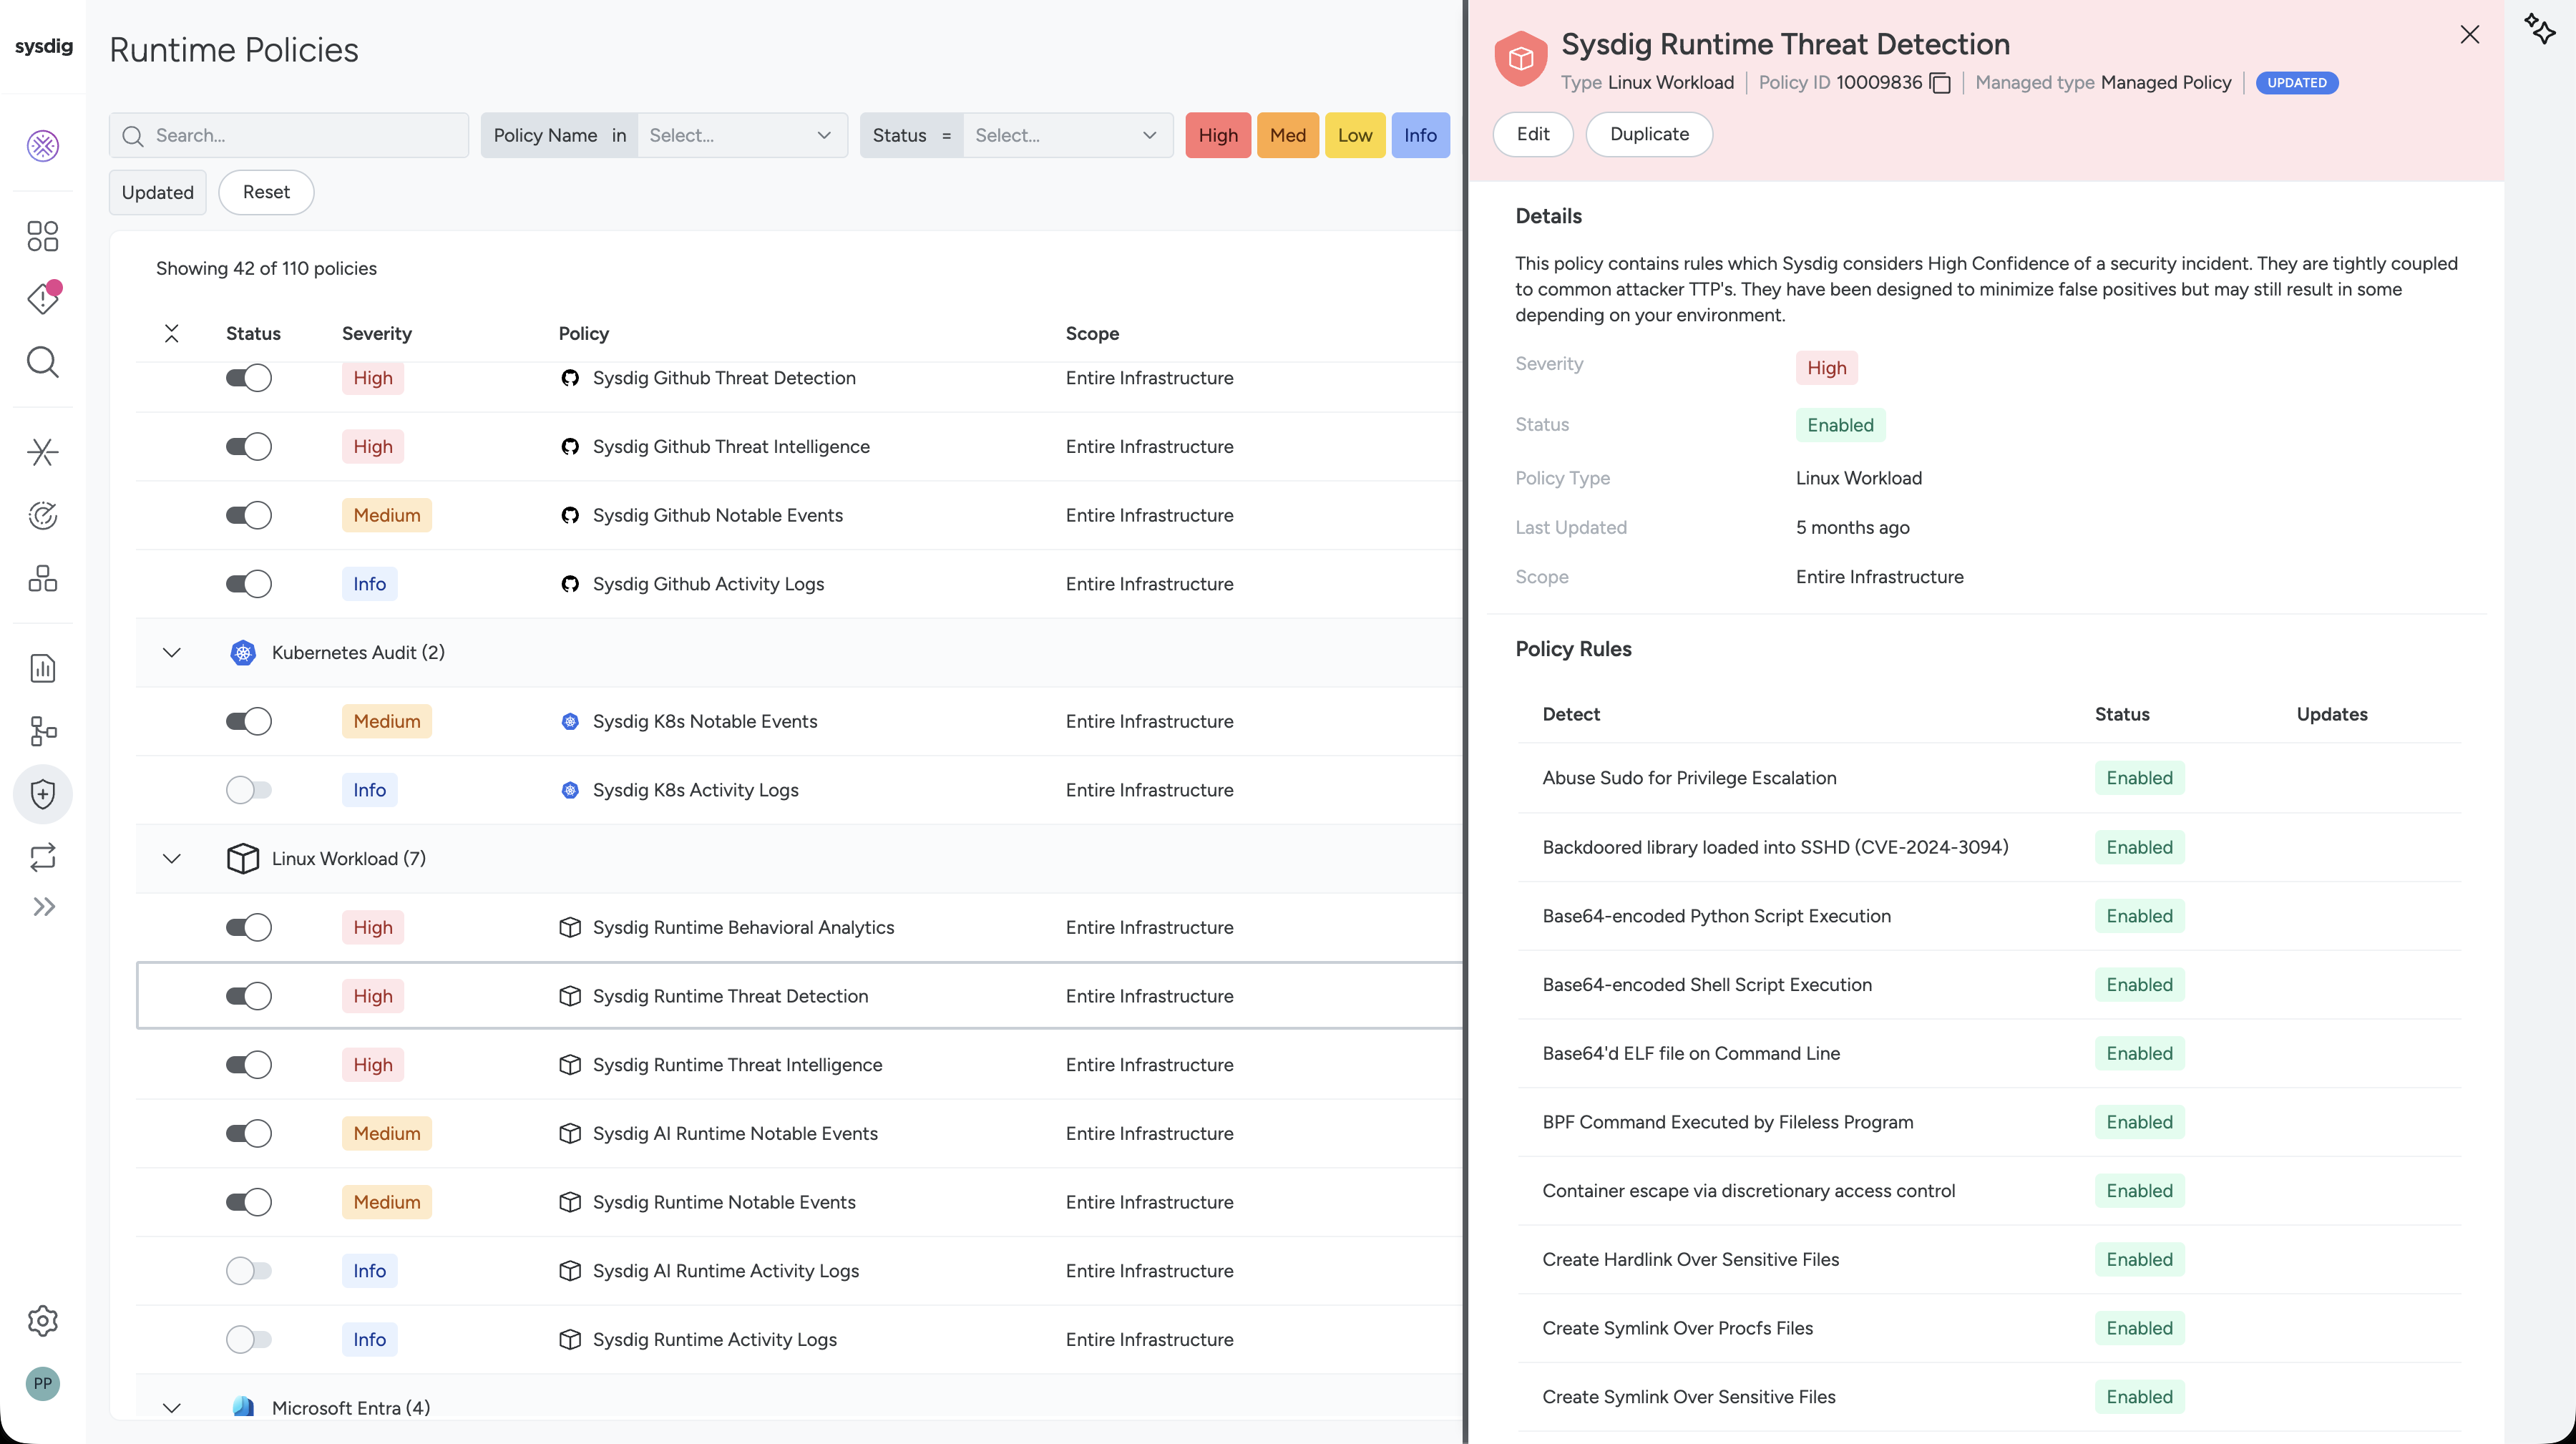
Optional: Edit any of the parameters except the rules. Rules can be enabled or disabled, but they cannot be removed. To remove a rule, create a custom policy.
Select Save.
The new policy will appear in the Runtime policy list. Under Managed Type, it will say Managed Ruleset.
When Sysdig updates the ruleset of the Managed Policy on which a Managed Ruleset is based, the Managed Ruleset will also be updated.
Create a Custom Policy
Custom policies are not subject to ruleset updates by Sysdig’s Threat Research Team. Therefore, you are responsible for ensuring the latest security detections are enabled. You can modify all fields in custom policies.
There are three ways to create a Custom policy:
- Create a policy from scratch
- Convert a Default managed policy to Custom
- Convert a Managed Ruleset policy to Custom
Create a Custom Policy from Scratch
To create a Custom Policy from scratch:
Log in to Sysdig Secure and select Policies > Runtime Policies.
On the Runtime Policies list page, select +Add Policy.
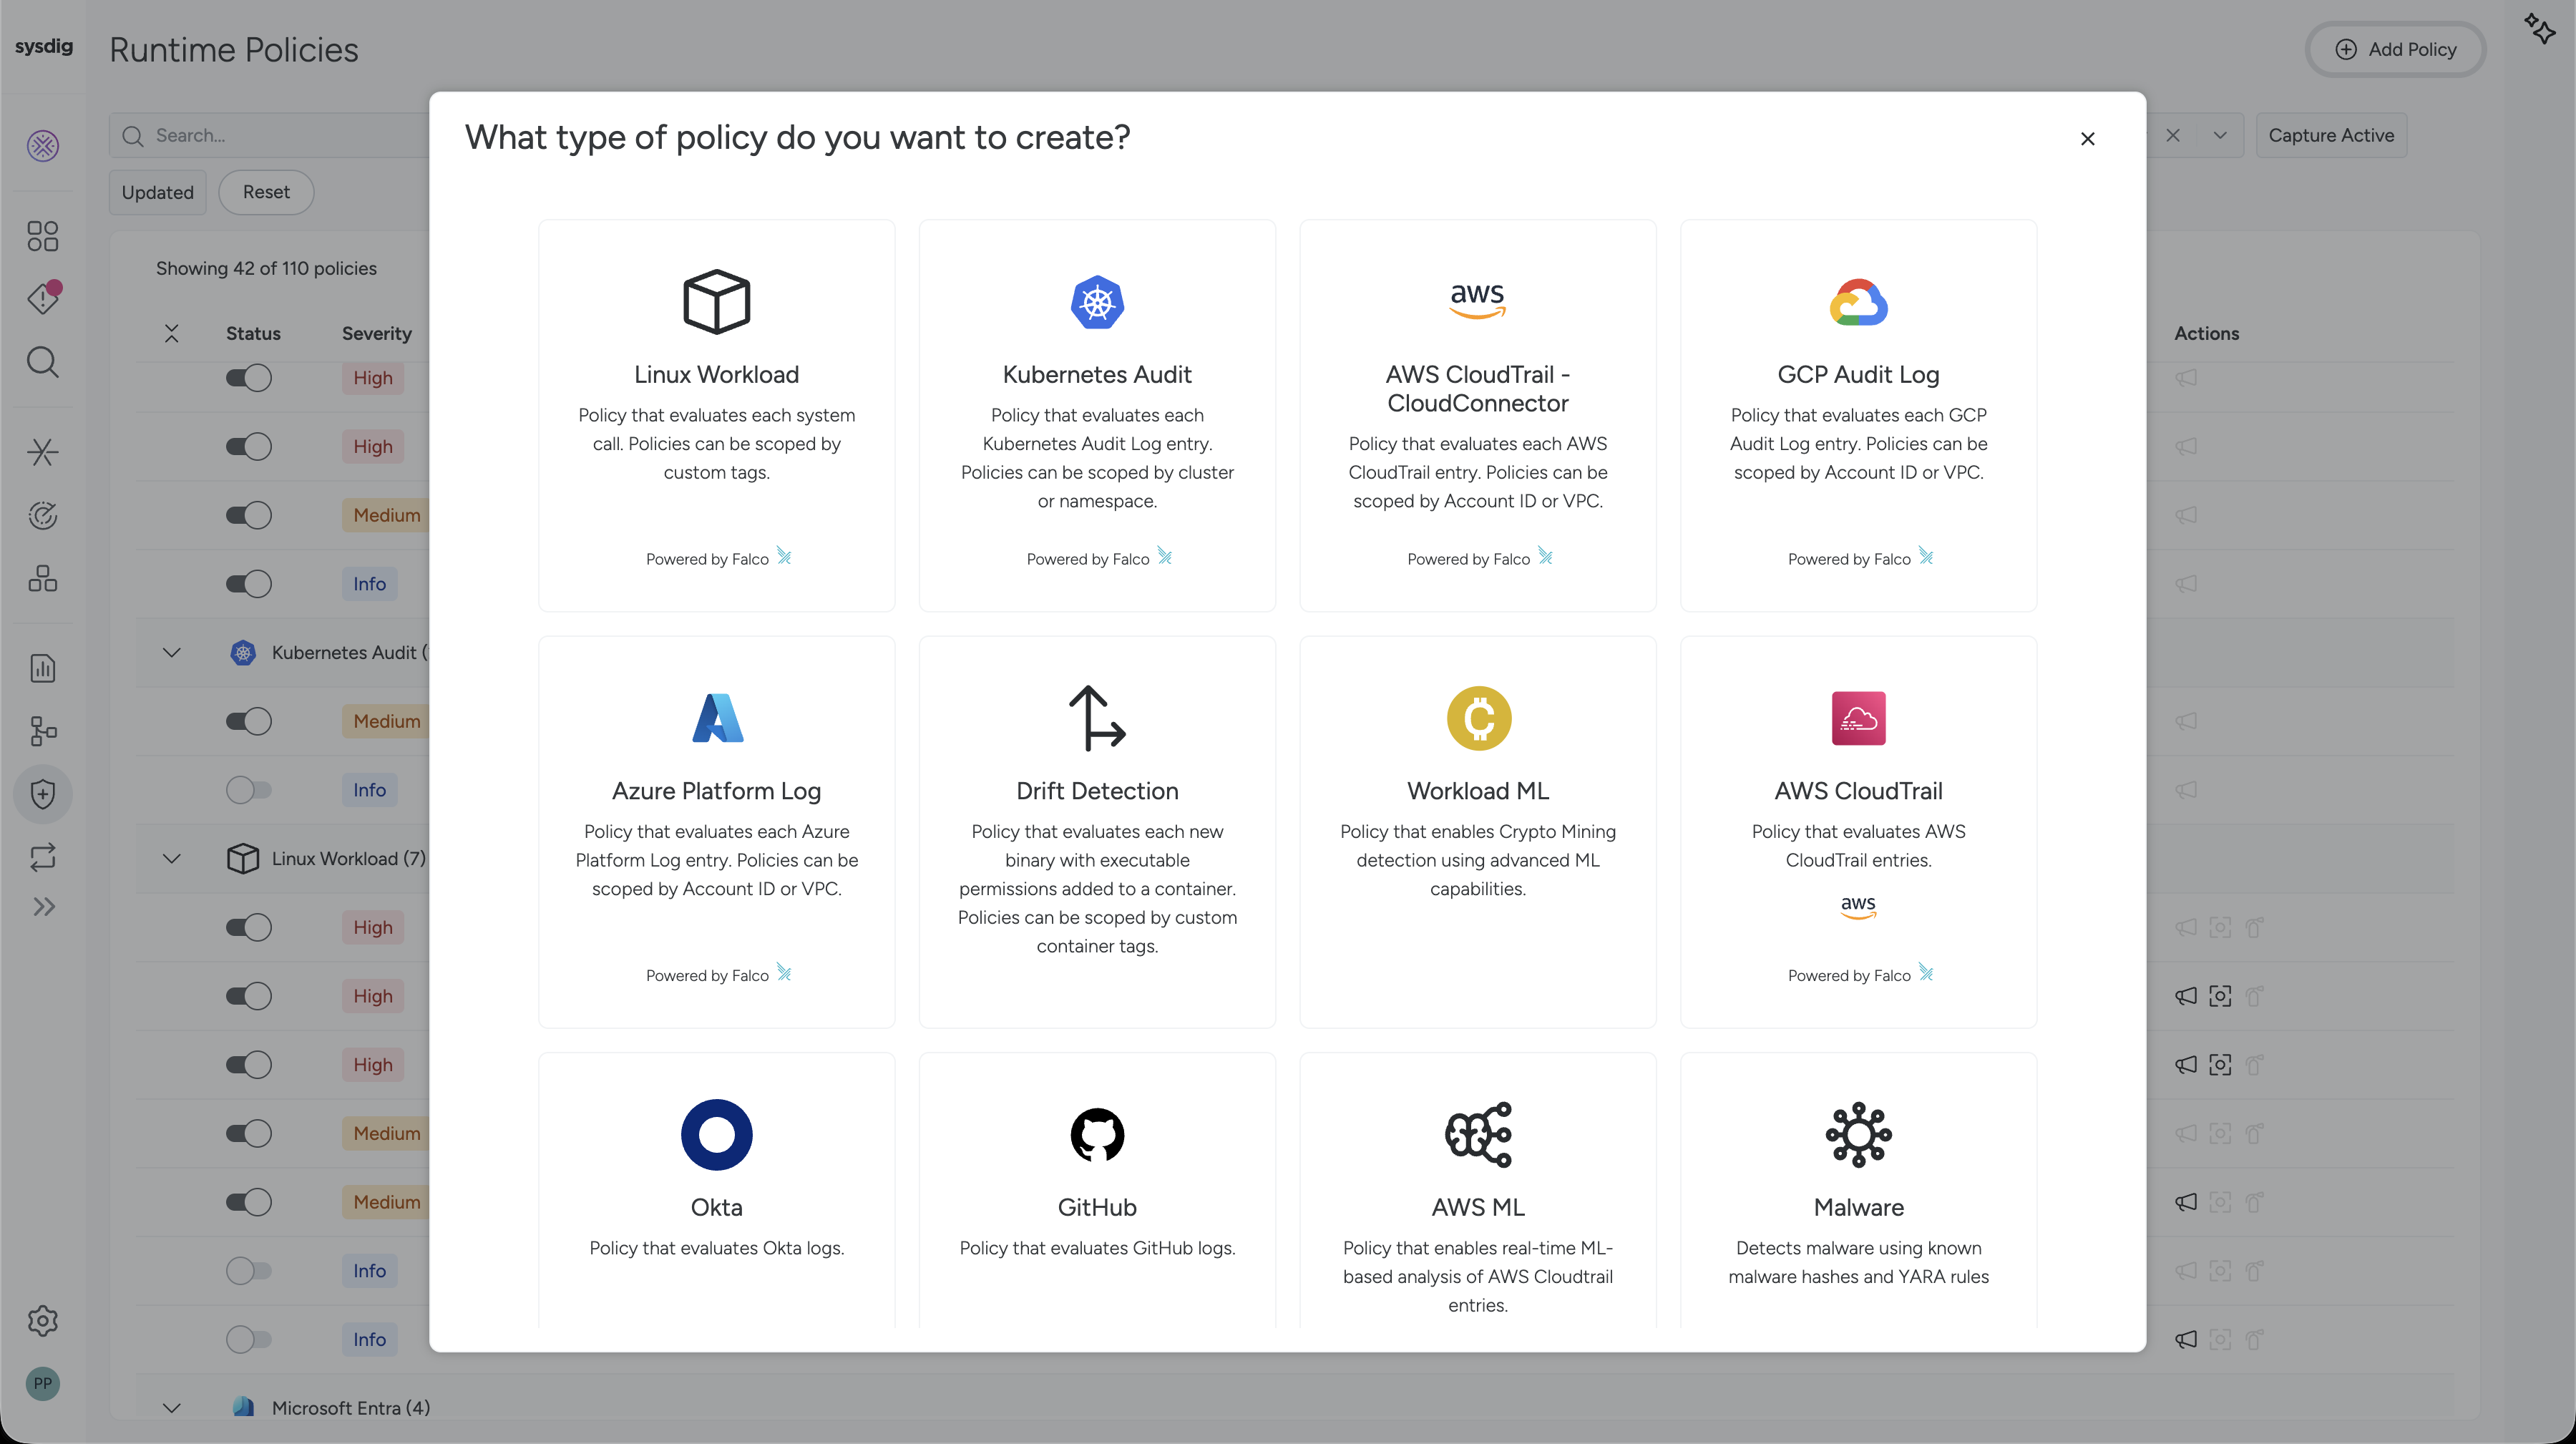
Select the Policy type you’d like to create.
Which types appear depends on your account. Machine learning policies are unavailable if your organization has opted out of data collection.
Configure the policy’s parameters. The settings every policy shares are described in Common Policy Settings. Some parameters vary by policy type. For specific instructions, see the section for the policy type, for example Linux Workload.
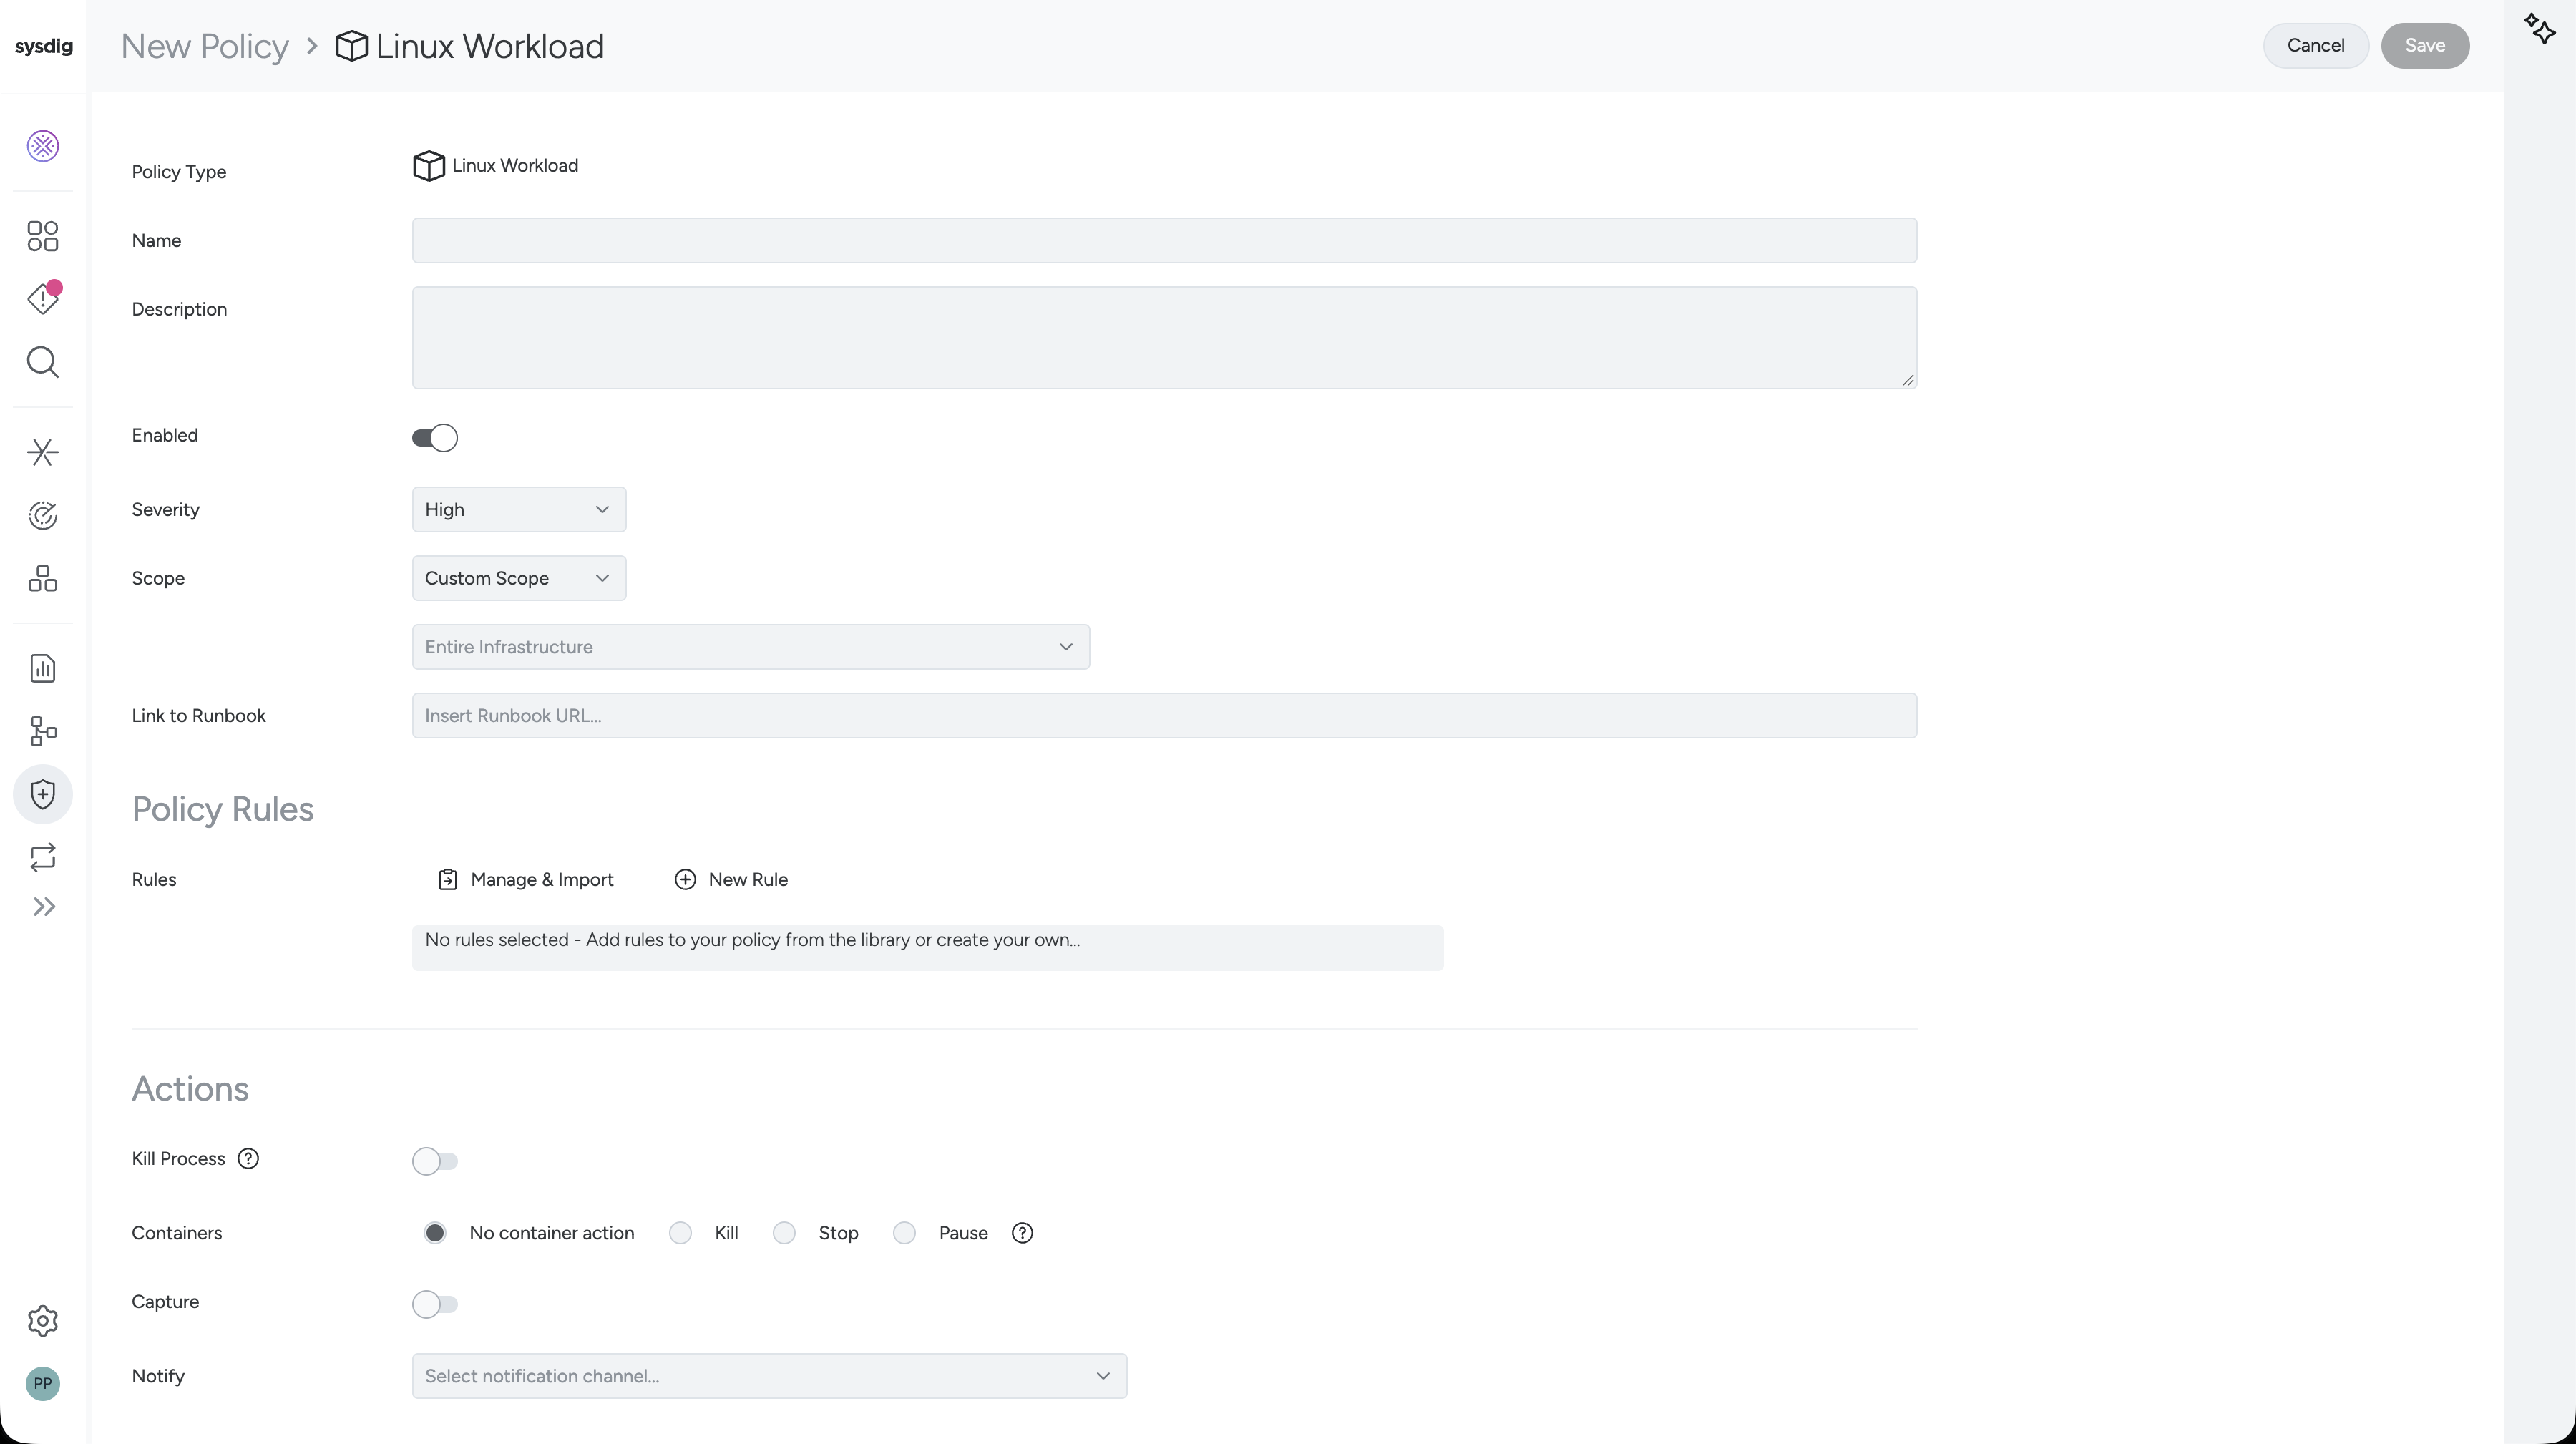
Add and edit Policy Rules. Select Manage & Import to add rules from the Rules Library, or New Rule to create your own. Some policy types come with pre-configured rules.
Define Actions to be taken if the policy rules are breached, such as Notify an email or Slack channel. See Policy Actions and Notification Channels.
Enable and Save the policy.
Convert a Managed Ruleset to Custom
To convert a Managed Ruleset into a Custom Policy:
Select a Managed Ruleset policy from the Runtime Policies list and click the edit icon in the details panel.
To create a custom policy from a Managed Policy, you must first duplicate it so that it becomes a Managed Ruleset.
In the Policy Rules section, click convert to a custom policy.
You can now edit everything about this policy, including the rules. It will not be managed or updated by the Sysdig team; if new rules are offered, you are responsible for adding them to the custom policies.
Click Save.
Duplicating a custom policy creates another unmanaged custom policy.
Managed Policy Updates
Sysdig’s Threat Research Team maintains the managed policies and updates them together with the managed rules. See Managed Rules and Releases.
Sysdig Secure SaaS always uses the most up-to-date managed policies. You don’t need to do anything.
On-premises deployments receive the managed policies and rules daily, at midnight UTC. The sysdigcloud-falco-rules-deployer cron job service handles the schedule automatically.
- To change the frequency, edit
Values.sysdig.secure.rulesDeployer.scheduleto your preferred settings. - To disable the updates, edit
Values.sysdig.secure.rulesDeployer.enabledto suspend the cron job.
In airgapped installations, the cron job can’t pull its image from the internet. You mirror the image to your own registry and control when the update runs. See Update Managed Rules in Airgapped On-Prem.
Common Policy Settings
Applies to: all policy types. Settings that differ by type are described in the section for that type.
| Setting | Description |
|---|---|
| Name | A policy name. |
| Description | A meaningful and searchable description. |
| Enabled | Toggle on so the policy generates events. |
| Severity | High, Medium, Low, or Info. Severity is subjective and groups policies in Sysdig Secure. There is no inheritance between the underlying rule priorities and the severity you assign to the policy. See Severity in the API. |
| Scope | Where the policy applies. See Scope. |
| Link to Runbook | (Optional) The URL of a company procedure to follow for events from this policy, for example https://www.mycompany.com/our-runbook-link. If you enter a value, a View Runbook option appears in any corresponding event. |
| Policy Rules | The rules the policy evaluates. Select Import from Library or create a New Rule. To learn more, see Manage Threat Detection Rules. |
| Actions | What to do when a rule is breached. See Policy Actions and Notification Channels. |
Scope
The scope restricts a policy to part of your infrastructure. The options depend on the policy type:
| Policy type | Scope options |
|---|---|
| Linux Workload, Malware, FIM | Custom Scope, Hosts Only, or Containers Only |
| Kubernetes Audit, Drift, Workload ML | Custom Scope |
| Cloud and identity policies (AWS, GCP, Azure, Entra, Okta, GitHub) | A custom scope expression on the attributes of the data source, such as account, region, tenant, organization, or repository |
| Windows Workload | Not editable; the policy applies to the entire infrastructure |
The default scope is Entire Infrastructure.
The Kubernetes workload labels kubernetes.daemonset.name, kubernetes.deployment.name, kubernetes.statefulset.name, and kubernetes.replicaset.name can’t be used in a policy scope. You can still use them to search events.
Policy Actions
Policy actions are the automatic responses a policy takes when one of its rules is breached. You define them on the policy, and Sysdig runs them as soon as an event is generated, without anyone reviewing it first, for example by stopping a container or capturing the activity.
They differ from Response Actions, which you run on demand from an event after you assess it yourself, for example to rule out a false positive before you act.
The following table lists the policy actions and the policy types that support them:
| Action | What it does | Applies to |
|---|---|---|
| Kill, Stop, Pause (containers) | Acts on the affected containers. Kill stops them immediately, Stop allows a graceful 10-second shutdown before killing them, and Pause suspends all their processes. | Linux Workload, Drift, Malware |
| Capture | Records a capture of the activity, with the number of seconds before and after the event you choose. | Linux Workload, Drift, Malware |
| Kill Process | Kills the process that triggered the event, for containers and hosts. | Linux Workload |
| Prevent Execution | Blocks the execution of the binary that breaches the policy. | Drift (prevent drift), Malware (prevent malware) |
| Notify | Sends a notification to the selected notification channels. | All policy types |
Policy types that aren’t listed for an action, such as Kubernetes Audit, cloud, machine learning, FIM, and Windows Workload policies, only generate events and notifications.
Container Actions
Select what should happen to affected containers if the policy rules are breached:
- Nothing (alert only): Don’t change the container behavior; send a notification according to the Notification Channel settings.
- Kill: Kills one or more running containers immediately.
- Stop: Allows a graceful shutdown (10 seconds) before killing the container.
- Pause: Suspends all processes in the specified containers.
The option isn’t available when the policy scope is Hosts Only.
Container policy actions coverage map:
| Environment | Container Policy Action Supported? |
|---|---|
| Kubernetes - Linux | ✅ |
| Kubernetes - Windows | ❌ |
| Hosts - Linux Containers | ✅ |
| Hosts - Linux Packages | ✅ |
| Hosts - Windows | ❌ |
| Hosts - ECS on EC2 | ❌ |
| Serverless - Azure Container Apps | ❌ |
| Serverless - Cloud Run Service | ❌ |
| Serverless - ECS on Fargate | Kill only |
For details, see Available Response Actions.
Host Shield can be configured to prevent Kill, Pause and Stop actions, regardless of the policy. See Ignore Container Actions at the Agent Level.
Kill Process
Toggle Kill Process on to have the policy automatically kill the process that triggered the event. This works for container events and hosts, and honors the Host Shield flag to ignore actions.
Capture
Toggle Capture on if you want to create a capture in case of an event, and define the number of seconds before and after the event that should be in the snapshot.
You can add the Capture option to policies affecting events from both Host Shield and Fargate Serverless Agents. For serverless agents, manual captures are not supported; you must toggle on the Capture option in the policy definition.
See also: Captures.
Report Policy Actions in Kubernetes Events
When you perform a container Stop, Pause, or Kill action, Sysdig includes a message in Kubernetes events to explain that Sysdig acted on the container due to the given rule. You will see this information when you run kubectl events in your terminal, without requiring login to the Sysdig Secure UI.

Enablement
If you deployed Host Shield using Helm, the feature and its associated permissions are enabled by default. If you deploy Host Shield manually, you must set Kubernetes role permissions. See Agent Configuration Library for details.
Notification Channels
Applies to: all policy types.
Use Notify to send the events of a policy to the people and tools that respond to them. A policy only stores which channels it uses. You create and manage the channels themselves in Integrations > Notification Channels. See Manage Notification Channels.
To notify a channel:
Edit the policy.
In Notify, select one or more notification channels from the list.
Save the policy.
You can send threat detection events to these channel types. Manage Notification Channels shows which channels each Sysdig Secure feature supports.
- Amazon SNS Topic
- Microsoft Teams
- OpsGenie
- PagerDuty
- Prometheus Alert Manager
- Slack
- Team Email
- VictorOps
- Webhook
Event notifications are generally limited to a frequency of once every five minutes. For details, see Message Throttling in Sysdig Secure.
Available Policy Types
Select Policies > Runtime Policies > Add Policy to see the policy types you can create. The types available depend on your account, and some, such as the machine learning policies, are off until you enable them. Each policy type below states what it evaluates, what it needs to work, and which shared settings apply. For the settings every policy has, see Common Policy Settings.
To review the existing policies of a type, select Policies > Runtime Policies, then filter by Managed Type and Select policy type.
Linux Workload
| Definition language | Falco, evaluating system calls |
|---|---|
| Data source and requirements | Host Shield on Linux hosts and containers. |
| Scope | Custom Scope, Hosts Only, or Containers Only |
| Actions | Container Kill, Stop, Pause, Capture, Kill Process, Notify |
| Managed or custom | Managed policies provided out of the box, managed rulesets, and custom policies |
| Notifications | Notification channels |
| Recent changes | View recent changes |
Linux Workload policies evaluate each system call and can be configured to take immediate action. You can edit the managed ones, duplicate them to create a custom version, or create a new Linux Workload policy from scratch.
Sysdig provides a set of managed Linux Workload policies for out-of-the-box threat detection in dynamic environments:
- Sysdig Runtime Behavioral Analytics
- Sysdig Runtime Threat Detection
- Sysdig Runtime Threat Intelligence
- Sysdig Runtime Notable Events
- Sysdig Runtime Activity Logs
To create a Linux Workload policy, select Policies > Runtime Policies > Add Policy, then select Linux Workload. Configure it with the common policy settings, and choose the policy actions you want.
Runtime Behavioral Analytics
Runtime Behavioral Analytics (BA) is an exceptional type of Linux Workload policy. It correlates a sequence of actions to detect multi-stage attacks often missed by event-driven security.
These include:
- Reverse Shell: Scenarios where a staged binary spawns a shell and connects to an attacker’s machine.
- Process Injection (PTRACE): Attempts to inject code into a running process.
- Multi-Event Chains: Writes to a file after a container execution, and subsequent attempts to execute that file in the same session.
For optimal performance of all Runtime Behavioral Analytics features, use the latest version of Host Shield. Only Linux workload (syscall) events are eligible.
To review the Runtime Behavioral Analytics policy and the rules it enforces:
Log in to Sysdig Secure.
Select Policies > Runtime Policies.
Find Sysdig Runtime Behavioral Analytics.
You can use search and filters to locate it. For example:
- Managed type = Managed Policy
- Select policy type = Linux Workload
By default, it is scoped to Entire Infrastructure. Edit the policy to change the scope.
Select the policy to open the detail panel.
Here, you can see the policy type, description, scope, last update, rules, and more.
Select any rule from the rule list to expand its full logic and coverage.
Windows Workload
| Definition language | Falco |
|---|---|
| Data source and requirements | Host Shield on Windows workloads |
| Scope | Entire infrastructure; not editable |
| Actions | Notify only |
| Managed or custom | Managed only. You can't create new instances of the policy. |
| Notifications | Notification channels |
| Recent changes | View recent changes |
Whereas Linux Workload policies are designed for Linux, the Windows Workload policy is designed for workloads running on Windows. It uses Falco rules to evaluate system calls.
The Windows Workload policy comes pre-installed in Sysdig Secure and is maintained by Sysdig’s Threat Research Team. As it is a managed policy, you can’t create new instances of it. Falco rule exceptions are supported out of the box.
To enable or disable the policy, select Policies > Runtime Policies, select Windows Workload from the Select policy type drop-down, and use the toggle on the left.
To configure it, select the edit (pencil) icon on the policy listing, or select the policy to open the detail pane and then the edit icon. You can configure:
- Enabled: Use the toggle to enable or disable the managed policy.
- Link to Runbook: (Optional) A URL of a company procedure to follow for events from this policy. If you enter a value, a View Runbook option is displayed in any corresponding event.
- Policy Rules: Use the toggles to disable or enable individual rules. You can’t delete rules, or add rules to managed policies. Select a rule to open the detail panel, where you can select the edit icon to edit the rule.
- Notify: Select a notification channel to receive alerts when the policy generates an event.
Kubernetes Audit
| Definition language | Falco |
|---|---|
| Data source and requirements | Sysdig Agent version 11.0.0 or later, and Kubernetes audit logging. See Kubernetes Audit Logging. |
| Scope | Custom scope, for example by cluster or namespace |
| Actions | Notify only |
| Managed or custom | Managed and custom policies: managed policies from Sysdig, duplicate to a managed ruleset, or create a custom policy |
| Notifications | Notification channels |
| Recent changes | View recent changes |
Kubernetes Audit policies evaluate each Kubernetes audit log entry from your clusters.
To use them, enable Kubernetes audit logging. See Kubernetes Audit Logging.
AWS CloudTrail
| Definition language | Falco |
|---|---|
| Data source and requirements | A connected AWS cloud account, evaluated by the Sysdig Agentless detection engine |
| Scope | Custom scope expression on AWS attributes, such as account |
| Actions | Notify only |
| Managed or custom | Managed and custom policies: managed policies from Sysdig, duplicate to a managed ruleset, or create a custom policy. Sysdig AWS Behavioral Analytics is a managed ruleset only |
| Notifications | Notification channels |
| Recent changes | View recent changes |
AWS CloudTrail policies evaluate each AWS CloudTrail entry in Sysdig Cloud. They are used by the Sysdig Agentless detection engine. The category includes policies such as Sysdig AWS Threat Intelligence and Sysdig AWS Notable Events, which detect noteworthy occurrences such as a suspicious IP inbound request or a console login without multi-factor authentication (MFA).
Behavioral Analytics
Sysdig AWS Behavioral Analytics is a unique case under the AWS CloudTrail policy. Instead of triggering at single incidents, its rules detect both suspicious sequences of actions and unusual clusters of activities across various AWS services, such as Identity and Access Management (IAM), Elastic Compute Cloud (EC2) and Simple Storage Service (S3). This improves detection of sophisticated threats, such as privilege escalation attempts and reconnaissance activities.
You can turn rules for Sysdig AWS Behavioral Analytics on or off, and edit existing exceptions field values, but you cannot duplicate it to create custom policies, as you can with other managed and managed ruleset policies. This is because behavioral analytics is not based on the Falco rules engine.
To see behavioral analytics policies:
Log in to Sysdig Secure.
Select Policies > Runtime Policies.
Under the AWS CloudTrail policy, find the managed policy type Sysdig AWS Behavioral Analytics.
Select the policy to review its rules in detail.
To see behavioral analytics events:
Log in to Sysdig Secure.
Select Detection & Response > Threats.
Behavioral analytics events will show up in the event feed.
Stats and Sequence are the two types of behavioral analytics. Stats have a list of API names and a corresponding count of how often that API was hit in the time interval. Sequence events show the sequence of APIs that were hit to match the condition of the rule.
Behavioral Analytics events do not appear in the insights view.
Add Exceptions to Behavioral Analytics
Behavioral Analytics do not support custom exceptions, but you can add values to existing exceptions. Exception definitions are added by the Sysdig threat research team. To add values to exceptions:
Log in to Sysdig Secure.
Select Policies > Runtime Policies.
Under the AWS CloudTrail policy, select Sysdig AWS Behavioral Analytics.
The detail panel appears.
Select the pencil icon in the top right.
The editor appears.
Select a rule to which you want to add an exception.
The rule detail panel appears.
Select the pencil icon in the top right.
The rule page appears.
Select Open Exceptions Editor.
The exceptions modal appears.
Select the pencil icon on an exception to add values.
The exception comparator supports
regex,in,and=field matching.Behavioral analytics do not support Suggested Exceptions or auto tuning.
Fill in the exception values and click Apply.
AWS CloudTrail - CloudConnector
| Definition language | Falco |
|---|---|
| Data source and requirements | Legacy Agent-Based with CIEM |
| Scope | Custom scope expression on AWS attributes, such as account |
| Actions | Notify only |
| Managed or custom | Managed and custom policies: managed policies from Sysdig, duplicate to a managed ruleset, or create a custom policy |
| Notifications | Notification channels |
| Recent changes | View recent changes |
AWS CloudTrail - CloudConnector policies evaluate each AWS CloudTrail entry. They are used by Sysdig’s Legacy Agent-Based with CIEM feature.
AWS GuardDuty
| Definition language | Falco |
|---|---|
| Data source and requirements | A connected AWS cloud account with GuardDuty enabled |
| Produces | Events from GuardDuty findings |
| Scope | Custom scope expression on AWS attributes, such as account and region |
| Actions | Notify only |
| Managed or custom | Managed and custom policies: managed policies from Sysdig, duplicate to a managed ruleset, or create a custom policy |
| Notifications | Notification channels |
| Recent changes | View recent changes |
Sysdig ingests GuardDuty findings from connected AWS cloud accounts through Threat Detection. On managed policies you can configure notifications or exclude the services for which you don’t need GuardDuty findings. On custom policies you can also set the event severity, name, and description.
GuardDuty findings are only available when the connected AWS cloud account has GuardDuty enabled. To enable it, see Getting started with GuardDuty.
GCP Audit Log
| Definition language | Falco |
|---|---|
| Data source and requirements | A connected GCP project that sends audit logs to Sysdig |
| Scope | Custom scope expression on GCP attributes |
| Actions | Notify only |
| Managed or custom | Managed and custom policies: managed policies from Sysdig, duplicate to a managed ruleset, or create a custom policy |
| Notifications | Notification channels |
| Recent changes | View recent changes |
GCP Audit Log policies evaluate each GCP Audit Log entry.
Azure Platform Log
| Definition language | Falco |
|---|---|
| Data source and requirements | A connected Azure subscription that sends platform logs to Sysdig |
| Scope | Custom scope expression on Azure attributes |
| Actions | Notify only |
| Managed or custom | Managed and custom policies: managed policies from Sysdig, duplicate to a managed ruleset, or create a custom policy |
| Notifications | Notification channels |
| Recent changes | View recent changes |
Azure Platform Log policies evaluate each Azure Platform Log entry.
Microsoft Entra
| Definition language | Falco |
|---|---|
| Data source and requirements | A connected Microsoft Entra tenant |
| Scope | Custom scope expression, for example by tenant |
| Actions | Notify only |
| Managed or custom | Managed and custom policies: managed policies from Sysdig, duplicate to a managed ruleset, or create a custom policy |
| Notifications | Notification channels |
| Recent changes | View recent changes |
Microsoft Entra policies evaluate Microsoft Entra ID logs in Sysdig Cloud. They are powered by Falco.
Okta
| Definition language | Falco |
|---|---|
| Data source and requirements | A connected Okta organization |
| Scope | Custom scope expression on Okta attributes, such as organization |
| Actions | Notify only |
| Managed or custom | Managed and custom policies: managed policies from Sysdig, duplicate to a managed ruleset, or create a custom policy |
| Notifications | Notification channels |
| Recent changes | View recent changes |
Okta policies evaluate Okta logs in Sysdig Cloud.
GitHub
| Definition language | Falco |
|---|---|
| Data source and requirements | A connected GitHub organization |
| Scope | Custom scope expression on GitHub attributes, such as organization and repository |
| Actions | Notify only |
| Managed or custom | Managed and custom policies: managed policies from Sysdig, duplicate to a managed ruleset, or create a custom policy |
| Notifications | Notification channels |
| Recent changes | View recent changes |
GitHub policies evaluate GitHub logs in Sysdig Cloud.
Drift Detection
| Definition language | Not Falco. One pre-configured rule set, which you can't edit or extend. |
|---|---|
| Data source and requirements | Host Shield. See prerequisites. |
| Scope | Custom Scope |
| Actions | Prevent Execution, Container Kill, Stop, Pause, Capture, Notify |
| Managed or custom | Always custom |
| Notifications | Notification channels |
| Recent changes | Not applicable |
Drift is when an environment differs from the state checked into a version control system. This can occur in software that was introduced, updated, or upgraded into a live environment. The Drift Detection policy identifies newly created, downloaded, or modified binaries that were not part of a container image before it started running. With policy actions, you can prevent drifted binaries from executing, configure automatic notifications, and stop, pause or kill drifted containers.
Drift Detection applies to containers only and does not work on hosts.
This policy was formerly known as “Container Drift” and “Drift Control”.
Drift Detection helps you:
- Prevent attacks by blocking container drift in production: Drift Detection automatically flags and denies deviations from the original container, blocking malicious executables before damage is done.
- Enforce immutability best practice: Drift Detection ensures that container software is not modified during its lifetime, driving good practices, consistency from source to run, and preventing actions that could be part of an attack.
- Enable easy and effective security: Teams are often overwhelmed by cloud-native complexity and blind to container drift, especially at scale. Now, security teams and IT can enable Drift Detection for the entire container environment and immediately start protecting it.
The Drift Detection policy has the following unique attributes:
- It includes only one pre-configured rule, which cannot be edited, and no other rules can be added to Drift Detection policies.
- It is a custom policy, not a managed policy.
To create one, select Policies > Runtime Policies > + Add Policy, then select Drift Detection. Configure the common policy settings. Auto-tuning is not used with Drift policies. If you have too many false positives, use scope to tune them.
Drift Detection Prerequisites
- Kernel version 5.0 and above (see Prevent Execution of Drifted Binaries)
- Host Shield 14.0+ to enable Detect Volume Binaries without enabling Detect Binary Drift first.
Host Shield can be configured to ignore container actions or all actions:
ignore_container_action: Ignores kill, stop, pause container operationignore_action: Ignores all the actions including kill, prevent malware, prevent drift and container actions.
For more details, see Configure Drift Detection in Agent Configuration.
Drift Policy Rules
In the Policy Rules section, you can enable or disable the following rules:
Binary Drift: Toggle this on to dynamically detect the execution of drifted binaries.
- A drifted binary is any binary that was not part of the original image of the container. It is typically downloaded or compiled into a running container.
- If a detected binary attempts to run when this toggle is enabled, Sysdig will create an event.
- To prevent a detected drifted binary from running, use Prevent Execution.
Volume Drift: Toggle this on to treat all binaries from mounted volumes as drifted. This will generate events and prevent the binaries from being executed.
- Independent volume drift requires Host Shield 14.0+. On earlier versions, you must enable Binary Drift detection first in order to enable Volume Drift detection.
Block Prohibited Binary Execution: Toggle this on to block execution of detected drifted binaries. When toggled on, the Prohibited Binaries section appears in the Rules Configuration section. You must define at least one prohibited binary to enable this toggle.
Drift Rules Configuration
Define binaries with their full path, separated by commas, using string or regex (if enabled). Defining with string is very specific, while regex is pattern matching and more flexible.
Use Regex: Toggle this on to use regex (regular expression) when you configure exceptions.
- Regex allows you to create patterns for matching file names or process paths. For example,
.*\.log$matches any file ending with “.log”. You can use regex to identify drifted files or processes that should be allowed or blocked by matching their names or paths to the regex pattern defined. - To learn more about regex syntax, see Regular Expression Syntax.
File-based Exceptions
Exceptions: Specify which drifted files can execute within a container. If a file matches any condition in the Exceptions list, it will be allowed. Even if a file is prohibited, has been modified or added post-deployment, it can still be executed if it is listed as an exception. This is useful for scenarios where certain files need to be updated or added and executed as part of legitimate operations, such as configuration scripts or updates.
Prohibited Binaries: Specify which drifted files are not allowed to execute. Prohibited binaries will be prevented from executing unless they are listed as an Exception.
Process-based Exceptions
Exceptions: Specify which processes can execute drifted files. If a process matches any condition in the Exceptions list, it will be allowed. Specified processes can interact with modified or newly added files without triggering security alerts, facilitating legitimate operations that require such interactions. Use Exceptions sparingly to ensure that only necessary drifted processes are allowed.
Prohibited Binaries: Specify binaries of processes whose execution is blocked even if they are built with the image. Prohibited binaries will be prevented from executing unless they are listed as an Exception.
If a file or process matches an entry in both the Exceptions and Prohibited Binaries lists, the Exception will take precedence. This means the file or process will be allowed to execute even if it is also listed as prohibited. Once something is explicitly added to the Exceptions list, it overrides any detection or prohibition rules.
The Prohibited Binaries option was formerly called always deny.
Prevent Execution of Drifted Binaries
Prevent Execution: Toggle this to stop detected executables from running.
Depending on the kernel version, Host Shield will either:
Kill the process once it is detected as drifted (kernel version <5.0)
Prevent drifted processes from running (kernel version 5.0+)
The latter method is preferable because it stops the drifted process from running for any period. Host Shield determines which mode to use at startup. One of the above-mentioned types of prevention is always available with 12.15+ agents. For example, Bottlerocket prevents by using the kill action.
Drift Detection also supports container actions, capture, and notifications. Serverless ECS on Fargate doesn’t support container actions for this policy type.
Check Drift Events
When the policy is enabled, you can check for any detected events:
Log in to Sysdig Secure and select Events.
Type
Driftin the filter bar to find where the Drift policy was triggered and drill down to examine the event details.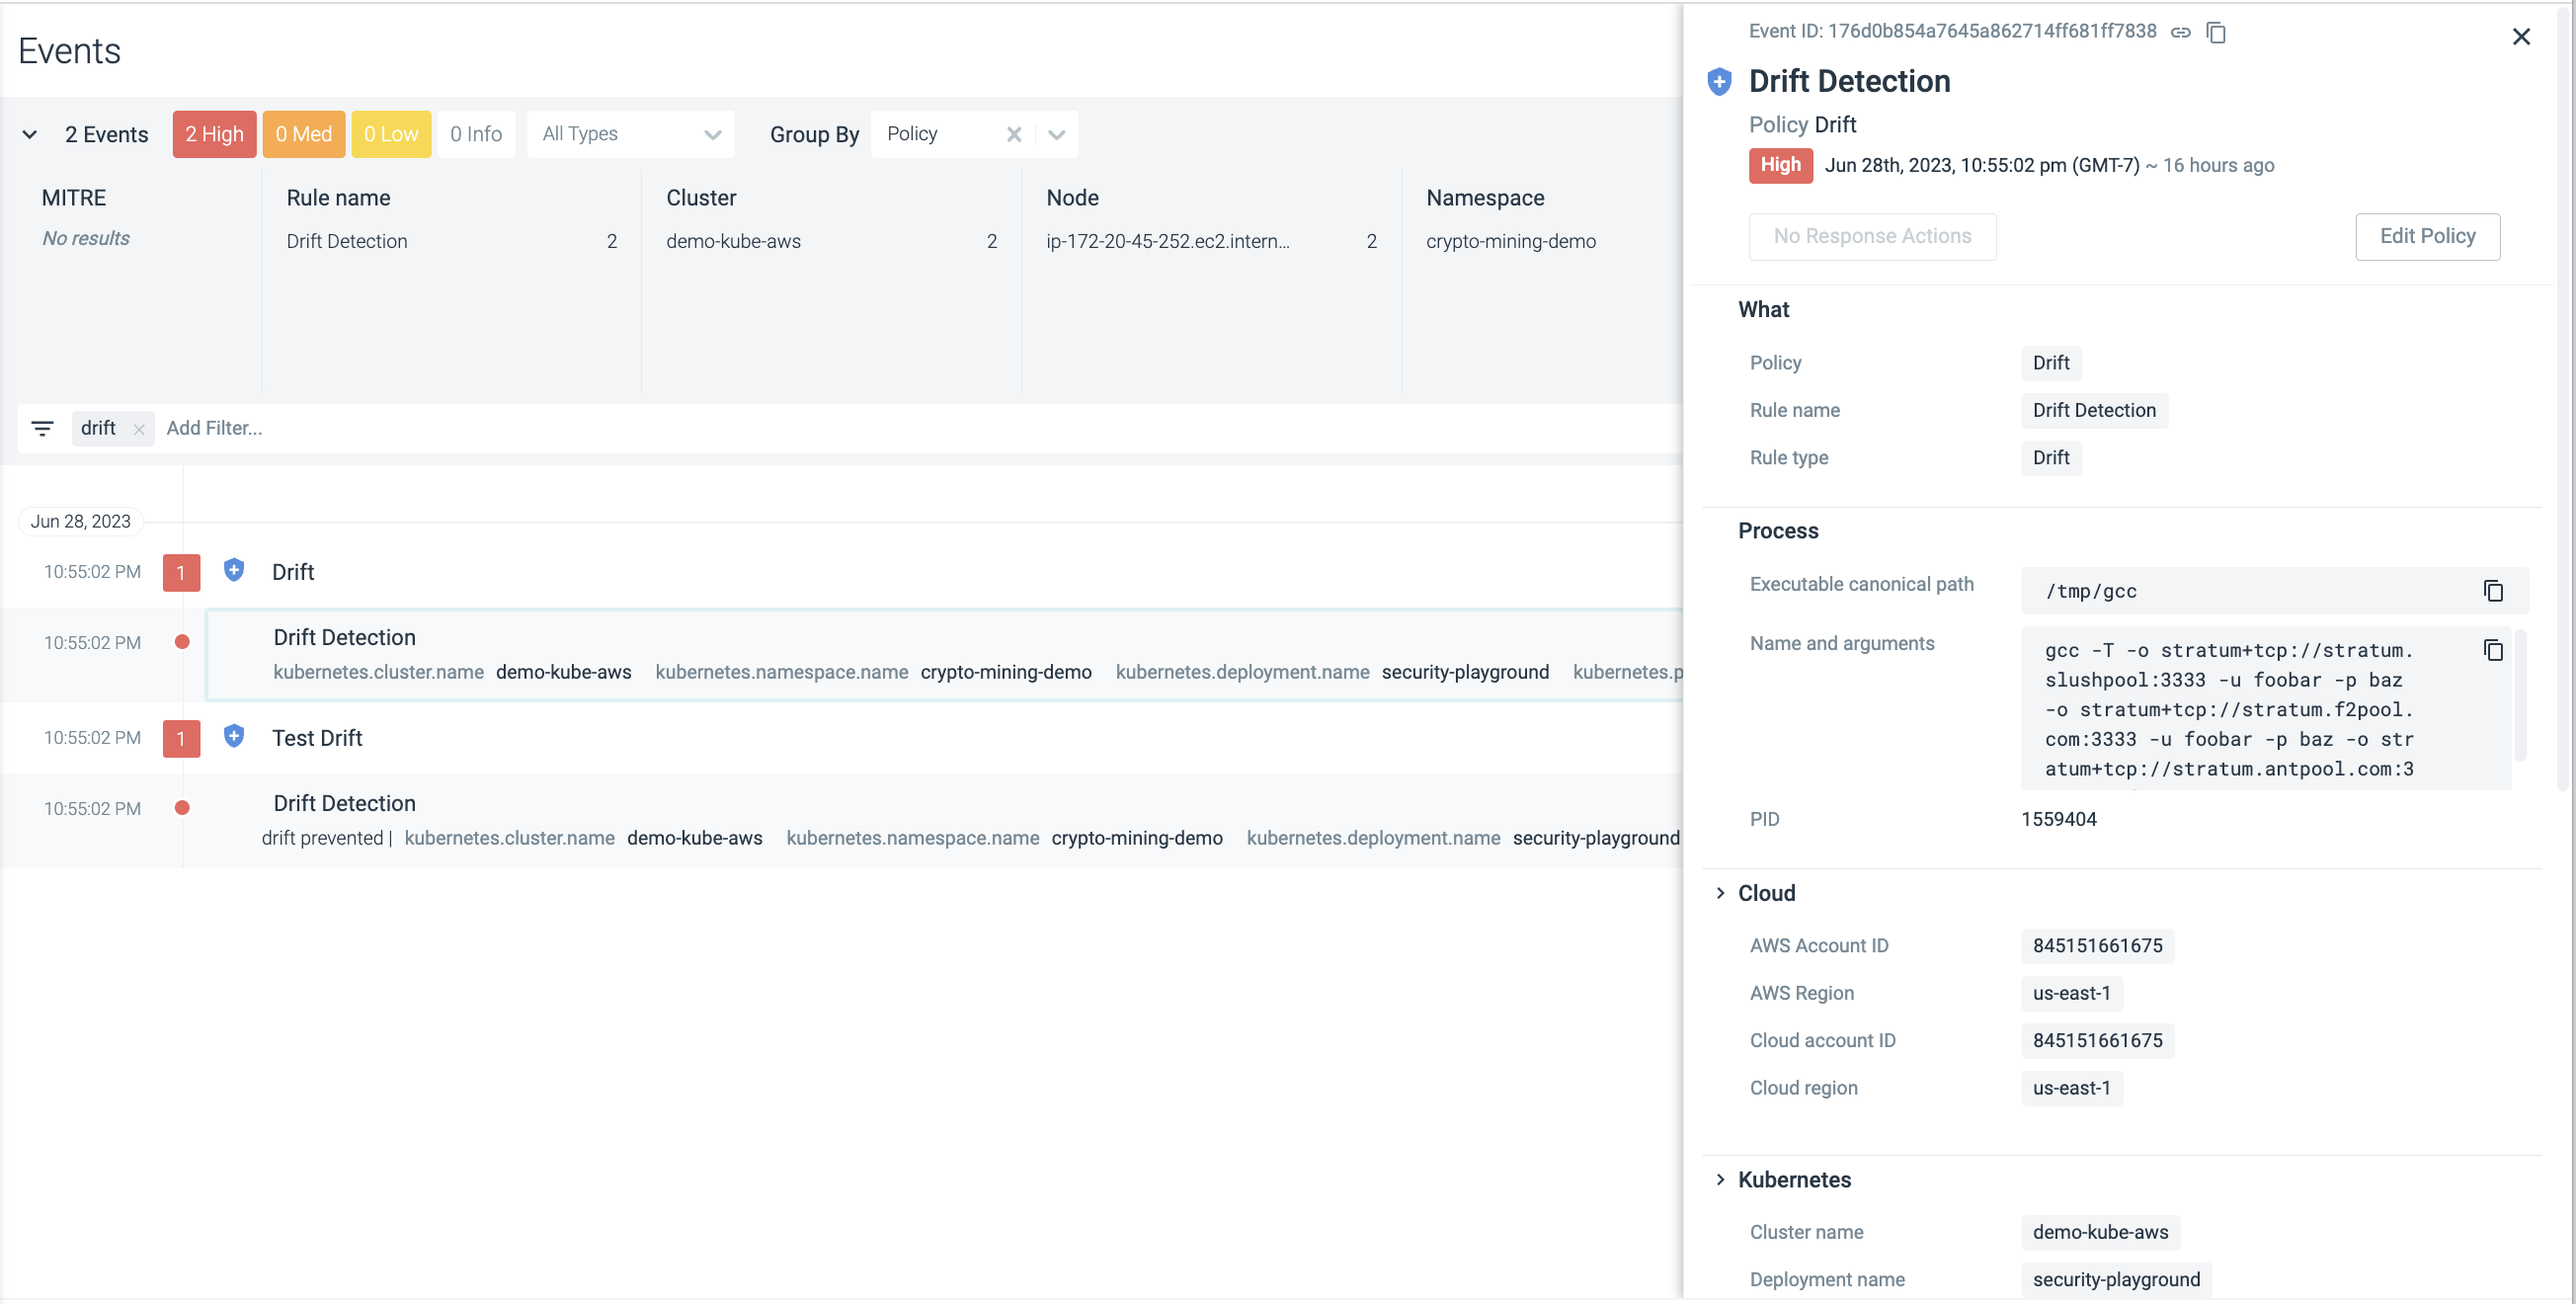
Drift Detection Limitations
There are certain conditions that the Drift Detection policy will not catch.
Script Execution using Binaries from the Base Image
Drift detections tracks the execution of binaries that were not part of the original image. It does not cover cases where a script is executed leveraging binaries from the original image. For example, if an attacker downloads a Python script and leverages an existing Python binary from the base image, drift detection will not detect it at runtime.
Persistent Volumes
As the Drift Detection policy uses overlays for detection, execution from persistent volumes is not considered “drifted.” Therefore, if a malicious binary is downloaded to a persistent volume and executed, it will not be caught.
Suppose you are using persistent volumes exclusively for data. In that case, you can set the following option in the Host Shield configuration file to treat the execution of all binaries from persistent volumes as drifted:
drift_deny_execution_from_volumes: true
Use with caution. When this option is used with the Prevent action, the execution of any binary from any mounted volumes will be stopped.
Container Limits
For kernel versions below v5.13, Drift Detection can monitor up to 128 containers per node.
For kernel versions v5.13 or above, you can modify the container limit as described in Configure Container Limits.
Malware
| Definition language | Not Falco. Known hashes, YARA rules, and your own hashes. |
|---|---|
| Data source and requirements | Kernel 5.x+ and Host Shield on hosts and Kubernetes, or Serverless Agent 6.2.0+ on ECS Fargate. See prerequisites. |
| Scope | Custom Scope, Hosts Only, or Containers Only |
| Actions | Prevent Execution, Container Kill, Stop, Pause, Capture, Notify |
| Managed or custom | Custom policy you create |
| Notifications | Notification channels |
| Recent changes | Not applicable |
When a Malware Control policy is created, depending on the options selected, Host Shield can use a managed database to monitor executions in a container or on the node for any malware. When a malicious binary is detected, Host Shield generates an event and can optionally block the execution from starting.
Malware Prerequisites
- For hosts and Kubernetes:
- Kernel 5.x+
- Host Shield
- For ECS Fargate:
- Serverless Agent 6.2.0+
Malware Control, also called Malware Detection and Prevention, is enabled by default on Kubernetes and hosts. You can optionally configure the dragent.yaml file to disable Malware Control globally, or to enable it for the underlying host node. For agent configuration options, see Configure Malware Control.
Malware Detection is disabled by default in Serverless Container. See the dedicated documentation to learn how to enable it.
To create a Malware policy, select Policies > Runtime Policies > +Add Policy, then select Malware. Configure the common policy settings and the options below, then click Save.
Detect Malware
Malware detection coverage map:
| Platform | Malware Detection |
|---|---|
| Kubernetes - Linux | ✅ |
| Kubernetes - Windows | ❌ |
| Hosts - Linux Containers | ✅ |
| Hosts - Linux Packages | ✅ |
| Hosts - Windows | ❌ |
| Hosts - ECS on EC2 | ❌ |
| Serverless - Azure Container Apps | ❌ |
| Serverless - Cloud Run Service | ❌ |
| Serverless - ECS on Fargate | ✅ |
Additional hashes: (Optional) Enter hashes of binaries in a SHA-256 format to have them evaluated by the policy. Comma-separate your entries.
Use known hashes: Sysdig maintains a list of known hashes which it checks against the executing binary. This option is enabled by default.
Use YARA rules: Toggle to enable or disable detection with YARA rules provided by Sysdig’s Threat Research Teams. YARA rules help to classify and identify malware samples by creating descriptions of malware families based on textual or binary patterns. Some malware add random bytes to the generated binary to generate unique hashes. This allows them to bypass detection based on hash-matching. YARA rules can detect such malware by inspecting the binary for known sequence of bytes. Detection with YARA rules is enabled by default.
Malware Exceptions
Hash exceptions: (Optional) Enter hashes in a SHA-256 format for which you do not want the policy to trigger an event. Comma-separate your entries.
File-Based Exceptions
File-based exceptions exclude specific files or file paths from malware scanning, helping reduce false positives and optimize scanning performance.
Use Regex for exceptions: Toggle to enable or disable pattern matching using regular expressions. When disabled, the system uses exact string matching for file paths.
- Regex allows you to create patterns for matching file names or process paths. For example,
.*\.log$matches any file ending with “.log”. - To learn more about regex syntax, see Regular Expression Syntax.
Exceptions: Enter complete file paths that should be excluded from malware scanning. For example: /usr/bin/test, /usr/local/scan, /opt/trusted/*. Multiple paths can be specified using comma separation.
Best practices include:
- Use specific paths rather than broad patterns to maintain security.
- Document all exceptions for audit purposes.
- Regularly review excluded paths to ensure they remain necessary.
Prevent Execution of Malware
Enable the Prevent toggle to have Sysdig Secure prevent the execution of detected binaries. This option is disabled by default. When Prevent is disabled, malware detection triggers an event at any configured notifications.
Malware policies also support container actions (ECS on Fargate supports Kill only), capture, and notifications.
File Integrity Monitoring (FIM)
| Definition language | Not Falco. Two rules, Modification and Deletion. |
|---|---|
| Data source and requirements | Host Shield 14.3+ with FIM enabled, and the Universal eBPF probe. See prerequisites. |
| Scope | Custom Scope, Hosts Only, or Containers Only |
| Actions | Notify only |
| Managed or custom | Custom policy you create |
| Notifications | Notification channels |
| Recent changes | Not applicable |
When a File Integrity Monitoring (FIM) policy is created, depending on the options selected, Sysdig Host Shield monitors the files contained in the specified directories for changes.
FIM Prerequisites
- Universal eBPF probe enabled. See more in the dedicated page.
- Host Shield 14.3+
To enable the feature, customize your Sysdig Shield setup by setting features.detections.file_integrity_monitoring=true. For additional installation instructions, see:
To create a FIM policy, select Policies > Runtime Policies > +Add Policy, then select FIM. Configure the common policy settings and the rules below, then click Save.
FIM Rules
Turn on one or both rules, to detect different operations performed on files:
Modification: Triggers when a file content is modified. This doesn’t trigger upon file creation.
Deletion: Triggers when a file is removed.
FIM Rules Configuration
Use Regex: If this is enabled, you can use Google RE2-compatible regular expressions when specifying the monitored and excluded directory paths. This will significantly increase the usage of CPU.
Monitored Directories: A comma-separated list of folders to be monitored for changes. The files existing in these folders at policy loading will trigger detections. For symlinks, the actual path is to be considered here. The longer the list, the higher the amount of resources used.
Excluded Directories: A comma-separated list of folders to be excluded from monitoring. These are absolute paths of subfolders of any of the list above.
Workload ML
| Definition language | Not Falco. Machine learning detection. |
|---|---|
| Data source and requirements | Host Shield on Linux workloads. Unavailable if your organization opted out of data collection. |
| Produces | Events, with the factors that make the activity anomalous |
| Scope | Custom Scope |
| Actions | Notify only |
| Managed or custom | Always custom |
| Notifications | Notification channels |
| Recent changes | Not applicable |
The Workload ML (machine learning) policy provides a second layer of defense to complete the deep and exact coverage that Falco provides, with a broader statistics-based approach.
- Machine learning collects low-level activities from your Linux workloads, aggregating them over time and applying algorithms.
- With machine learning policies, you can configure the detections you want to use and their thresholds.
- Machine learning detection algorithms estimate the probability that those activities are related to the detection subjects, such as miners. The Sysdig Workload ML detections don’t rely on mere program names or executable checksums matching. Instead, they are based on runtime behaviors.
To create one, select Policies > Runtime Policies > +Add Policy, then select Workload ML. Configure the common policy settings, then choose the detection:
Crypto Mining Detection: The supported detection type.
Confidence Level Enablement: Fine-tune the policy to choose at which certainty level the detection should trigger an event.
Severity is defined at detection level, so that you can have a different severity for each detection type.
AWS ML
| Definition language | Not Falco. Machine learning detection. |
|---|---|
| Data source and requirements | A connected AWS cloud account sending CloudTrail logs. Unavailable if your organization opted out of data collection. |
| Produces | Events, with the factors that make the activity anomalous |
| Scope | Custom scope expression on AWS attributes |
| Actions | Notify only |
| Managed or custom | Always custom |
| Notifications | Notification channels |
| Recent changes | Not applicable |
The AWS ML policy detects anomalous AWS Console login events in connected AWS cloud accounts. It is available by default in the main policies menu for all Sysdig Secure SaaS users.
This policy:
Extends machine learning to AWS cloud accounts to monitor whether AWS console logins follow irregular patterns and notify users about suspicious activity.
Quickly detects AWS log-ons from odd locations or different areas of the globe, as well as from unexpected browsers or OSes.
Enables advanced machine learning detection capabilities based on CloudTrail logs.
Allows users to understand why an event is considered anomalous compared to the expected behavior. Specifically, the policy provides the following info:
- Description: What the anomaly is about
- Influential Factors: Variables contributing most to the anomaly
- Confidence Level: Probability measure of detection accuracy
To create one, select Policies > Runtime Policies > +Add Policy, then select AWS ML. Configure the common policy settings, then set the detection:
Anomalous Console Login: Toggle on or off and select the confidence level at which the policy should be triggered: Default, Higher, or Highest.
- Default: This is the value at which the model is tested by Sysdig’s Threat Research Team.
- Higher and Highest: The higher the value chosen, the lower the chance of false positives, but the higher the chance of false negatives (that is, missed anomalous behaviors).
Okta ML
| Definition language | Not Falco. Machine learning detection. |
|---|---|
| Data source and requirements | Okta integration, and Customer Data Analytics collection enabled |
| Produces | Events, with the factors that make the activity anomalous |
| Scope | Custom scope expression on Okta attributes |
| Actions | Notify only |
| Managed or custom | Always custom |
| Notifications | Notification channels |
| Recent changes | Not applicable |
The Okta ML policy detects anomalous Okta login events in connected Okta accounts.
This policy:
- Leverages machine learning to continuously monitor your cloud environment for unusual login activities, and notifies you when they happen.
- Detects and alerts you of anomalies in your Okta logs.
- Extends the functionality of Falco rules, providing a second layer of defense.
Okta must be integrated into Sysdig Secure. See Okta Integration. Customer Data Analytics collection must also be enabled under Privacy Settings. See Privacy Settings.
To create one, select Policies > Runtime Policies > +Add Policy, then select Okta ML. Configure the common policy settings, then set the detection:
Anomalous Login: Toggle on or off and select the confidence level at which the policy should be triggered: Default, Higher, or Highest.
- Default: This is the value at which the model is tested by Sysdig’s Threat Research Team.
- Higher and Highest: The higher the value chosen, the lower the chance of false positives, but the higher the chance of false negatives (that is, missed anomalous behaviors).
View Recent Changes
Applies to: policy types that use Falco rules, such as Linux Workload, Windows Workload, Kubernetes Audit, and the cloud and identity policies. It doesn’t apply to Drift, Malware, FIM, machine learning, or Behavioral Analytics policies. Managed policies change when Sysdig updates their rules.
When rules are changed, either by the Sysdig Threat Detection team or by users, an Updated badge is displayed next to relevant policies for seven days.
There are several ways to view recent changes to a rule.
From Runtime Policies
Go to Policies > Runtime Policies and scroll down to find any Updated badges.
Select the policy to open the detail panel. In Policy Rules, the Updates column shows the rules that were updated.
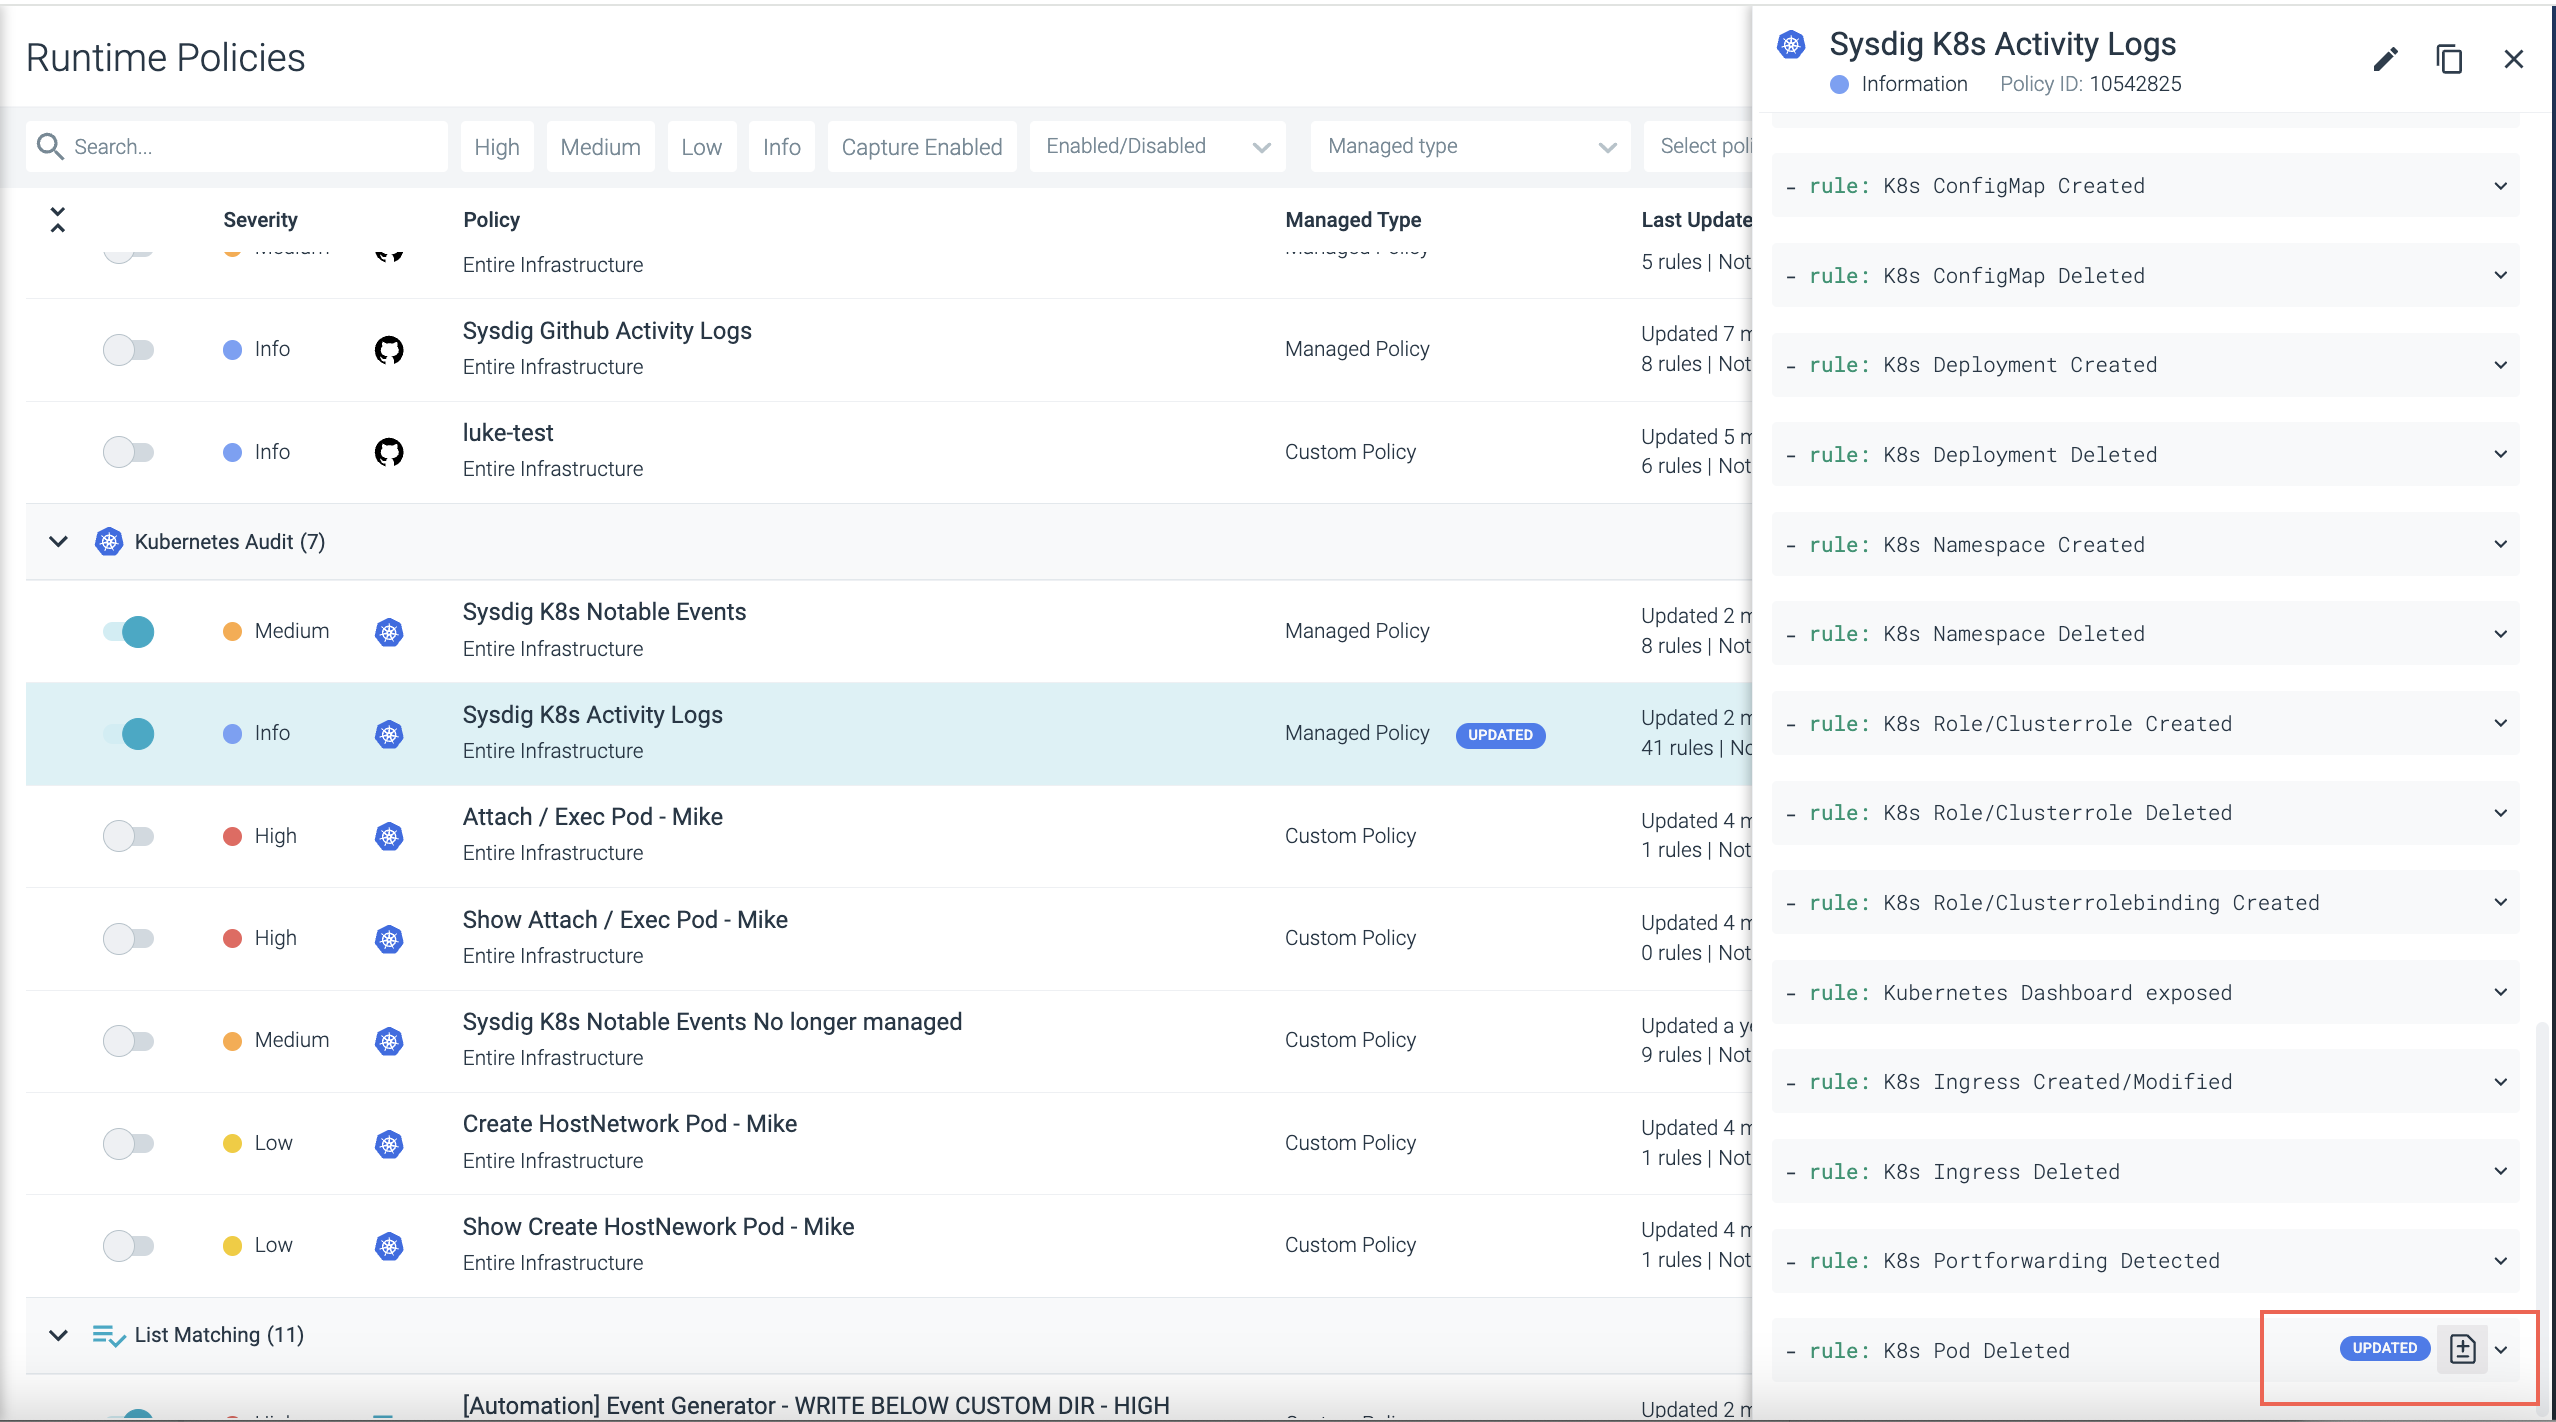
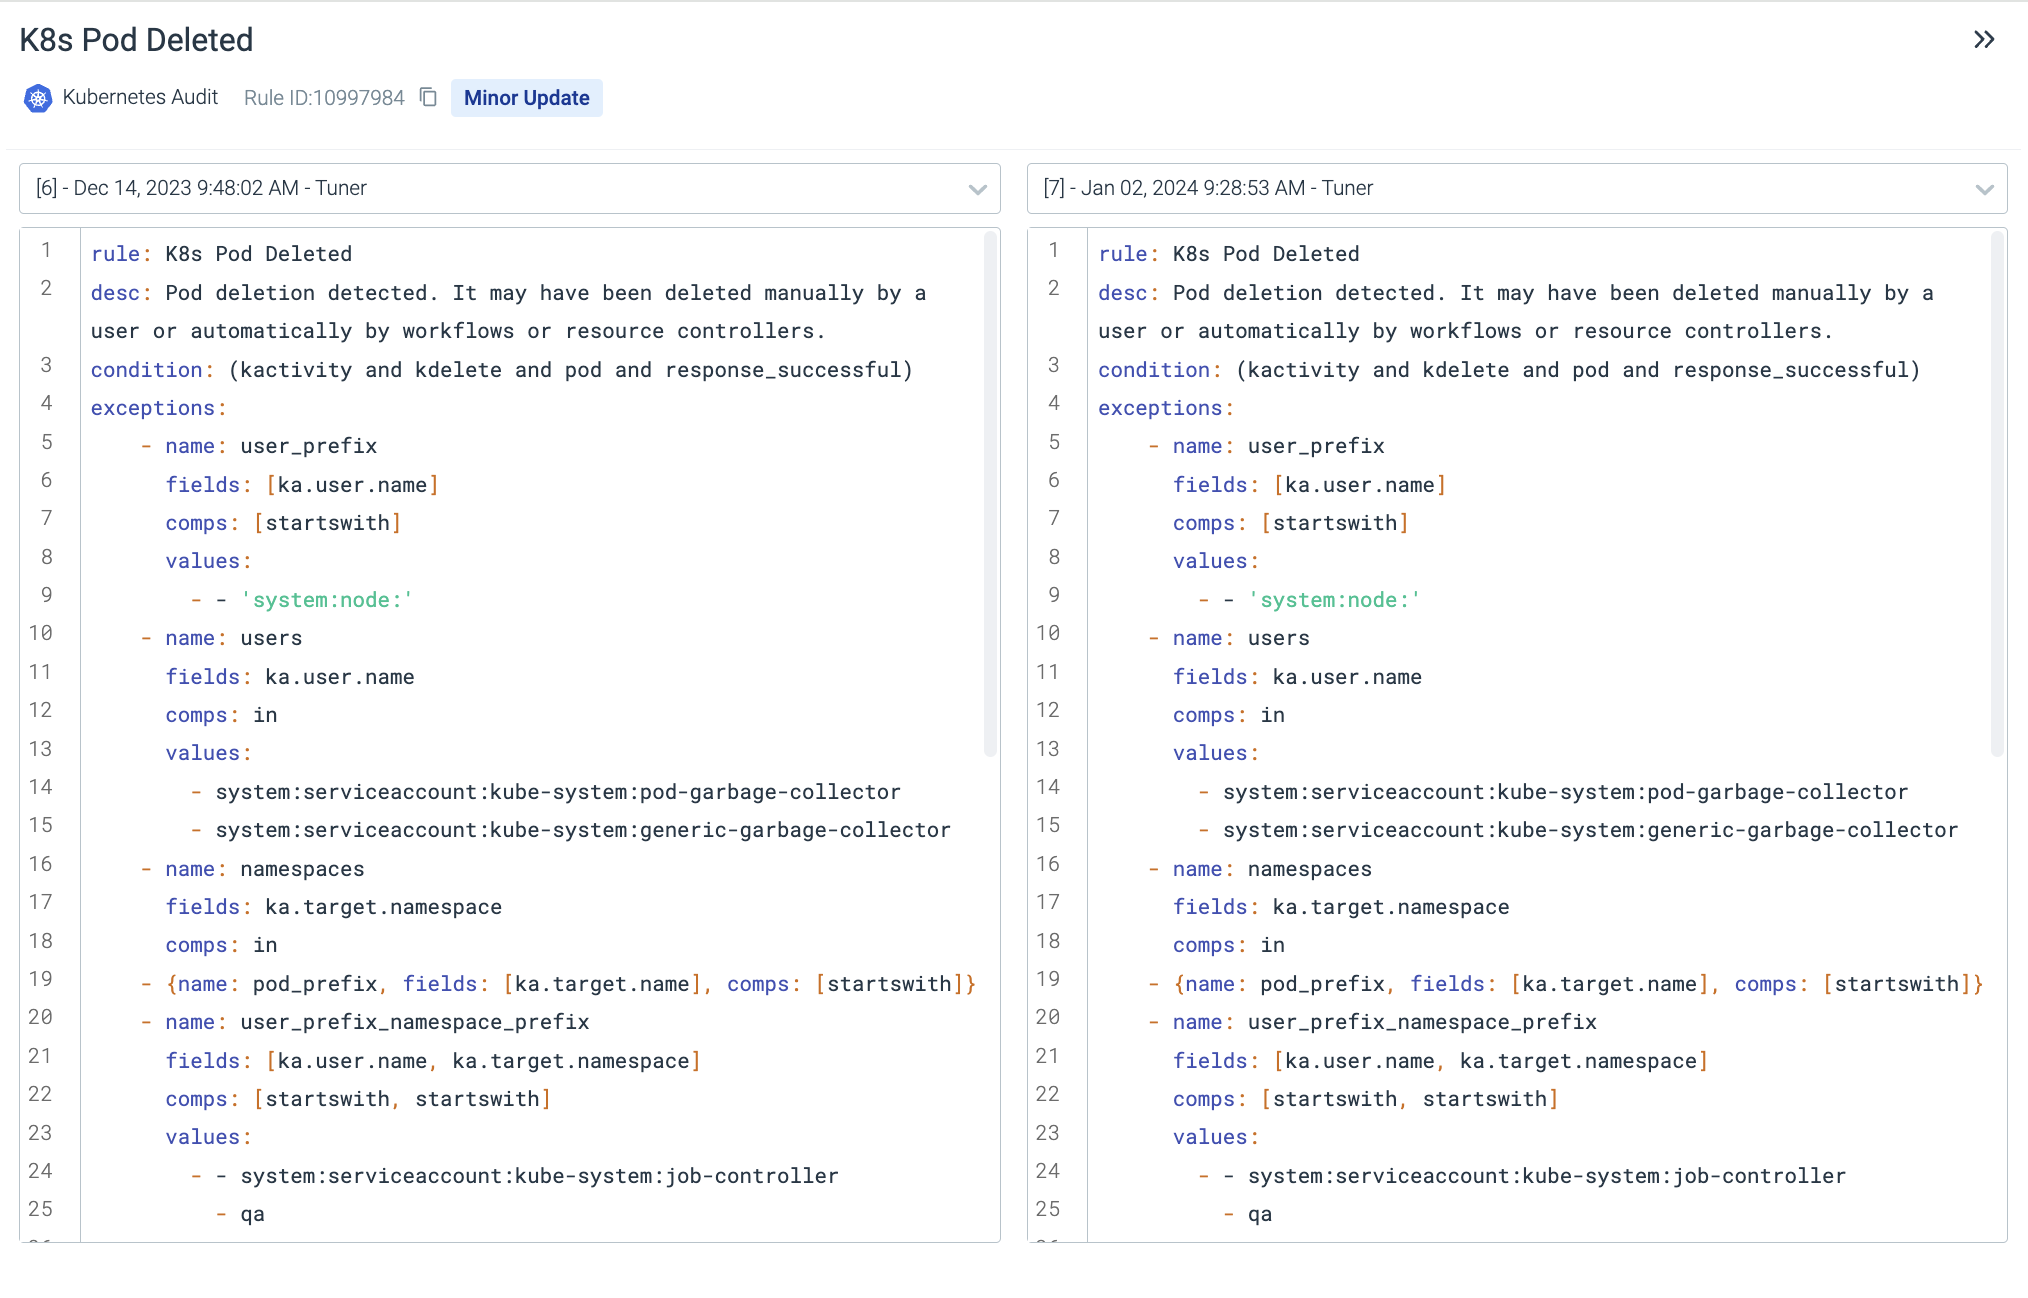
Select an updated rule to open its details, then select View as Diff, the button with the +/- icon, to compare the two versions of the rule.
From the Policy Edit Page
Go to Policies > Runtime Policies and select a policy.
Select Edit to open the Policy Edit page.
In Policy Rules, find the rules with an Updated badge.
Select the View Rule Diff button, with the +/- icon, next to the badge of the rule to compare the two versions of the rule.
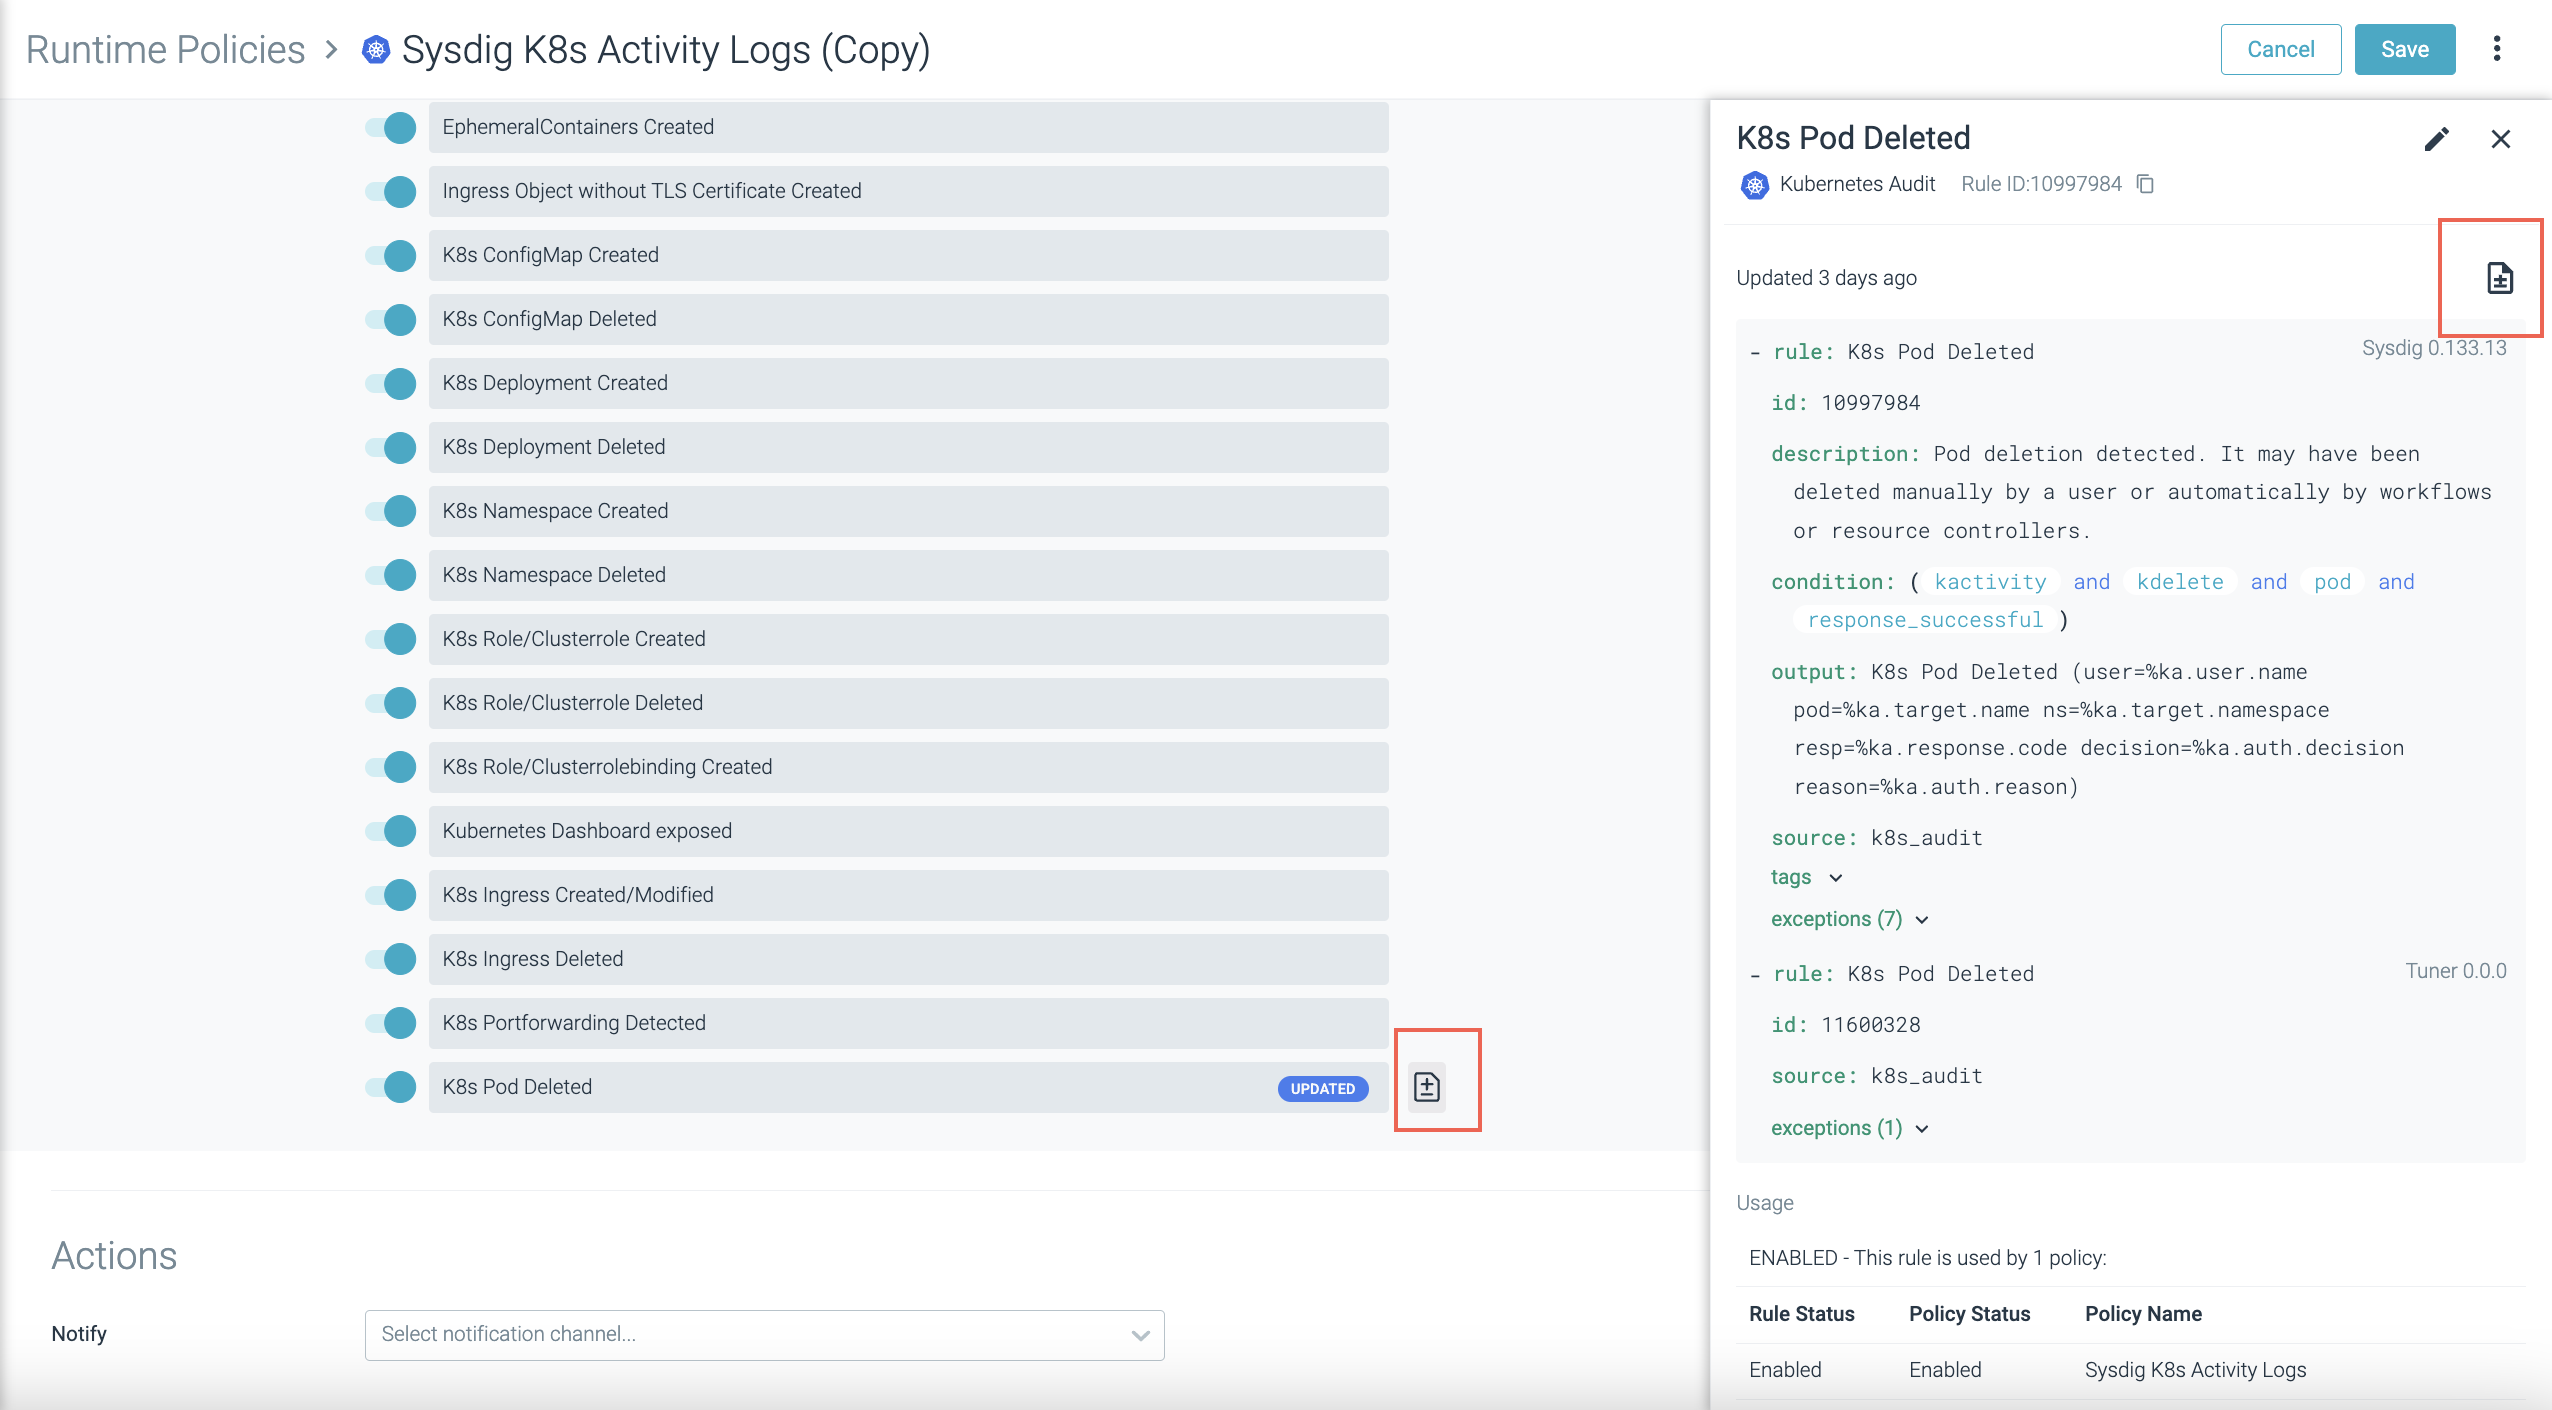
See View Recent Changes to a Rule from the Rules Library.
Severity in the API
When you create a policy in the UI, you define the severity as Info, Low, Medium, or High. From an API perspective these are mapped to a number from 0 to 7. When an event is triggered, the corresponding number to the severity is displayed:
| Number | Severity |
|---|---|
| 0 | High (UI Default) |
| 1 | High |
| 2 | High |
| 3 | High |
| 4 | Medium (UI Default) |
| 5 | Low (UI Default) |
| 6 | Info |
| 7 | Info (UI Default) |
