Runtime
This document applies only to the Vulnerability Management engine, released April 20, 2022. See Which Scanning Engine to Use for more information.
Runtime Scanning
Although shifting vulnerability management to the earliest phases (such as integrating with CI/CD) is essential, runtime vulnerability management remains important:
- Strong defense: Runtime VM provides an additional layer of defense to your arsenal.
- Up-to-date: New vulnerabilities are discovered every day; new discoveries need to be checked against your running images.
- Prioritized feedback: The In Use spotlight lets you hone in on the most important vulnerabilities discovered within your running images so you can efficiently prioritize and act.
Sysdig runtime scanner will:
- Automatically observe and report on all the Runtime workloads, keeping a close-to-real time view of images and workloads executing on the different Kubernetes scopes of your infrastructure.
- Perform periodic re-scans, guaranteeing that the vulnerabilities associated with the Runtime workloads and images are up-to-date with the latest vulnerabilities feed databases. It will automatically match a newly reported vulnerability to your runtime workloads without requiring any additional user interaction.
Understanding the Runtime Workload and Labels
Runtime entities are associated using the concept of workload, defined by:
A unique Image ID
A set of labels describing the runtime context (Kubernetes in this case)
These workload labels are in the order: cluster > namespace > type > container
- Kubernetes cluster name, demo-kube-eks in the example above
- Kubernetes namespace name, example-voting-app above
- Kubernetes workload type, deployment (or daemonset, etc.)
- Kubernetes container name, sysdiglabs/example-voting-app-result:metrics-3 above
This means:
- Several replicas of the same deployment are considered the same workload (single entry on the table), as the images are identical and the runtime context is the same.
- An identical image deployed on two different Kubernetes clusters will be considered two different workloads, as the runtime context is different.
Runtime Policies
Policies let you define a set of rules that will evaluate each workload. After the evaluation, each policy will pass or fail. A policy failure or non-compliance happens if the scan result doesn’t meet all the rules in a policy.
Runtime policies contain a runtime scope filter, so it only applies workloads in that scope, or Entire infrastructure, which will apply globally.
NOTE: If you have enabled host scanning, then you can assign runtime policies to container image workloads, hosts, or the entire infrastructure.
Learn more about Vulnerability Management policies, the available rules, and how to define policies in Vulnerability Policies
Review Runtime Scan Results Overview
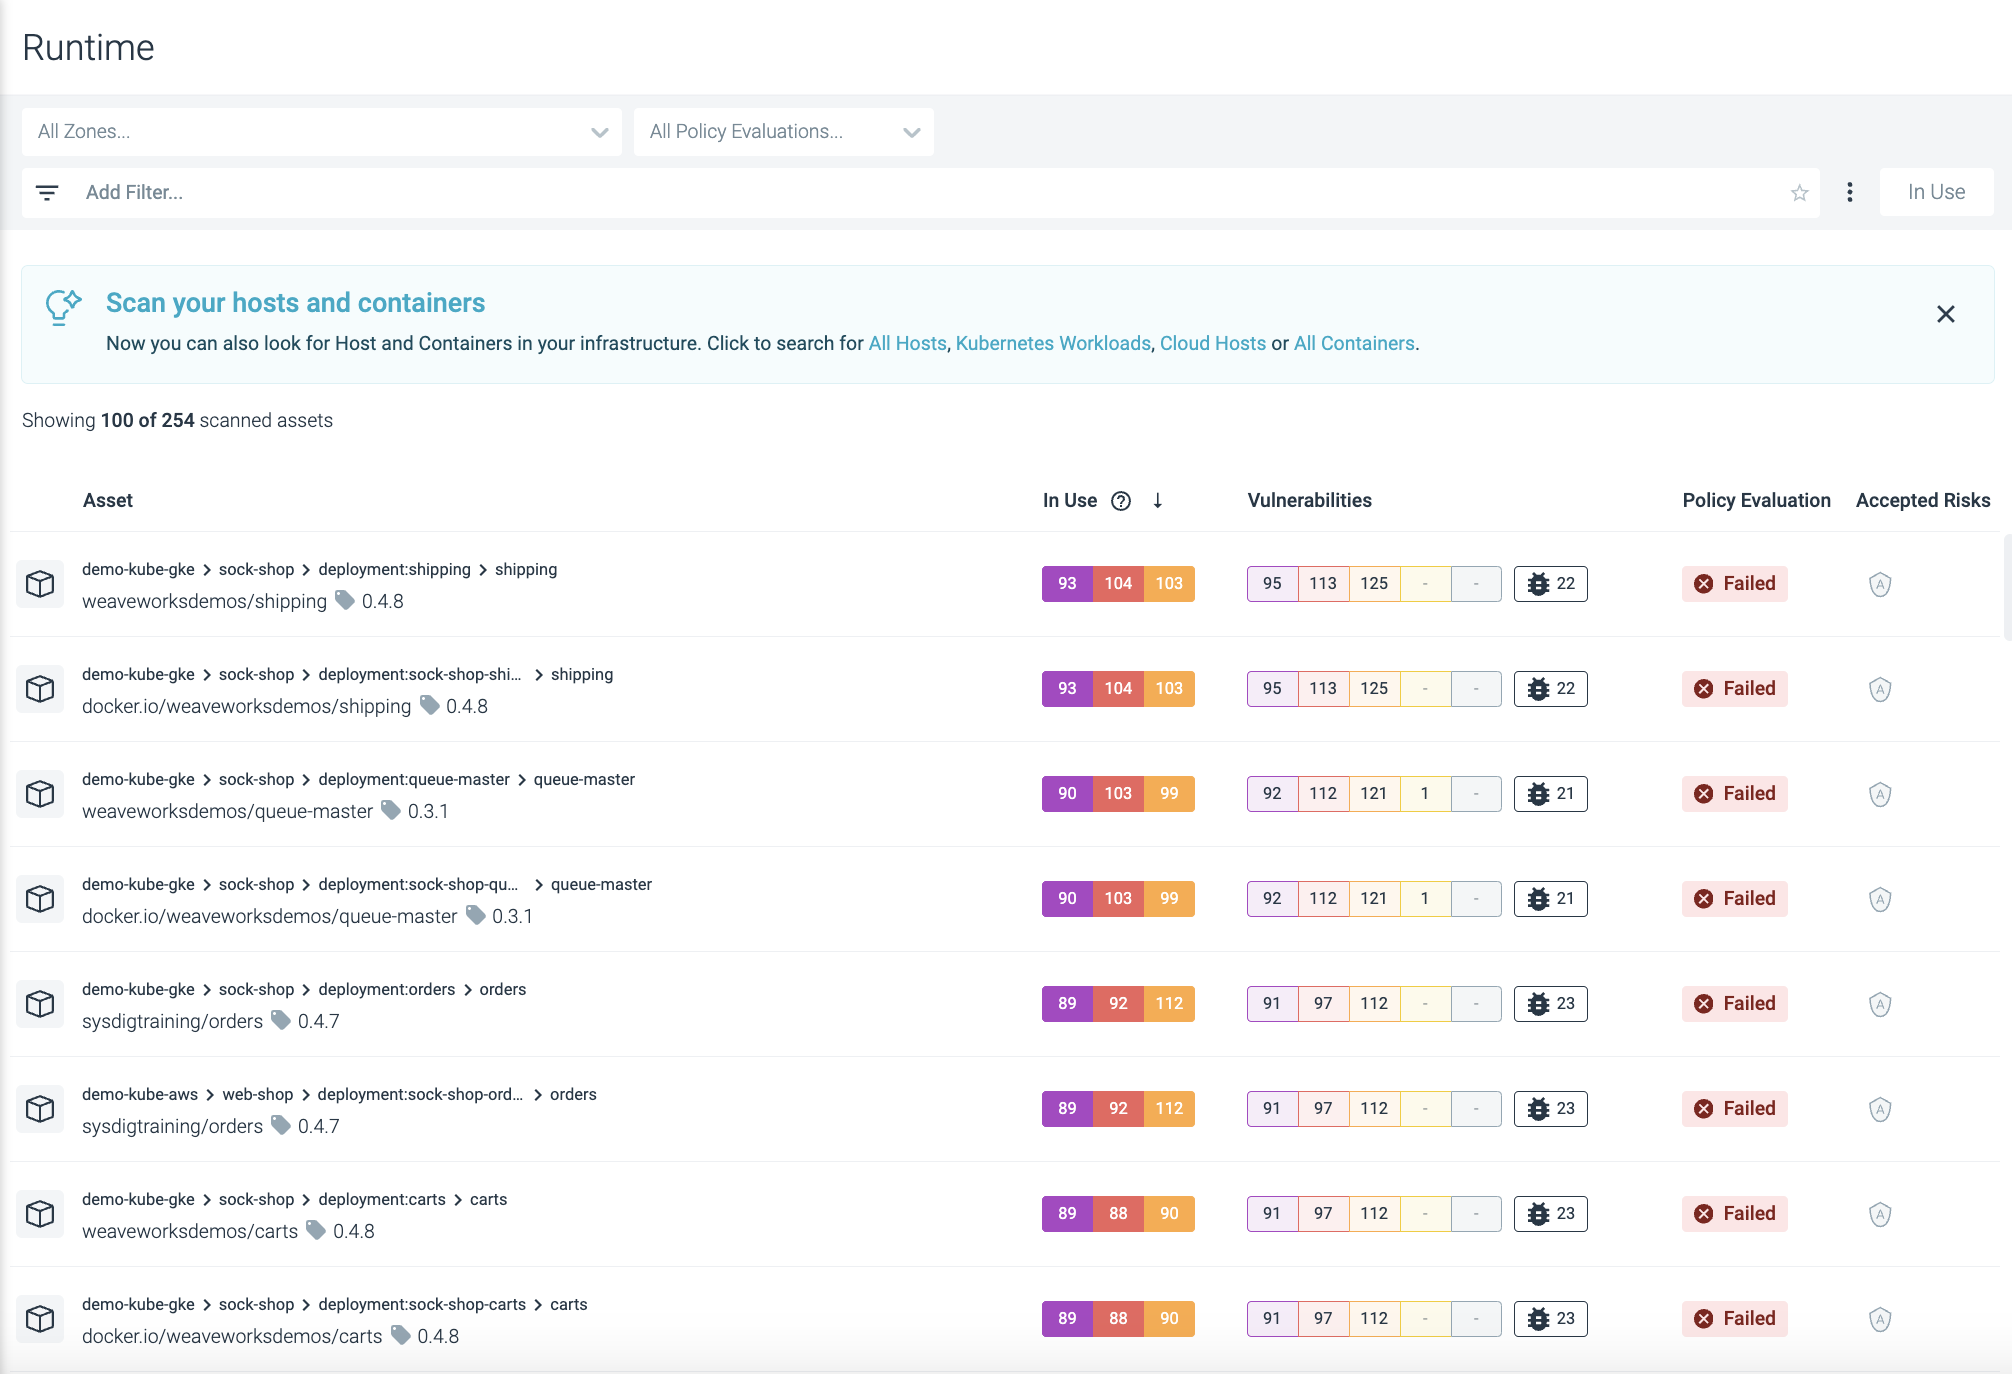
Navigate to Vulnerabilities > Runtime.
By default, the entire infrastructure results are shown.
Results are ranked by:
- Number of actual exploits
- Severity of vulnerabilities
- Number of vulnerabilities
Find and remediate the priority issues discovered, by:
Recommendations
Checking what’s In Use
See Understanding the In Use Column for details.
Drilling down to image details
Filtering results
Accepting risks/ revoking acceptances
Drill into Scan Result Details
Select a workload from the Runtime results list
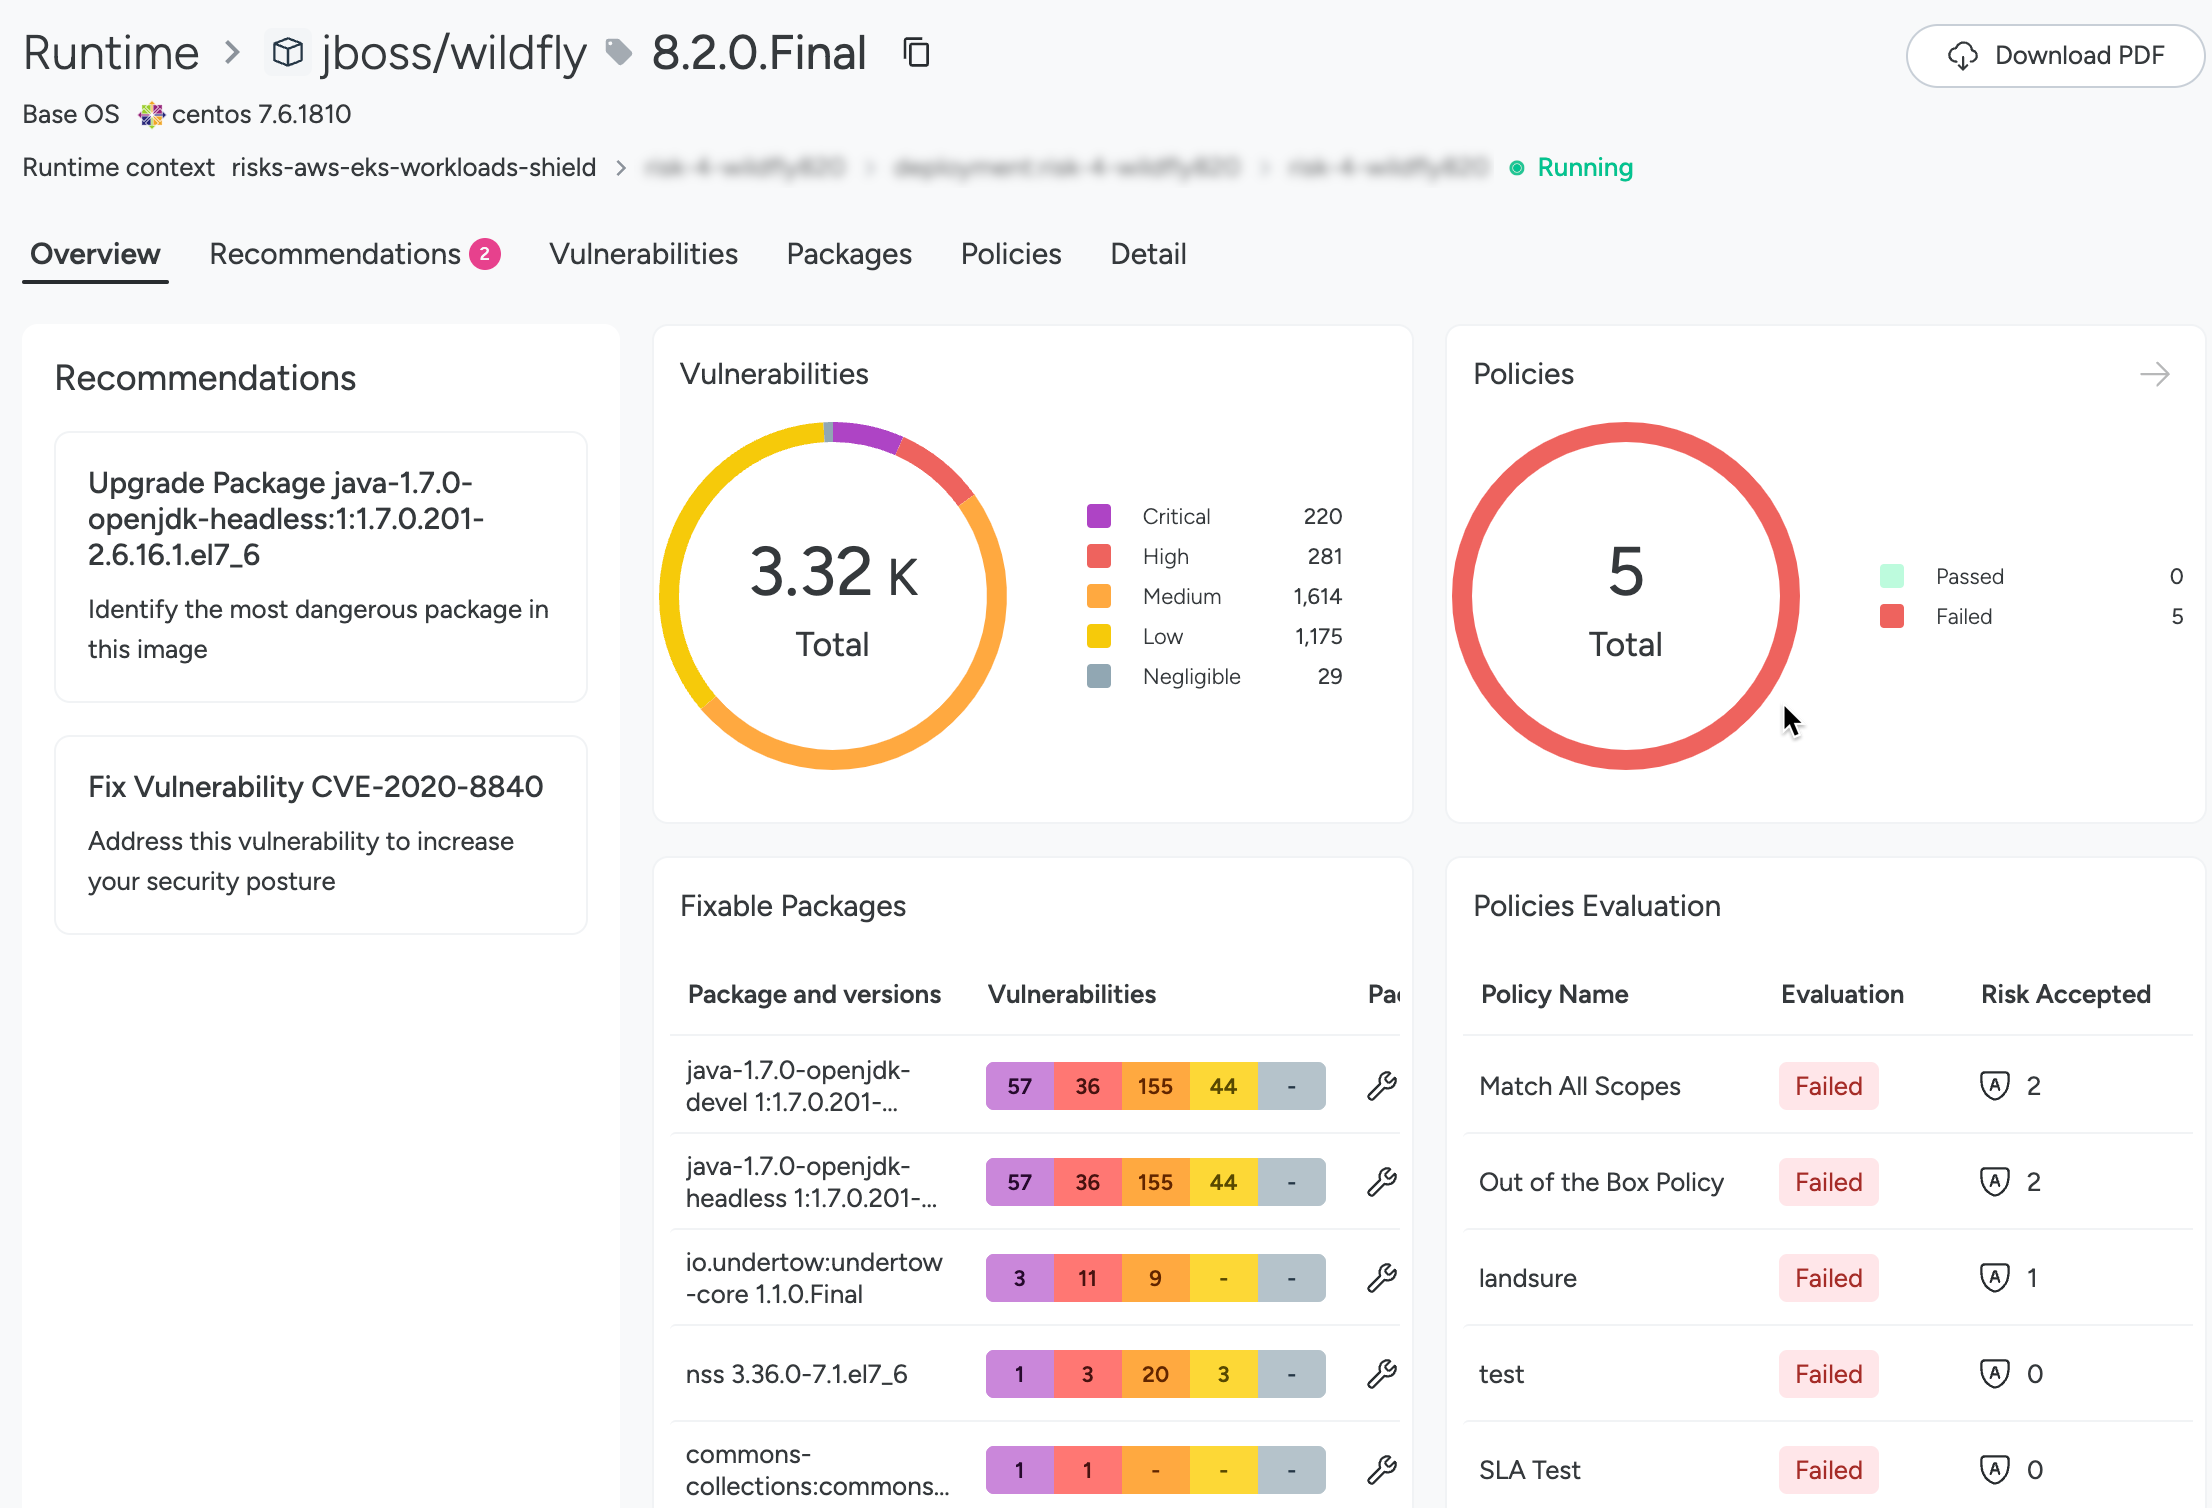
Overview Tab
Focuses on the recommendations, preview into total number of vulnerabilities, and passed and failed policies, policy evaluation, and fixable packages in the selected image.
Clickable cells lead into the Vulnerabilities list.
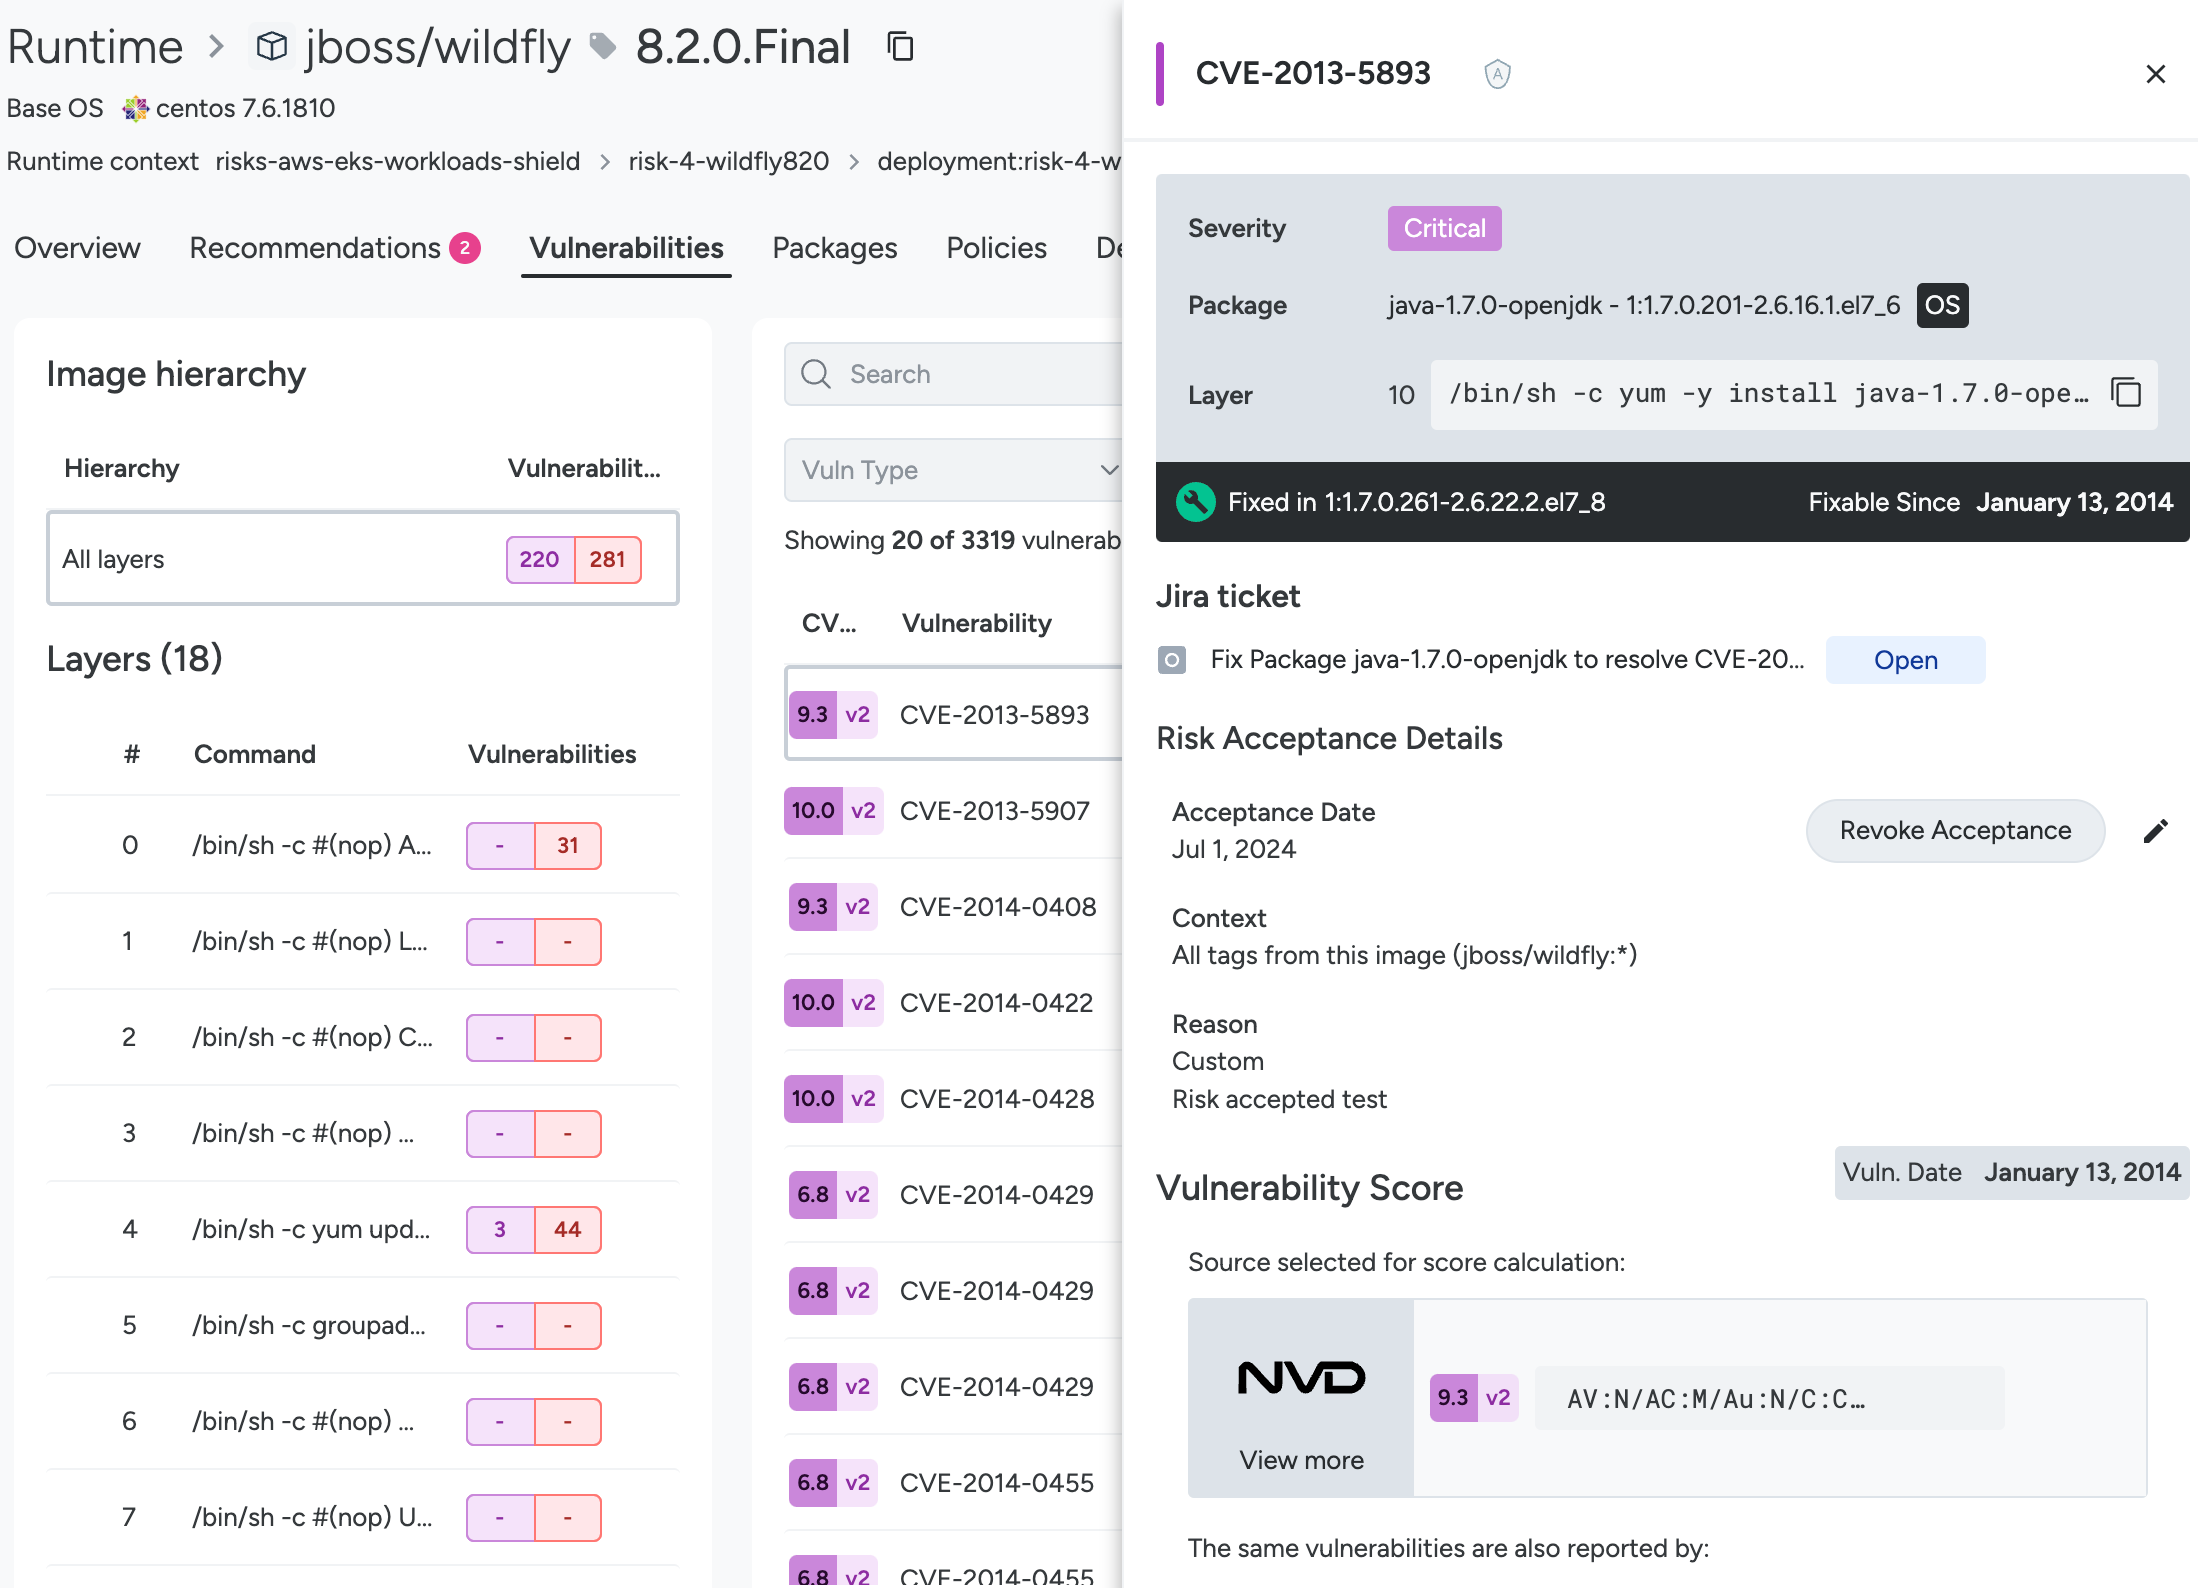
Vulnerabilities Tab
Lists the image layers and actionable instructions as well as provides the expanded filters and a clickable list of CVEs that open the full CVE details, including source data and fix information. Click on the row associated with a layer to view CVEs associated with that particular layer.
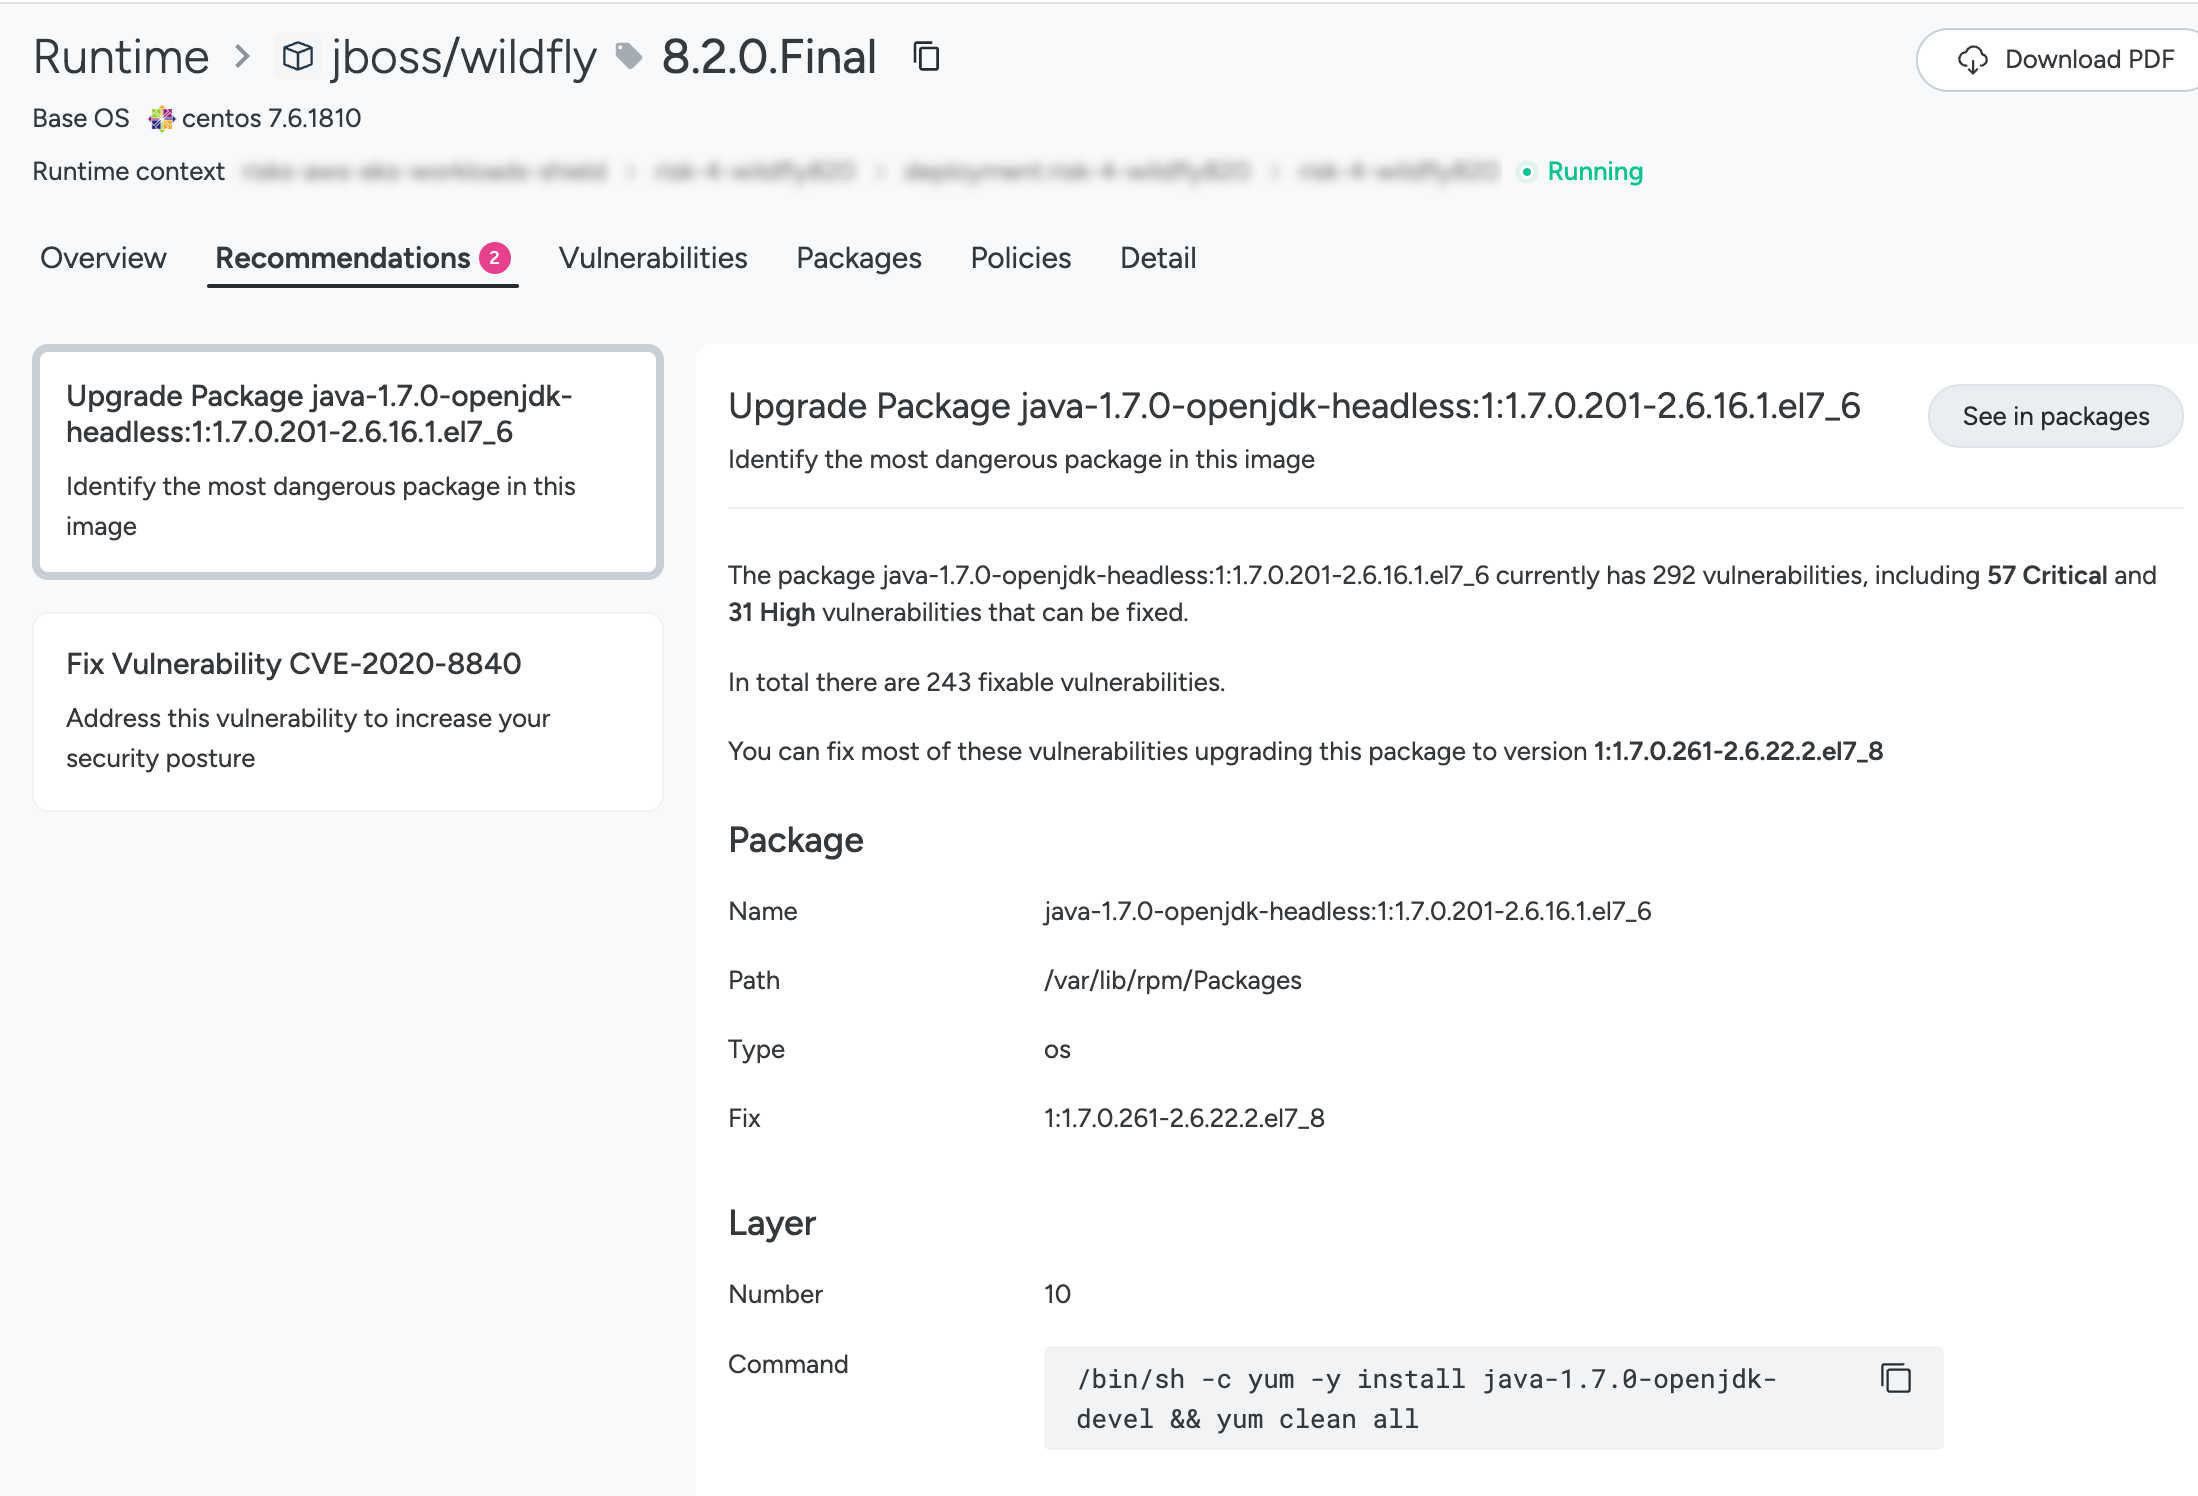
Recommendations Tab
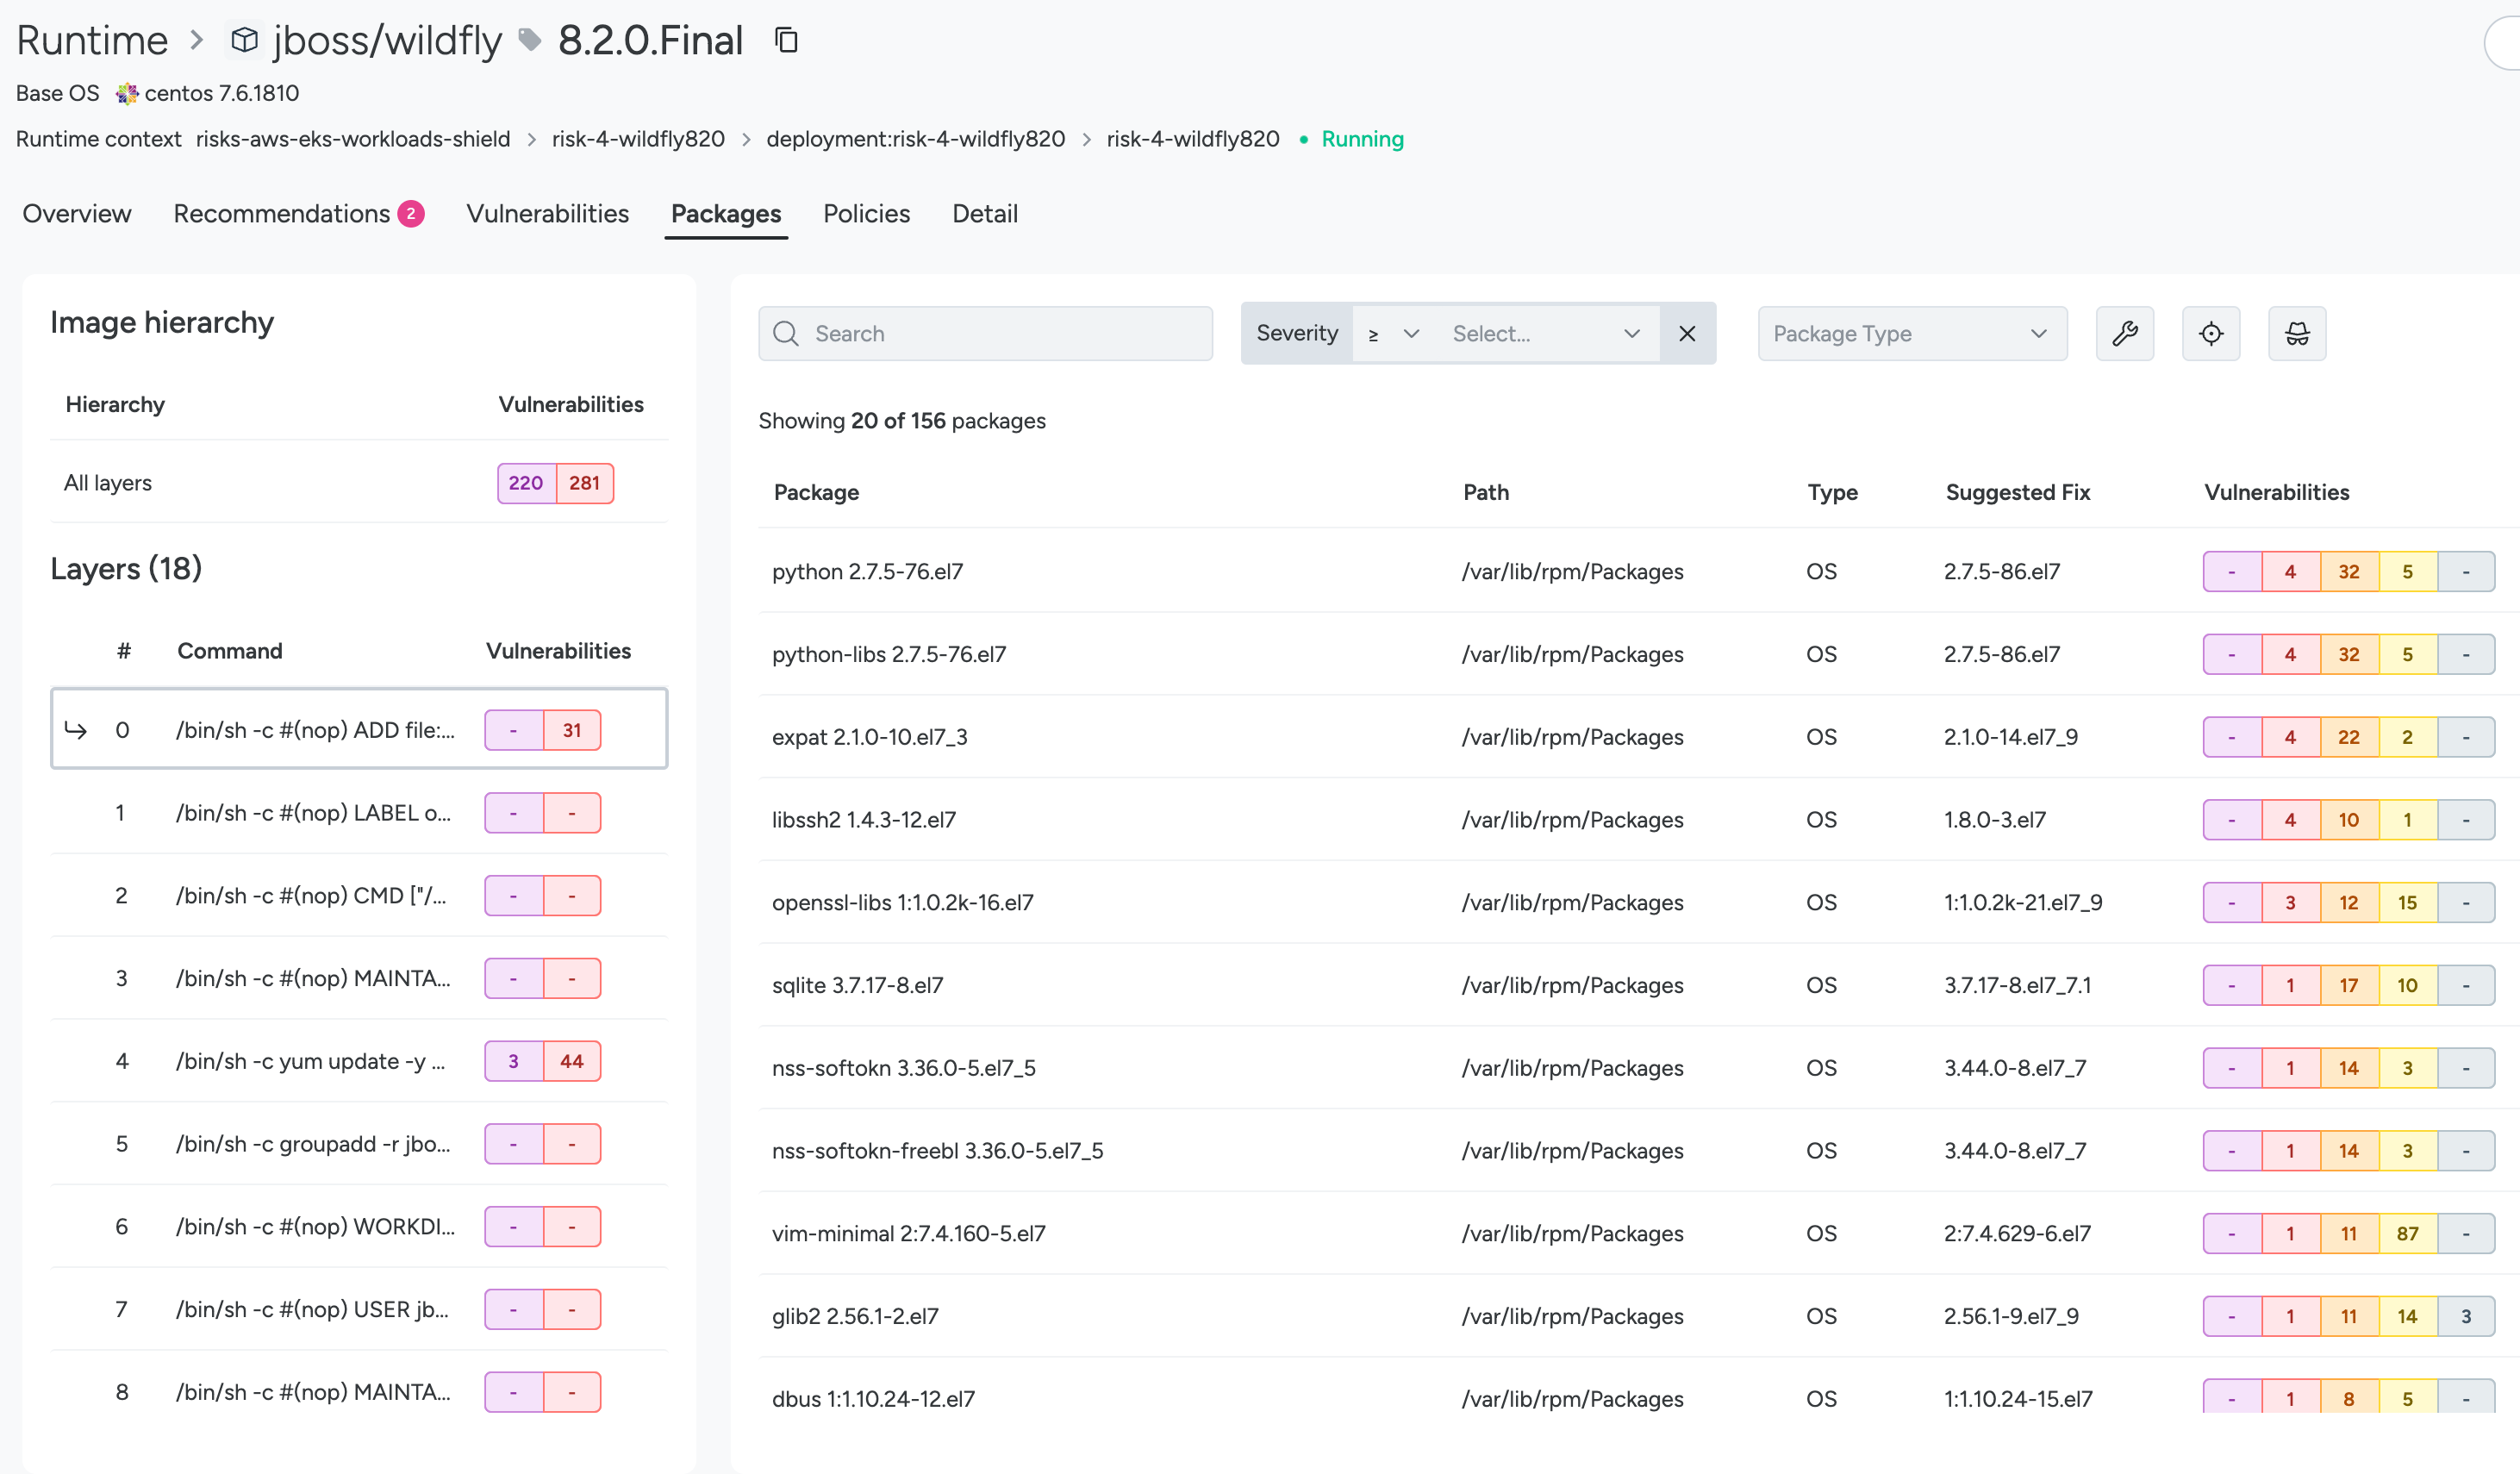
Shows image hierarchy, surfaces image layers, identify vulnerability issues in packages contained in each layer, and provides actionable instructions to fix the issues.
Package Tab
Organized by package view, with expanded filters and clickable CVE cells. Click on the row associated with a layer to view packages associated with that particular layer.
Policies Tab
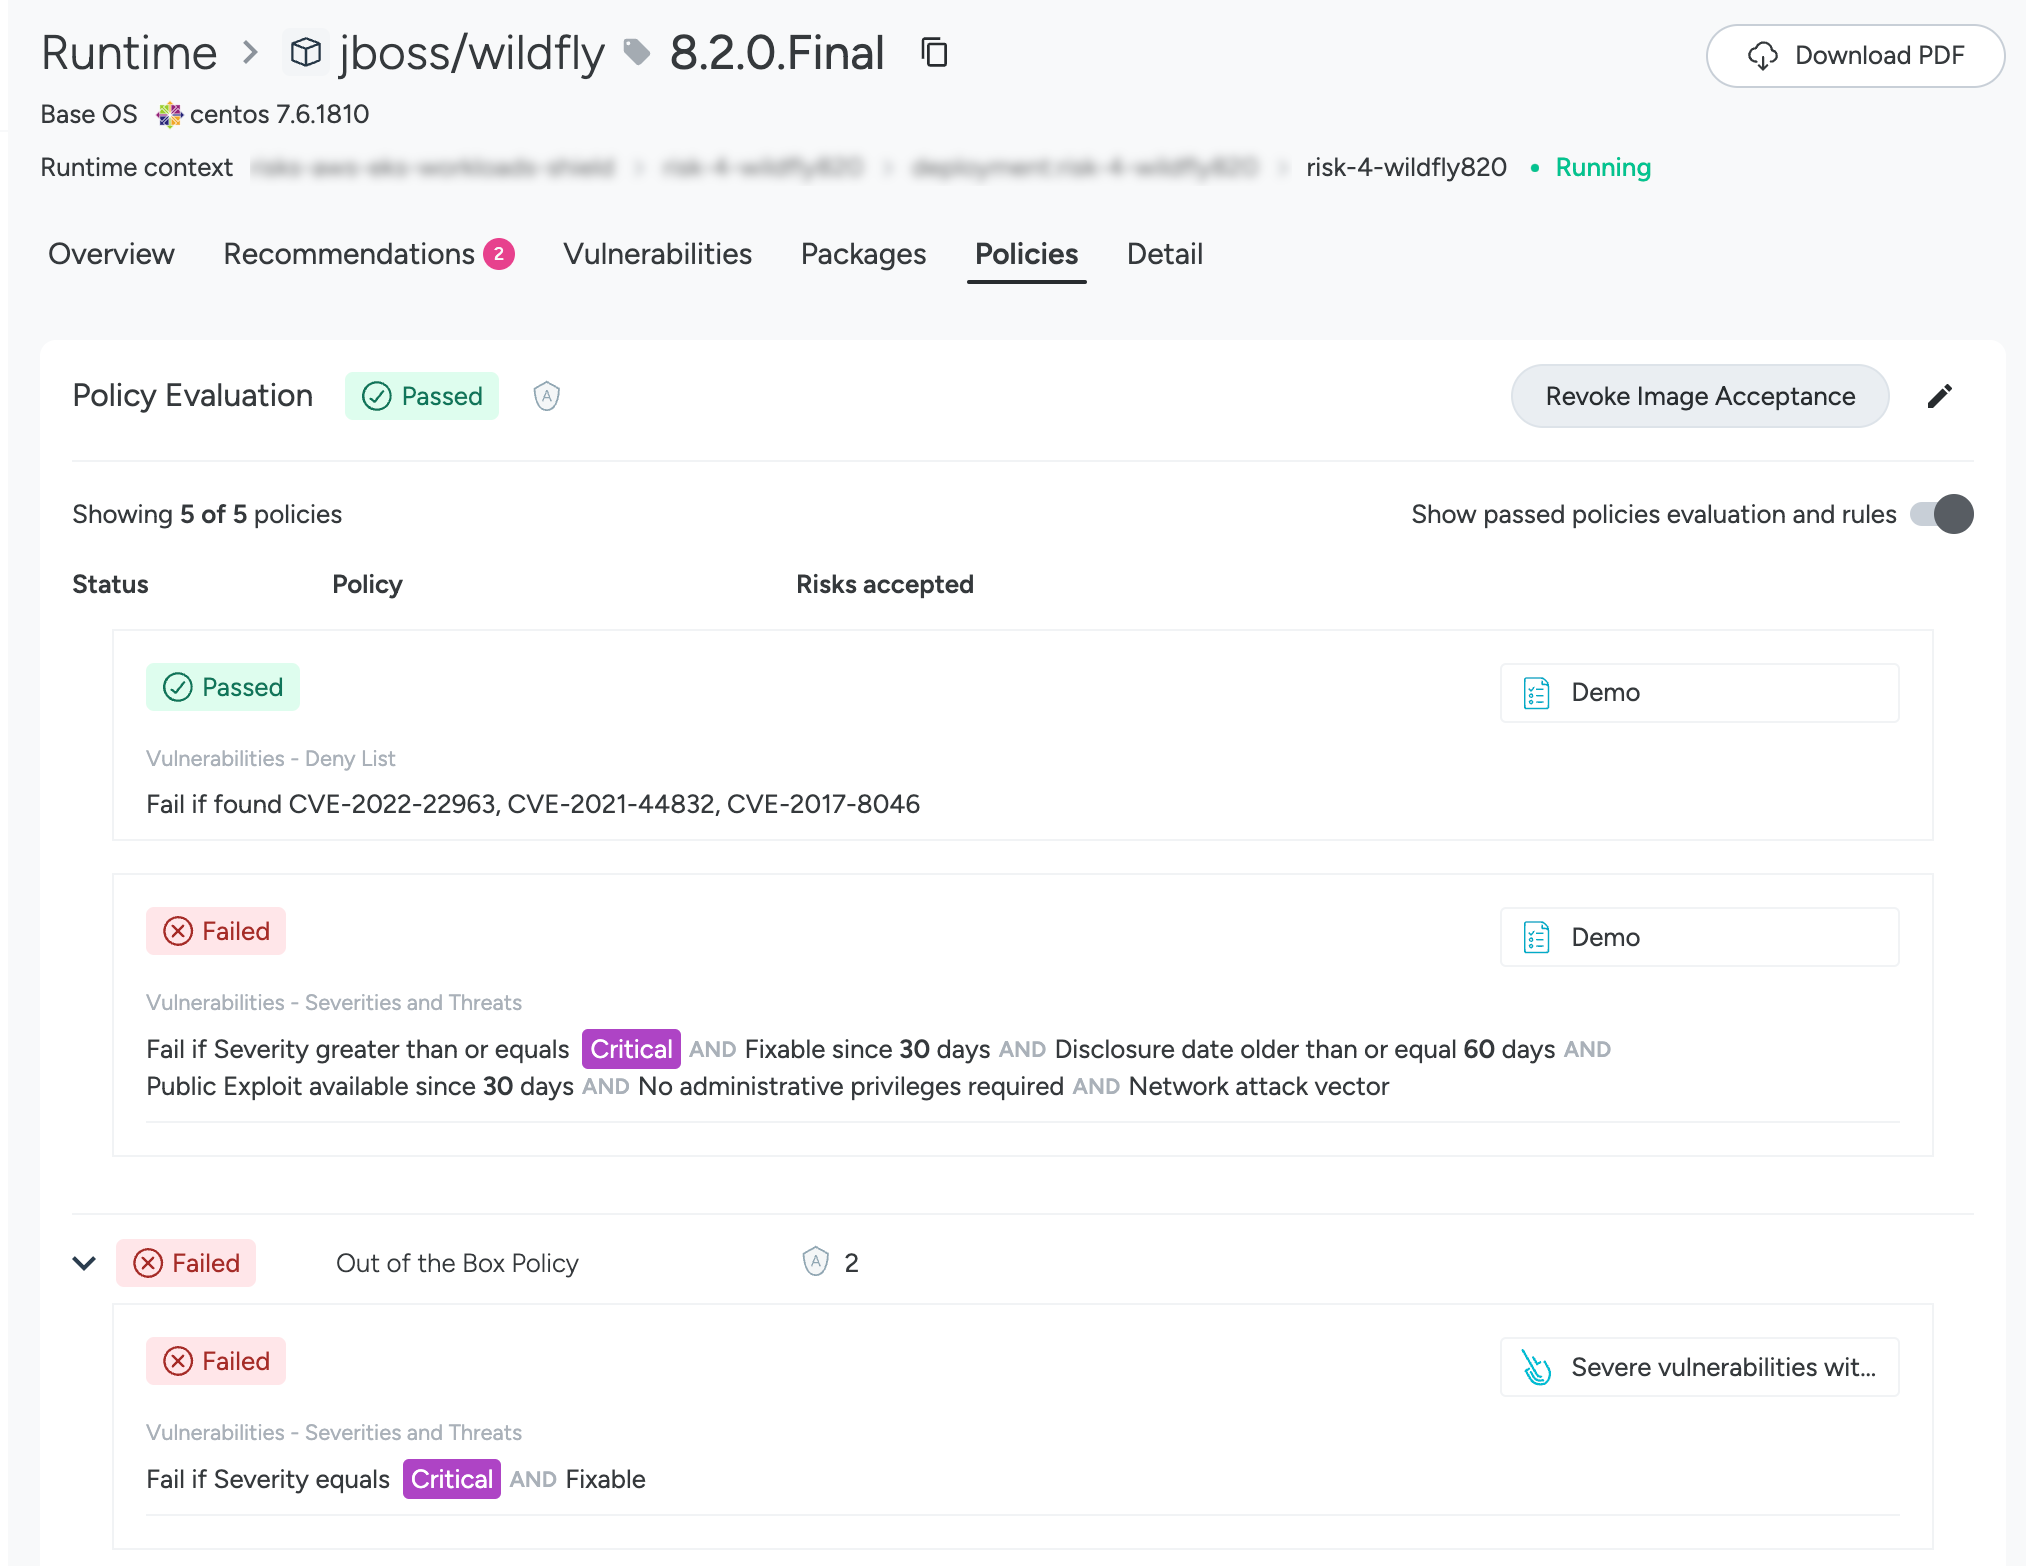
Shows CVEs organized by the policy+rule that failed. Use the toggle to show or hide policies+rules that passed. Click CVE names for the details.
Filter and Sort Results
Filter by Zones
Filter by workload labels and optionally save constructed filters as Favorite or Default from the three-dot menu on the filter bar.
Hover over the workload labels and click
=or=!to add them to the filter bar to refine by cluster, namespace, or type.Filter by asset type: host, workload, or container. See also Asset Types Defined.
Filter by evaluation:
Pass/Fail/No PolicyClick In Use to list the results that have been evaluated for risk first.
Use further-refined filters within the image detail tabs. For example,
CVE Name;Severity (>=);CVSS Score (>=);Has Fix;Exploitable.
Runtime Risk Acceptance
The ability to accept risk establishes the baseline for accepted level of risk and provides relevant status, clear ownership, and consistent process for addressing each vulnerability identified in your runtime environment.
If the minimum enablement requirements are not met, the Accept Risk button and panel will show in your interface, but will not activate. A created Acceptance would appear in Pending status for 20 minutes, then disappear as if you had never created it.
Review Understanding Accept Risk and the Prerequisites.
Define an Accepted Risk
The process for risk acceptance is the same for Runtime and Pipeline.
Failed CVE
Navigate to Vulnerabilities > Runtime.
Do one of the following:
Click Accept Risk and continue to Complete the Risk Acceptance Definition.
Failed Rule
Navigate to Vulnerabilities > Runtime.
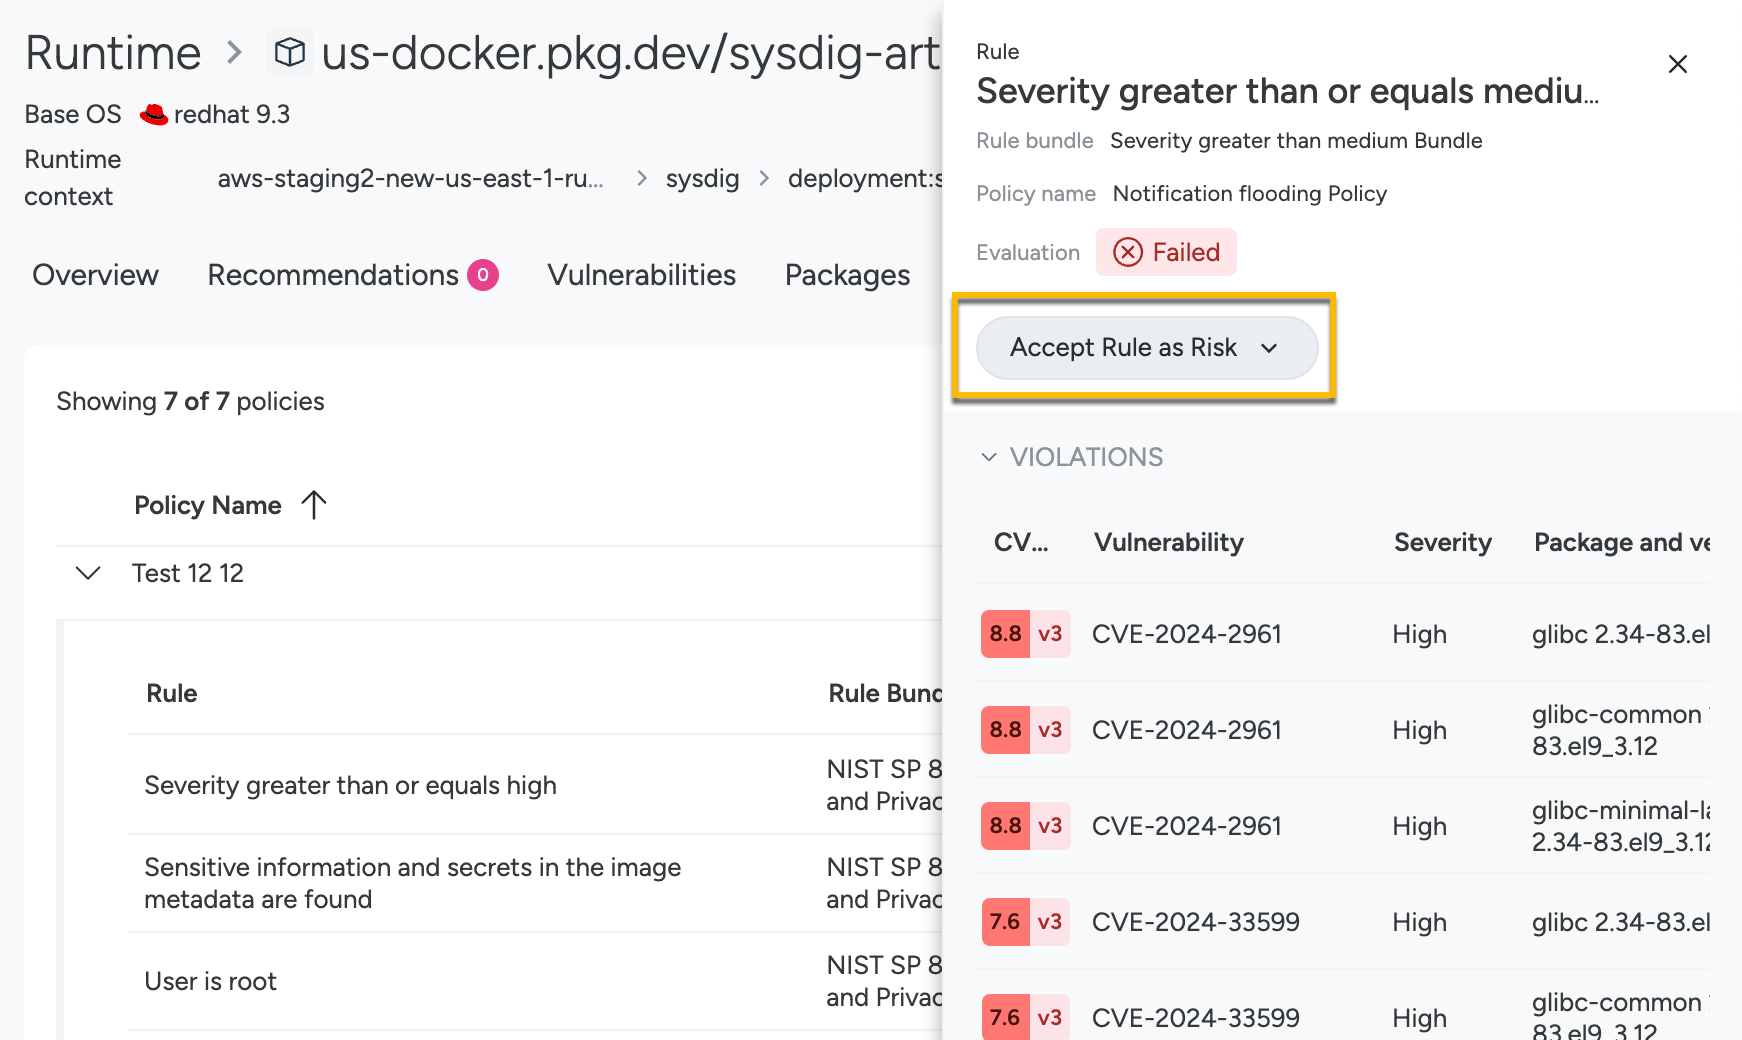
Select a failed asset from the list and choose the Policies panel.
Select the a failed rule to open the detail panel.
Click Accept Rule as a Risk and continue to Complete the Risk Acceptance Definition.
Failed Host or Image
You can accept risk for an entire host or image, based on the image name or host name. Consider the following while accepting risk of a host or image:
- You are not accepting the vulnerabilities and finding rules within the asset as individual risks, but just the asset as a whole. Any future CVE or failing rule will be accepted too.
- The ImageID or digests are not taken into account. The context of the acceptance is based on the host or the image name.
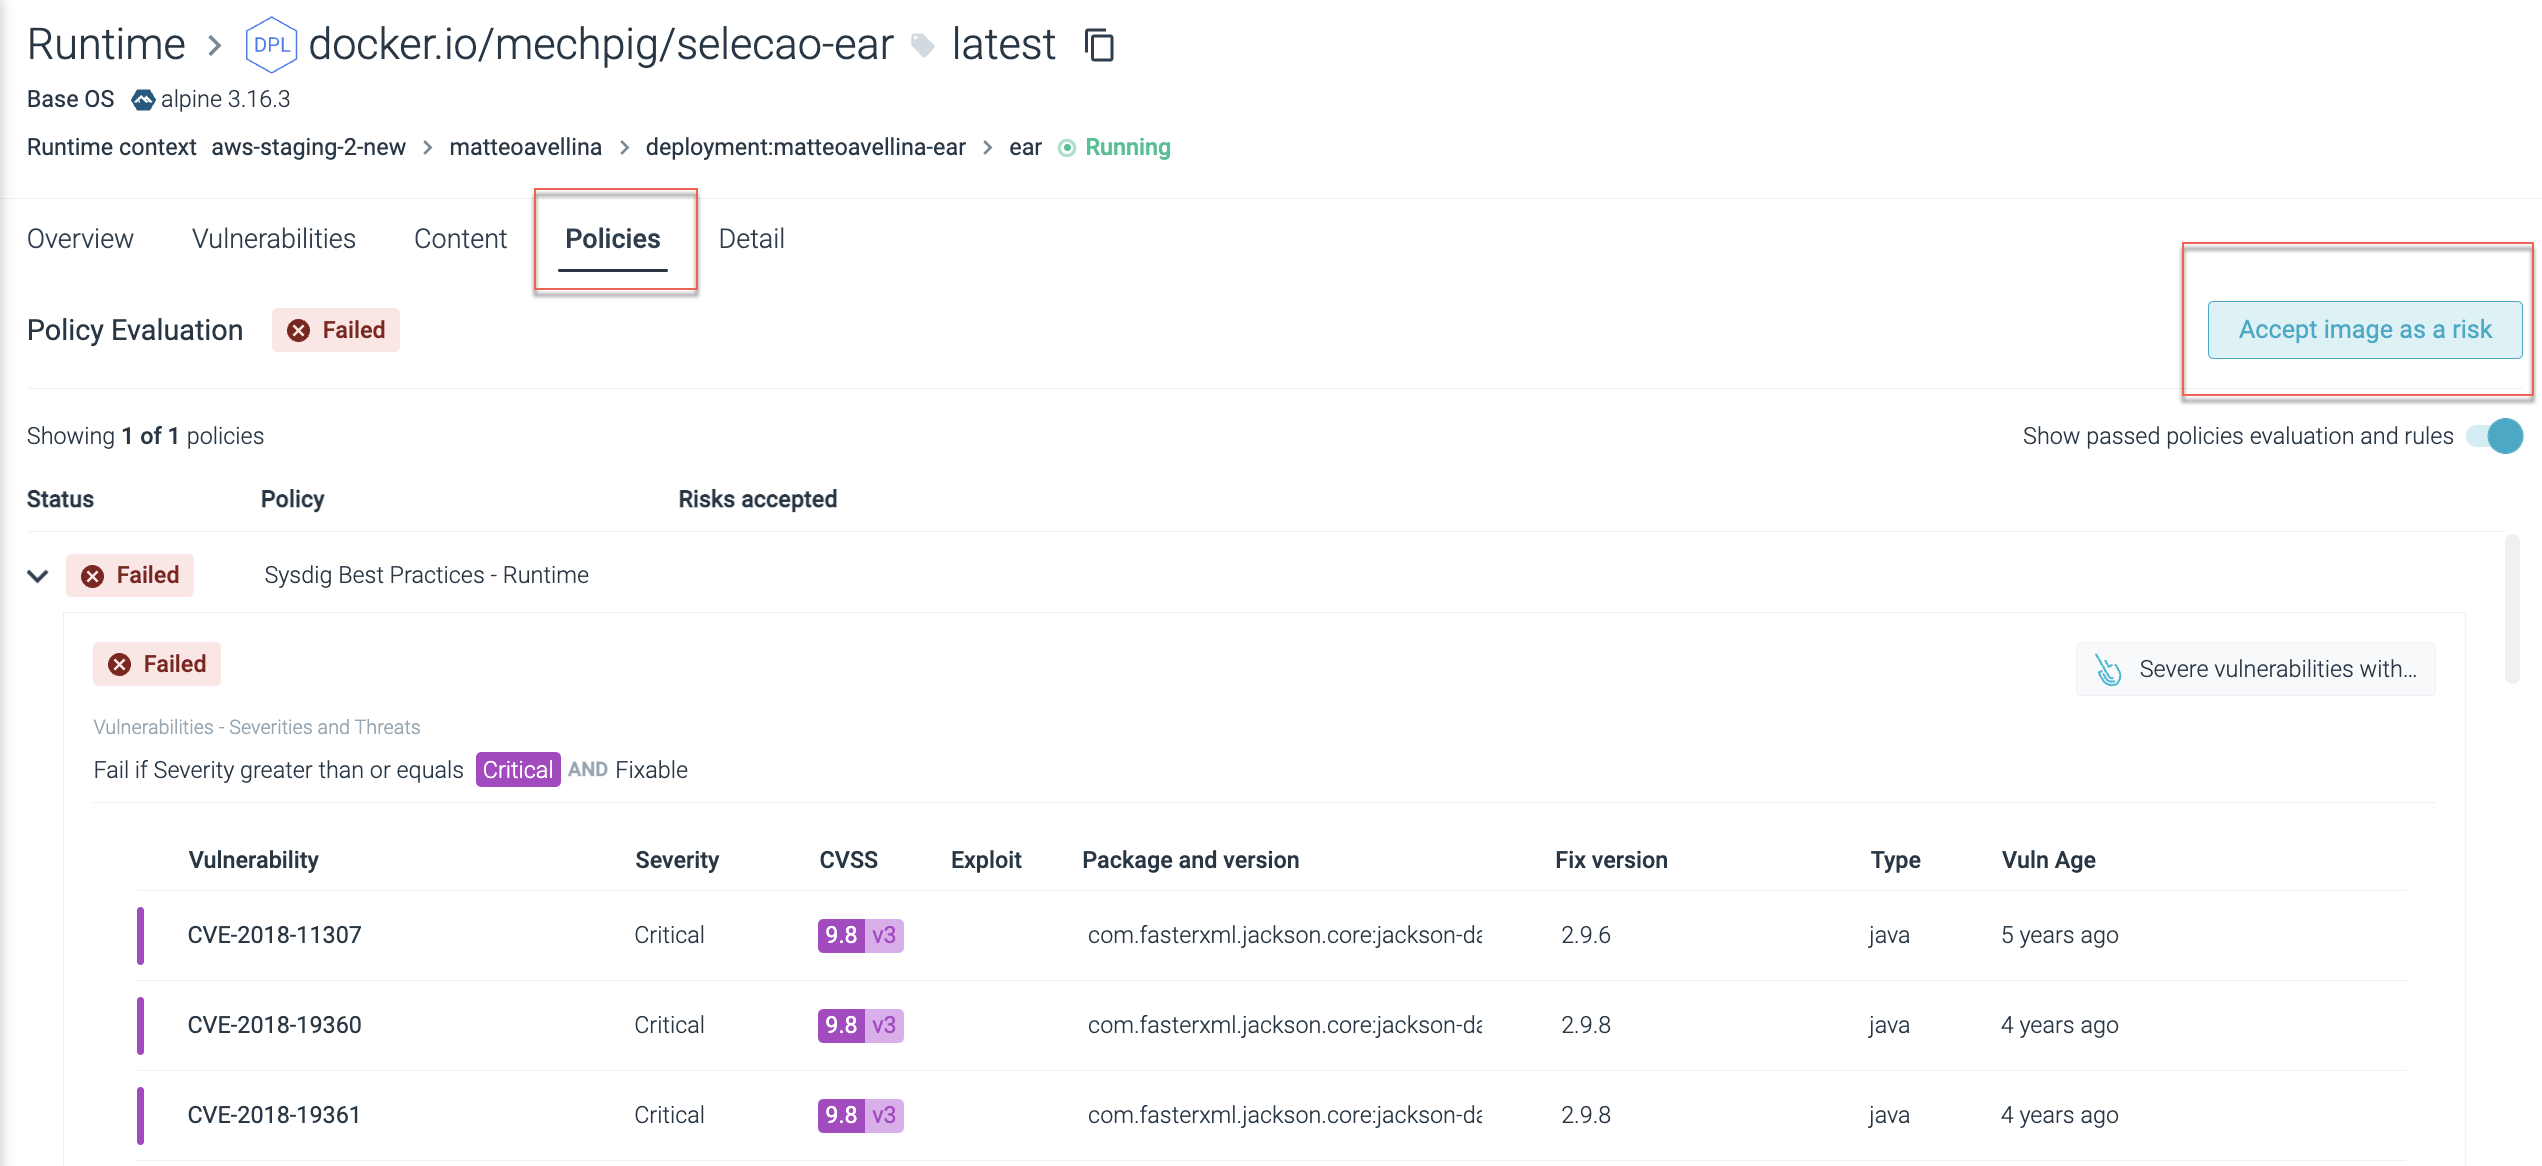
Navigate to Vulnerabilities > Runtime and select a failed asset.
Choose the Policies panel and select the Accept Image as a Risk or Accept Host as a Risk button.
Continue with Complete the Risk Acceptance Definition.
Complete the Risk Acceptance Definition
Based on your risk acceptance for asset type, you are presented with the Risk Acceptance definition dialog. Specify the risk acceptance details and click Accept.
Context: Specify the scope and stage:
- Where: Define the scope, that is, the cases to which the Accept will apply. Based on the asset type you chose, the configuration parameters differ.
Asset Type Description Vulnerability - Global: Every time this vulnerability is found, regardless of the asset or the package and also regardless of the phase (Pipeline, Runtime), the selected vulnerability will always be accepted.
- Package: You are accepting only the combination of this CVE and a particular package. There are two sub-options: any version or a particular version. For example,
rpm 4.14.4orrpm - Image: You have four options:
- This particular image
- This specific image from all registries and repositories
- All versions of this image
- Image name contains a specific value
Note that the context can affect multiple assets with a single configuration. For example, accepting one CVE globally would affect the policy evaluation of all the different images in which that vulnerability is found.Image You have four options: - This particular image
- This specific image from all registries and repositories
- All versions of this image
- Image name contains a specific value
Host You have two options: - This particular host
- Host name contains a specific value
Rule Depending on the asset type you choose, you will have two options: - Global
Host or Image
For each option, you can further narrow down the scope.
- Stage: Specify the context in which you are accepting the risk of the selected rule. You can select either Runtime or Pipeline.
Reason: Specify the reason for accepting the risk.
- Risk Avoided
- Risk Owned
- Risk Transferred
- Risk Avoided
- Risk Mitigated
- Risk Not Relevant
- Custom
Optionally, you can enter additional details in the text box given.
Expires In: Specify the duration. You can also set custom days starting from a specific date, or mark it as never expires.
- Accepts should be exceptional choices; normally they should not mask a security risk forever
- When the Accept expires, the vulnerability or asset reappears in the violations count, potentially causing an evaluation to fail again.
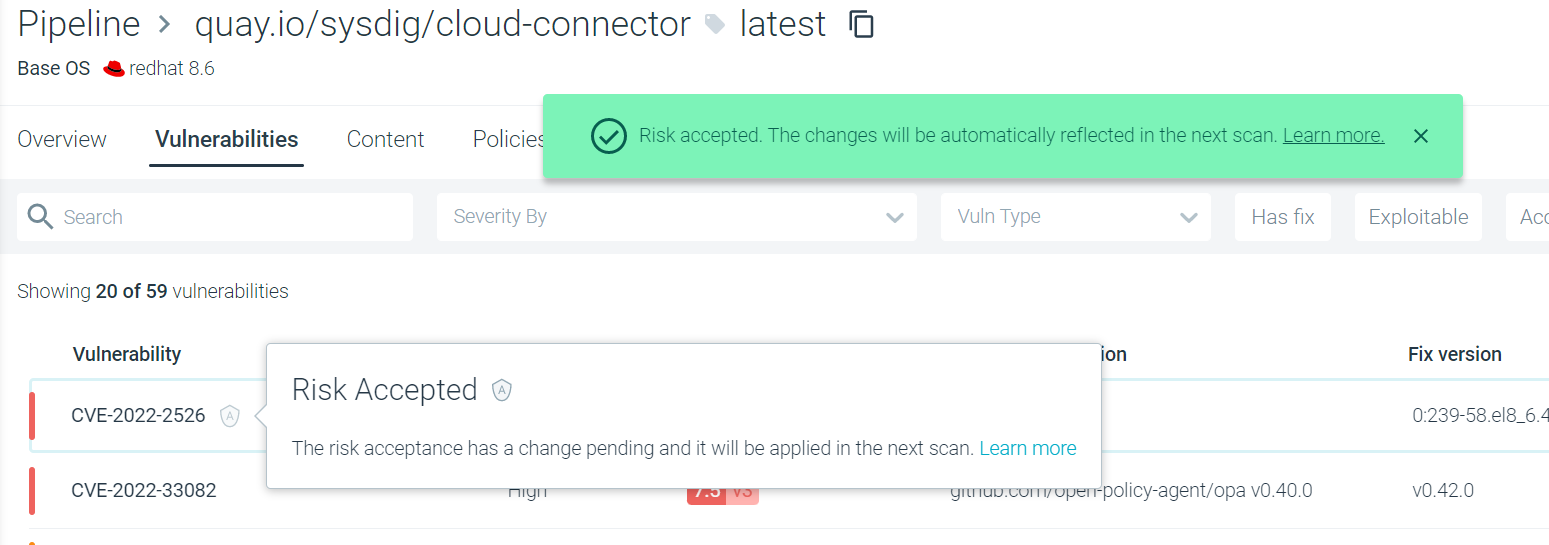
An acknowledgment message is displayed, and a greyed-out Shield icon shows the Accept is in Pending status.
Manage Accepts
Accept Validity
The creation, editing, or revocation of an Accept does not take effect immediately. The change is in Pending status with the grey shield icon until the next runtime scan is:
- Automatically triggered
- Within 20 minutes
No additional changes can made to the Accept configuration while it is pending.
Note: This differs in Pipeline. See the Pipeline page for details.
Limits
There is a limit of 1000 Accept Risk items (per customer account)
- This is the number of configurations created, not the number of impacted assets/CVEs.
- For example, a global CVE Accept impacting 30 images counts as 1 Accept Risk item.
- Both CVE accepts and Asset accepts count towards that total.
Review Accepts
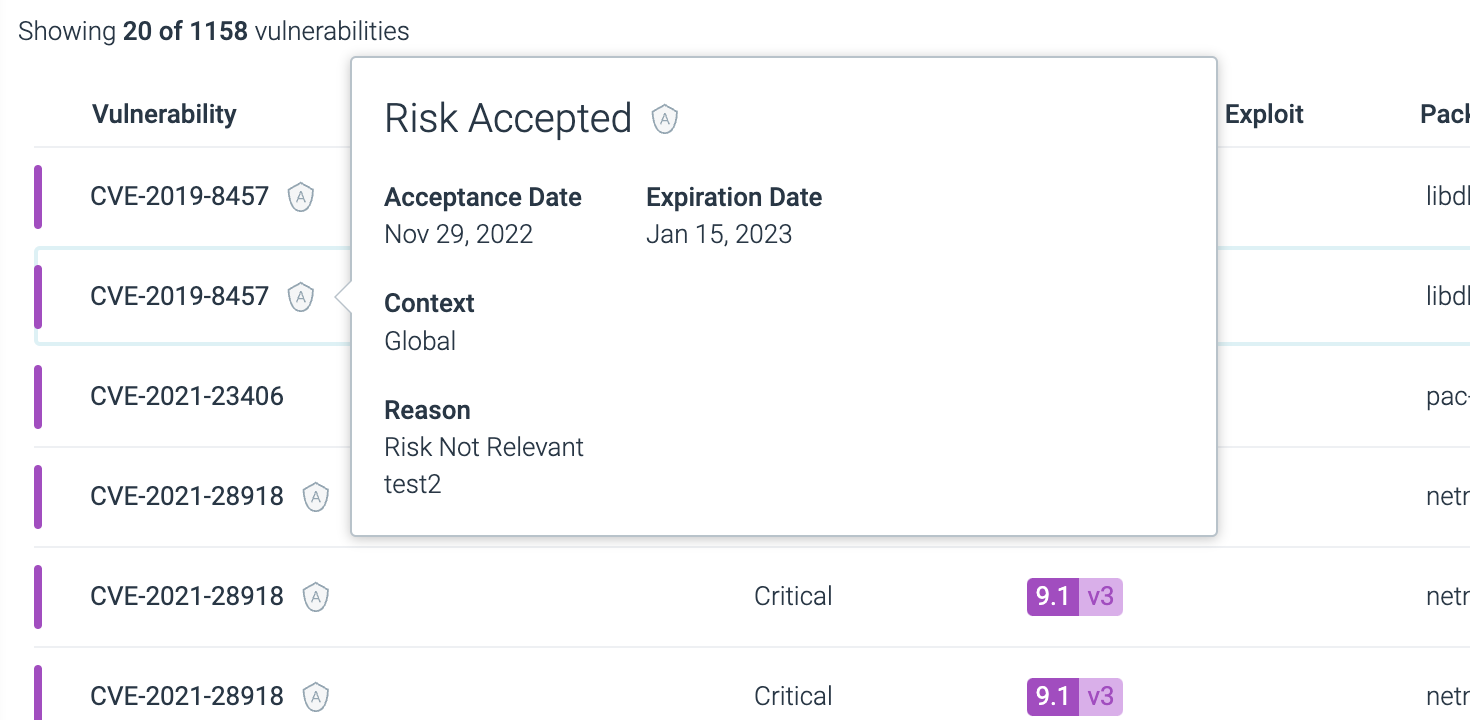
When no longer pending, the Accept Risk shield is not greyed out and appears in the list of assets. You can also filter by Accept Risk to see all assets where an Accept has been applied.
Click into the asset to see more, and hover over the shield icon to see all the Accept Risk configuration details.
Accepted Risk on a CVE will be shown in the:
- List of CVEs in the Vulnerabilities panel
- List of Policy violations under the Policies panel
- Policy evaluation card, showing the number of overridden violations
Passing Evaluations
A policy will pass if:
- All the rules inside the policy pass, or
- All the violations to a policy have been voided by a matching accept
A host or image will pass if:
All the policies attached to the asset pass, or
The asset itself is accepted
In this example, the policies are failing but the asset has been accepted, indicated by the shield icon beside the [PASSED] global evaluation.
Edit an Accept
To edit an existing risk, click on the pencil icon in the Accept details.
You can edit the
- Reason
- Description
- Expiration
To change the affected resource or the context, you must create a new Accept configuration, and delete the old one if no longer valid.
Container Scanning
To manage container vulnerabilities in your runtime environment, you can extend the Host Scanner to scan for Docker and Podman containers present within the host file system. Sysdig provides a list of vulnerabilities, policy evaluations, has-fix, and has-exploit information to help you focus on the most critical vulnerabilities in your environment.
Risk Spotlight (In Use)
Sysdig has updated and completed the full release cycle of its pioneering Risk Spotlight tool, which identifies vulnerable packages and libraries that are actually used in runtime workloads. It is used to power the In Use field in the Vulnerability runtime scan results and Risk Spotlight integrations with 3rd-party software.
Feedback
Was this page helpful?
Glad to hear it! Please tell us how we can improve.
Sorry to hear that. Please tell us how we can improve.
