Vulnerability Findings
Understand Image Scanning
Image scanning enables you to examine container images for vulnerabilities, misconfigurations, and license violations. You can integrate image scanning into your development build process to verify images added to your container registry, as well as scan images used by active containers in your infrastructure.
Image scanning provides registry insights into where your images are stored, initiates scans, and allows you to review the scan results.
Behind the scenes:
SBOM is analyzed
SBOM is compared against multiple vulnerability databases
SBOM is then evaluated against default or user-defined policies.
Results are reported, both in Sysdig Secure and (if applicable) in a developer’s external CI tool.
Platform-Based Scanning
Sysdig Vulnerability Management module offers platform-based scanning by default. The scanning tools analyze images and host filesystems to extract the Software Bill of Materials (SBOM) and send them to the Sysdig backend for vulnerability matching and policy evaluation. You can retrieve the scanning result by using an API or the Sysdig Secure UI.
Prerequisites
VM Tools installed
The following version of VM tools support SBOM scanning:
Host Scanner v0.7.0 and above for non-Kubernetes containers
Host scanner for host filesystem is not currently supported
Cluster Scanner v1.23 and above
CLI Scanner v1.8.0 and above
Registry Scanner v1.1.26 and above
Agentless scanning
For on-prem environment, use v6.8.0
Retrieve SBOM Results
You can retrieve SBOM results from the scanning process in CycloneDX JSON format via either the API or the Sysdig Secure UI. Having a downloaded version of the SBOM provides you with a detailed list of software components, enabling you to conduct thorough audits, manage risks effectively, and meet compliance standards.
Retrieve SBOM Using the API
To retrieve the SBOM of your asset, issue a curl GET request against the Sysdig Secure endpoint:
curl -X GET -H 'Authorization: Bearer <API_TOKEN>' 'https://<HOSTNAME>/secure/vulnerability/v1beta1/sboms?assetId=<sha256:xxxxxx>&assetType=container-image'
Query Parameters
assetId: The ID of the asset for which you want to retrieve the SBOM. It’s theimageIdfor container-image and thehostIdfor hosts. For example,assetId=sha256:xxxxxx. You can providebomIdentifieror bothassetIdandassetTypeassetType: The type of the asset for which you want to retrieve the SBOM. For example,container-image. Provide this with theassetIdif you are not providingbomIdentifier.bomIdentifier: The ID of a single SBOM. Either you can providebomIdentifieror bothassetIdandassetTypeto retrieve the SBOM result. For example,bomIdentifier=urn:uuid:45667rrrr-b8f2-42345-b996-dkffllflp.
Download SBOM Using the UI
To download the SBOM of your scan results in CycloneDX JSON format from the Sysdig Secure UI:
Based on your scanning type, open the Findings page in the Vulnerabilities menu.
For example, Attack Surface > Vuln Runtime Findings.
From the all findings page, select a scanning result.
The scanning results page appears.
Select the Details tab on the scan results page and click Download SBOM.
Instant Scanning with Scan Now
You can skip deploying CLI-based scanning tools such as Registry Scanner and directly scanning the images in your running environment using the Scan Now button. This initiates platform-based scanning, making it easier to get started with Vulnerability Management. You can effortlessly scan and view image results without needing to deploy any extra components. For more information, see Manual Image Scanning.
Layered Analysis
Container images are optimized for distribution by layer composition. Each instruction or change made during the image build process creates a new layer. Any filesystem change—whether it’s adding, deleting, or modifying files—generates a new layer on top of the previous image.
Layered Analysis helps detect and display vulnerabilities and packages associated with each image layer and identify different remediation actions and ownership depending on the layer that introduces them. For example, vulnerabilities in the base OS layer are remediated by updating the base image version, typically performed by the platform operation team. In contrast, the ones belonging to the application or non-os layers are remediated by bumping the versions of libraries and dependencies in the corresponding application or service owned by the development teams.
Additionally, layered analysis can detect sibling images that are built on top of the same base image and enables routing remediation actions to the right layer and the right owner.
Prerequisites and Guidelines
On-Prem version 6.13.0 or higher
CLI Scanner v1.12.0 or higher
Use the
--separate-by-layerand--separate-by-imageoptions to change the output of the CLI scanner to show image hierarchy or layer information. For more information, see Display Image Layers.Cluster Shield
Platform scanning is enabled by default
Registry Scanner v1.1.26 or higher
Platform scanning is enabled by default
Legacy runtime-scanner is not supported
Use Scan Results API JSON to view the new fields for layer information
Caveats
The FROM shown in the Image Hierarchy should not be confused with the
FROMin the Dockerfile, as they might differ.A base image can have multiple tags. When Sysdig identifies a base image in your application, it displays the tags that were used to scan the base image, which may differ from the tags specified in your application’s Dockerfile.
For example, if the following is your Dockerfile of your application:
FROM alpine:3.18
WORKDIR /usr/app
COPY myapp-binary .
ENTRYPOINT [ "/usr/app/myapp-binary" ]
You should scan the base image,
alpine:3.18, using the exact image name. If you scan it usingalpine:latest, though the taglatestis referring to the samealpine:3.18, the image will be known to Sysdig asalpine:latest, and shown in the Image Hierarchy asFROM alpine:latestinstead of theFROM alpine:3.18matching the Dockerfile.You can see the base image on the Image hierarchy as follows:
To effectively identify base images within the image hierarchy, Sysdig need to know the SBOM of the base images in advance. For pipeline scans, prioritize scanning base images before scanning the child images. When handling images in registries and runtime workloads, ensure that the base images are also scanned. This enables Sysdig to detect and correlate the layers accurately.
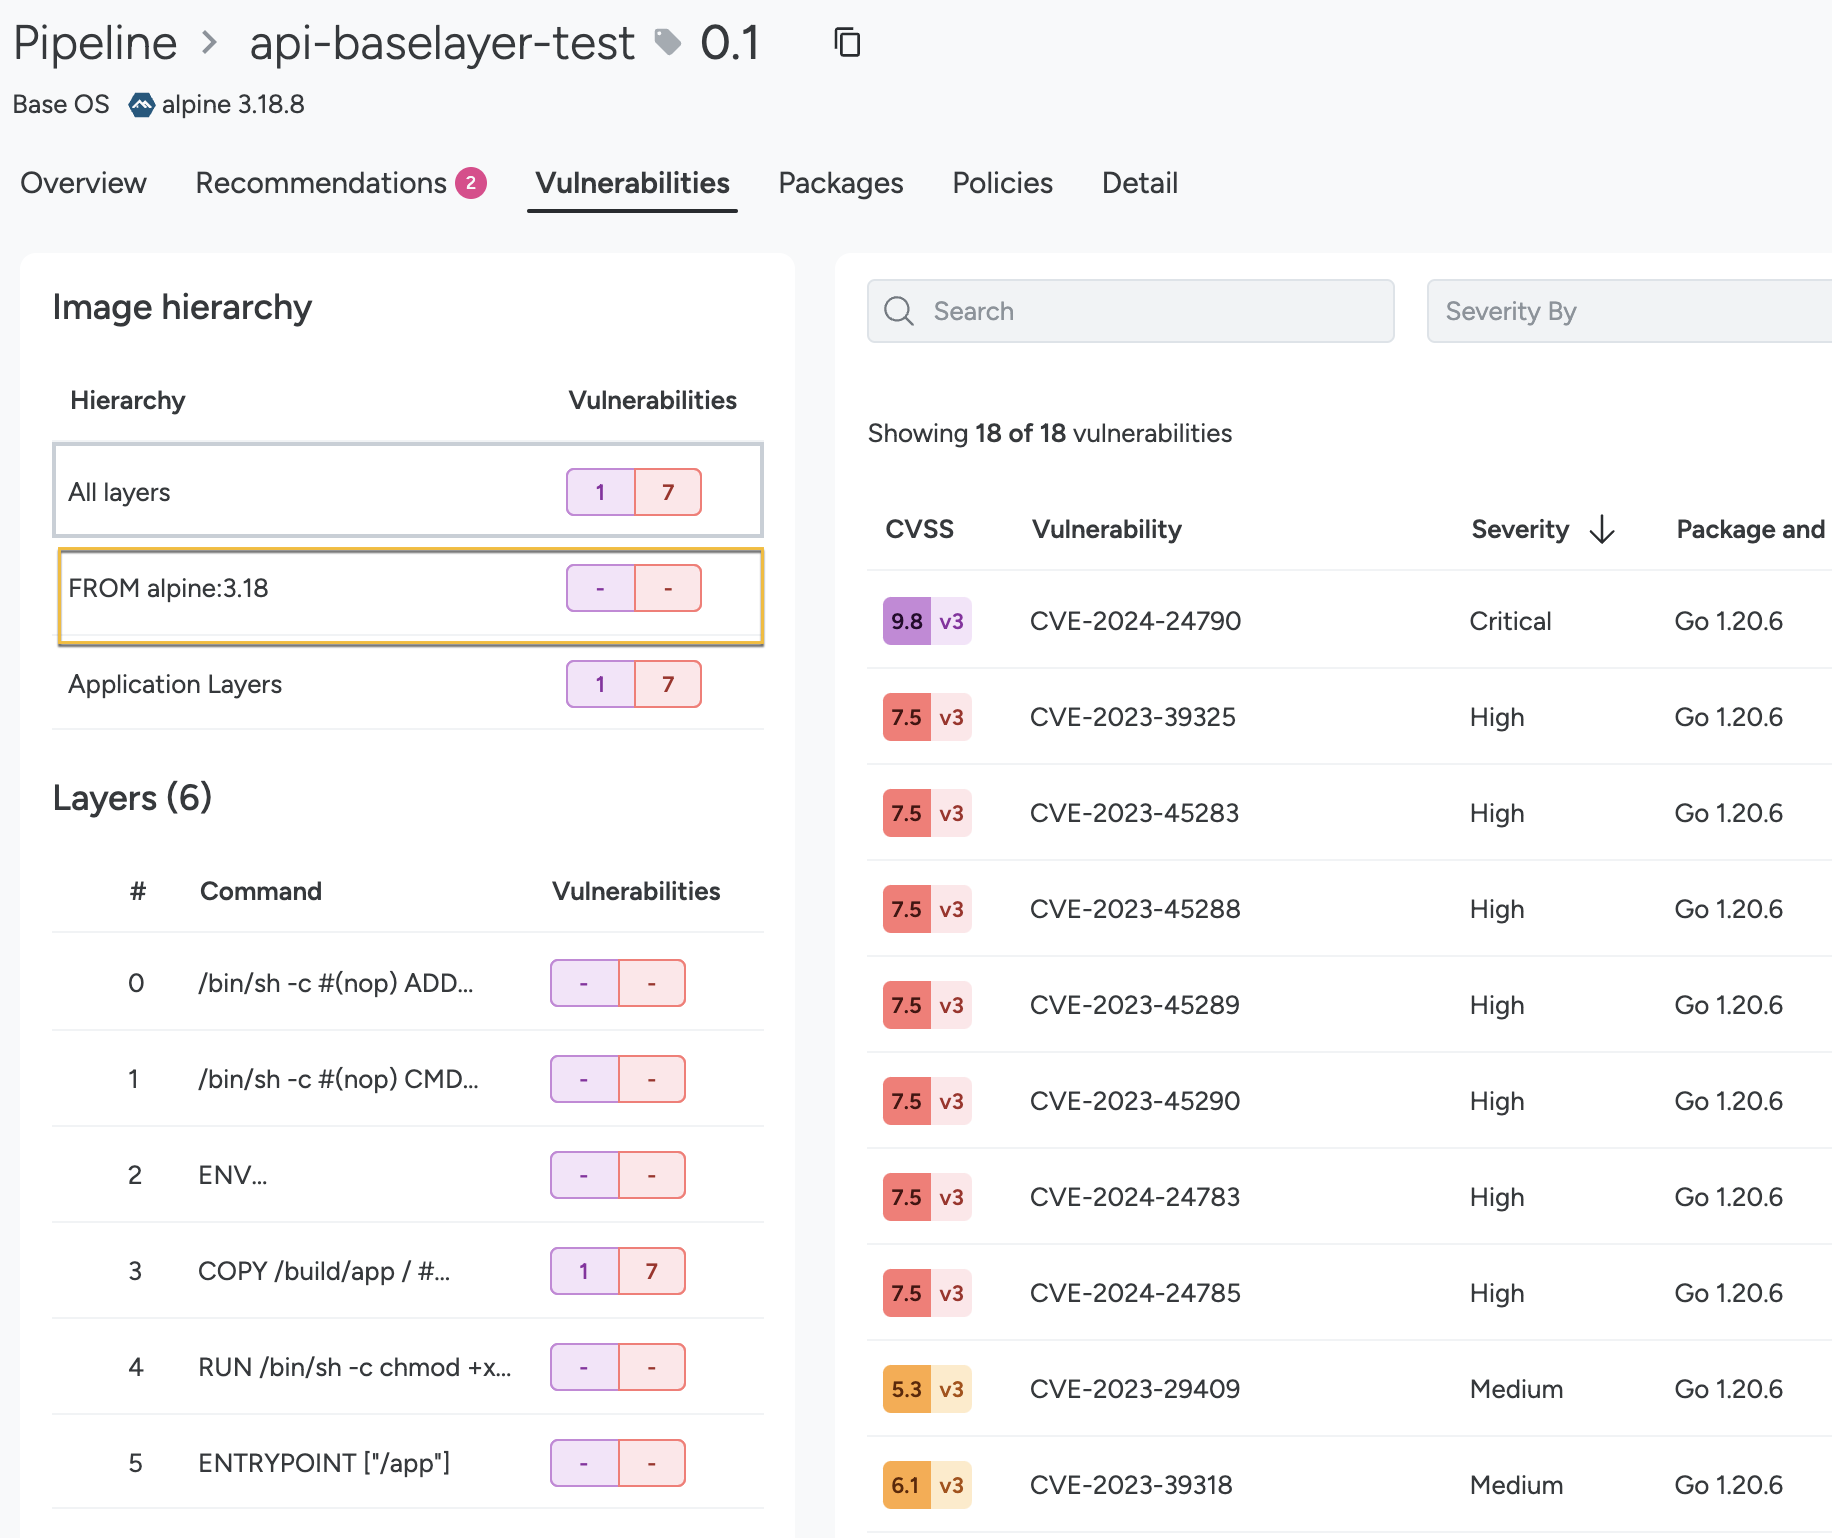
Under the Image Hierarchy:
All layers shows the total number of vulnerabilities in the final image composition, including vulnerabilities from both the application layers and base image layers. Commonly the total number displayed will be the sum of the base images and the application layers, but this is not always the case. If a vulnerability is fixed by upgrading or removing a package or library in one of the intermediate layers, the count in the All layers won’t include that vulnerability.
The base images (prefixed with FROM) display the vulnerabilities present in that base image, including those inherited from parent images. However, the Application layers counter includes vulnerabilities introduced in the application layers only. It doesn’t include the ones from base images.
View Image Layers
See the Recommendations tab associated with an image or pipeline scan to view list of CVEs, fixable packages, and the commands to fix the issues.
The Vulnerabilities tab provides you with the hierarchy of the image, all the layers of the image, and the total number of CVEs. Select a layer to view the CVEs associated with that particular layer.
See the Packages tab to view the list of layers associated with the selected image and packages associated with each layer.
Report Scanning Results
The analysis generates a detailed report of the image contents, including:
Official OS packages
Unofficial OS packages
Golang, Rust, PHP, and .Net packages
Configuration files
Credentials files
Image layers
Localization modules and software-specific installers:
JavaScript with NPM
Python PiP
Ruby with GEM
Java/JVM with .jar archives
Image metadata and configuration attributes
For a full list, see Non-OS-Based Sources and Supported Package Types.
Remediate with Jira
Sysdig has an API-enabled remediation workflow with Jira. After you integrate Jira, you can create a Jira ticket from the Vulnerabilities module:
Log in to Sysdig Secure.
Navigate any results page in Vulnerabilities.
Click on a vulnerability
The details panel will open on right.
Click Create a Jira ticket.
Fill in the details, such as Project, Ticket type, assignee, and customer labels.
Submit the ticket.
Once submitted, the CVE drawer will note a Jira ticket exists for that vulnerability.