Findings
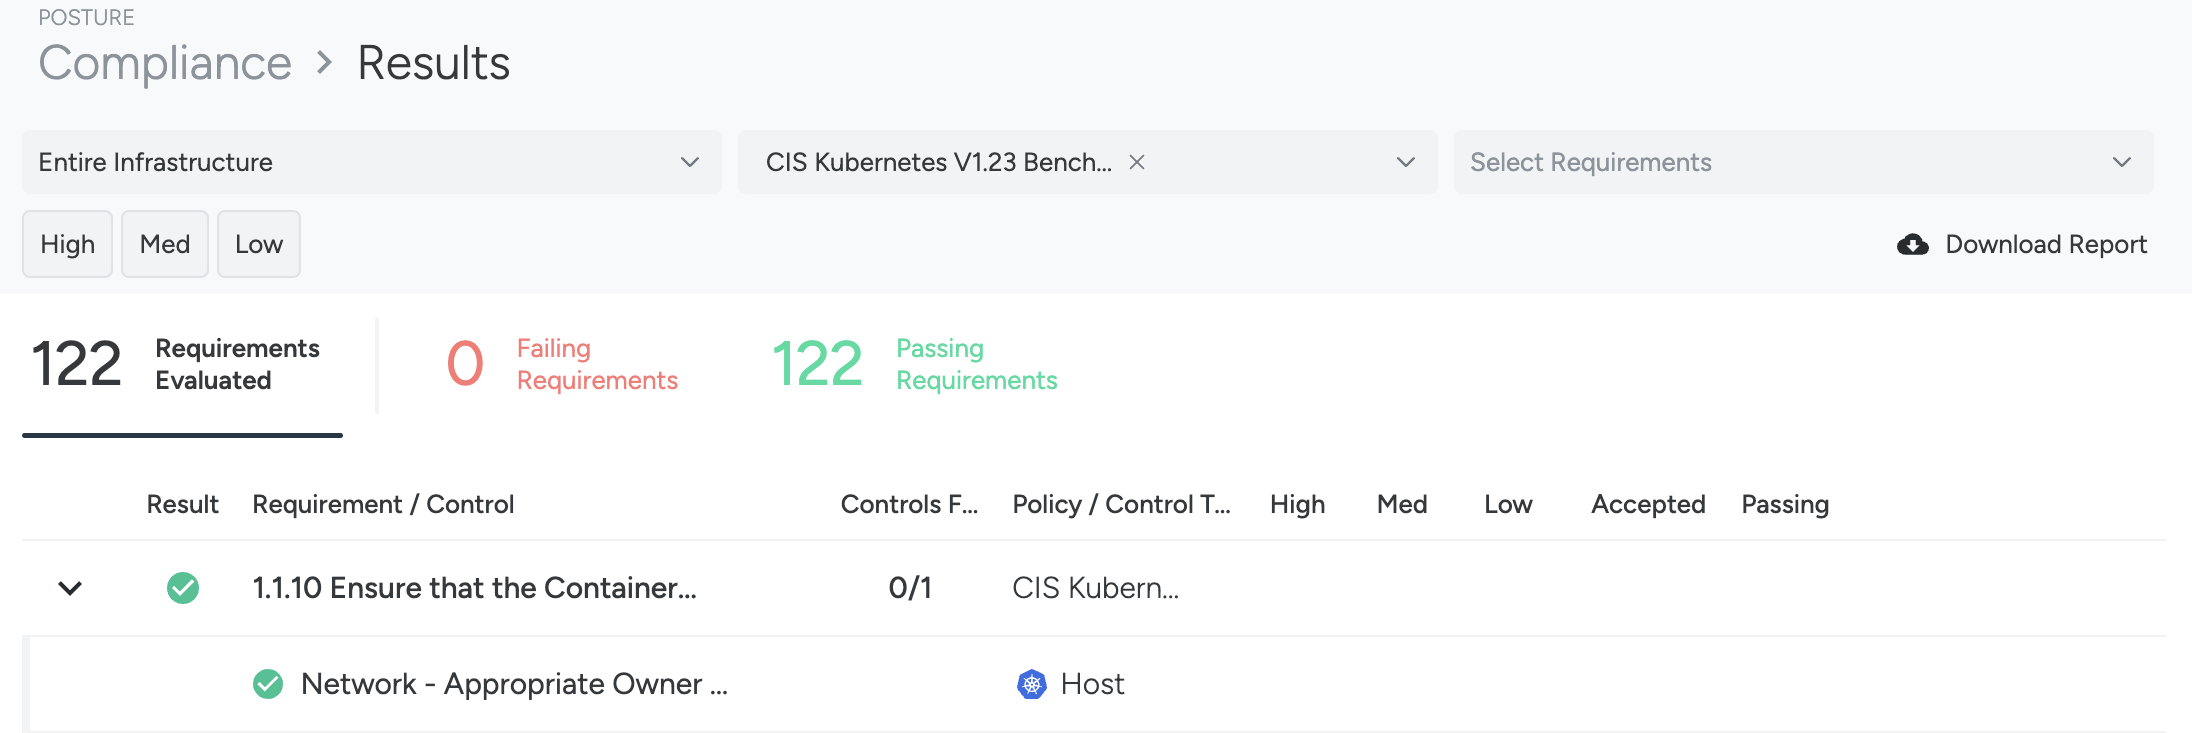
The failed requirements are sorted by severity and importance. You can view the following:
- Controls Failed: The number of controls that failed out of the total number of controls
- Policy/Control Type: The name of the policy or control type that failed. Hover over the visual logos to see details about the types.
- Severity: The number of controls or failed with High, Medium, and Low severity
- Accepted: The number of accepted risks
- Passing: The number of controls that passed the evaluation.
- Accept Risk: Global risk acceptance for the control
You can edit the filters to focus on the compliance findings that are relevant to you. The Findings page presents the policy requirements for the selected zones and policies, and the controls under each requirement.
Select a finding from the list to see the individual controls.
Accept Risk Globally on a Control
Ensure that you have the required permission to use this feature.
In addition to accepting the risk on a single resource, you can accept risk for an entire control, affecting all resources that match the given zone.
Select Compliance > Findings, then select a particular tile corresponding to a finding.
Hover over a control to display the Accept Risk button on the Results list and click.
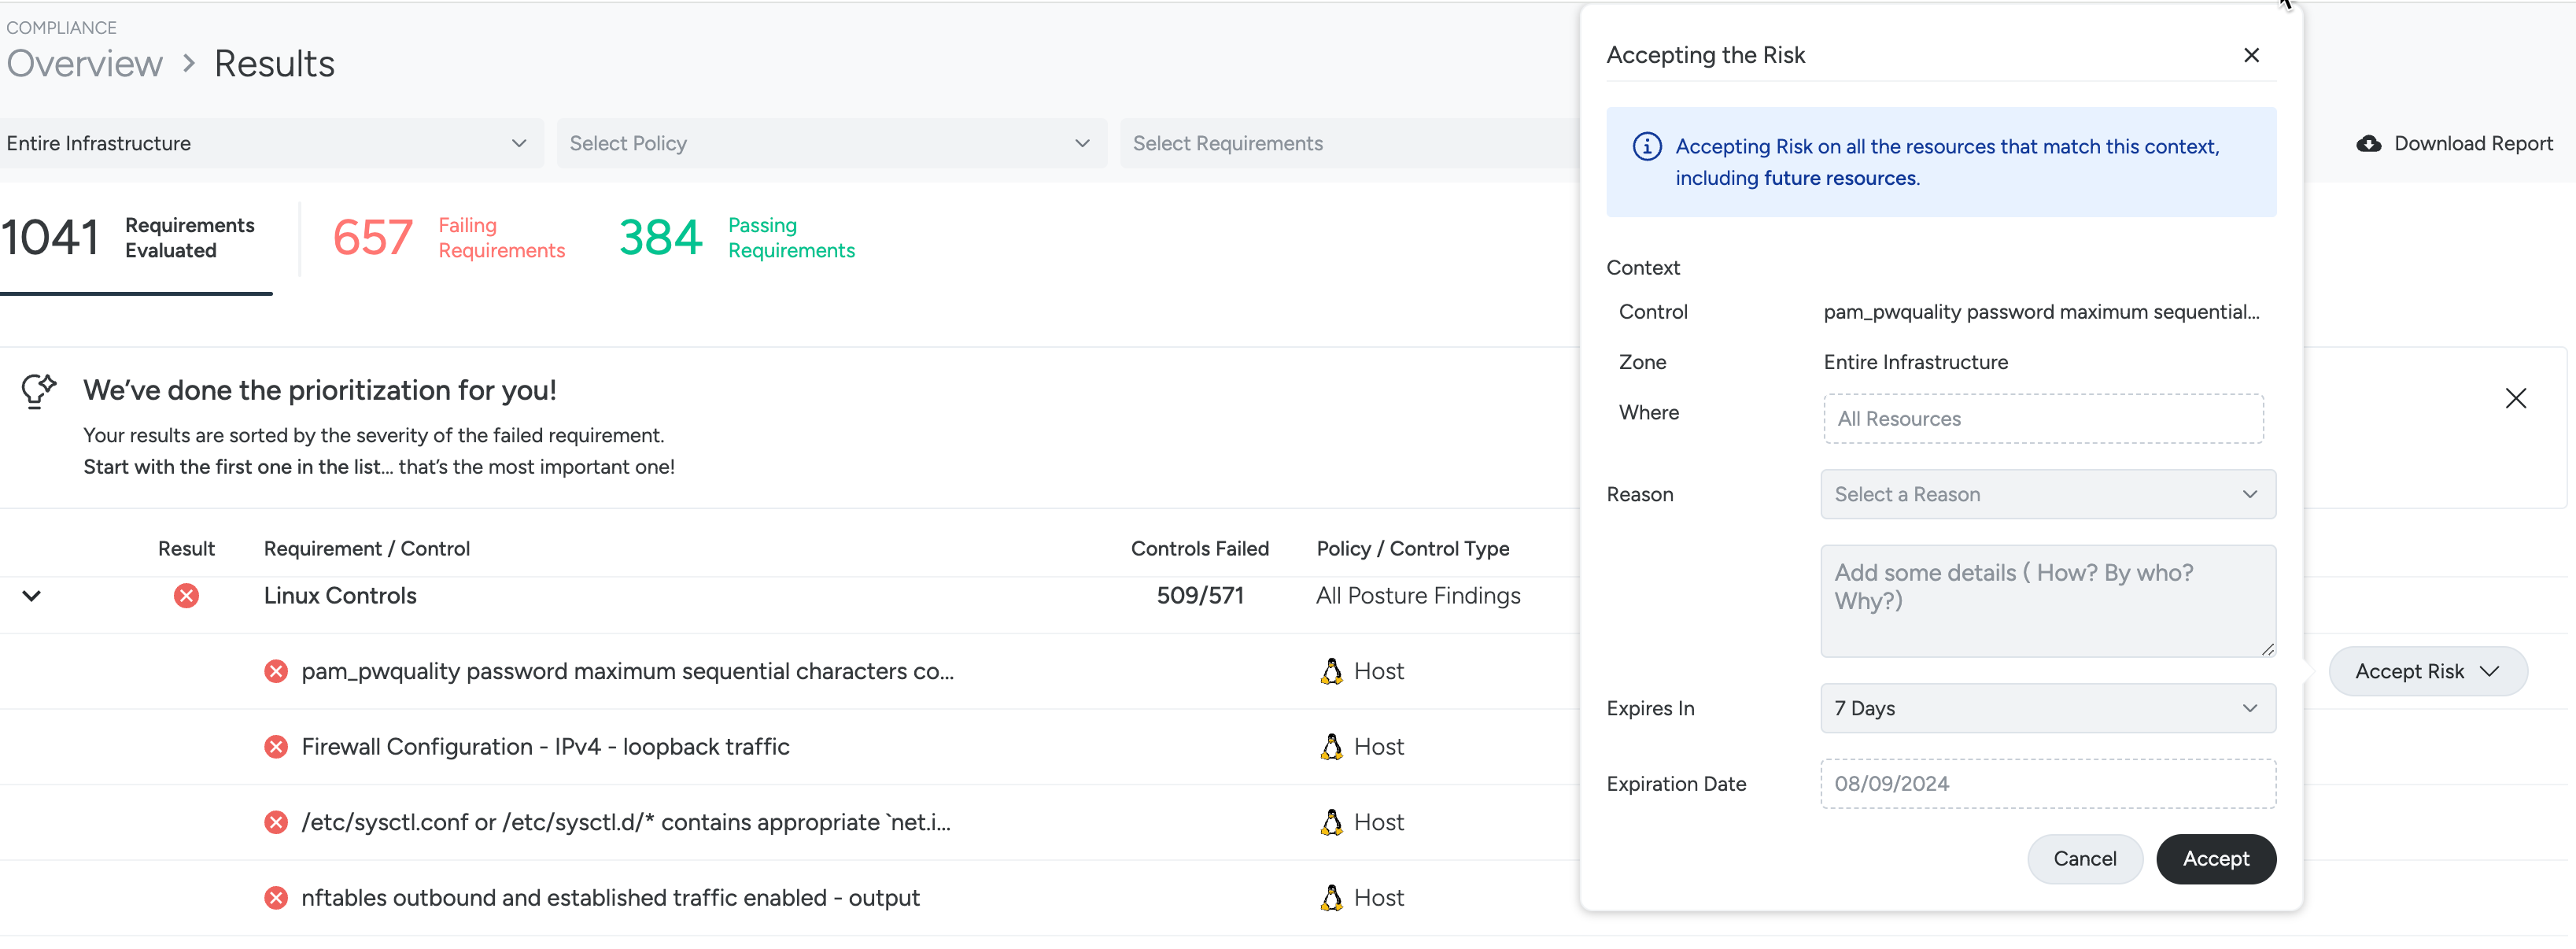
Fill out the required fields to comply with audit best practices and click Save.
Reason: Select a reason, such as Risk Owned, Transferred, Avoided, Mitigated, Not Relevant, or Custom.
See Reasons for Accepting Risk.
Details: Explain to an auditor more details about the reason for accepting the risk.
Expires In: Select when you want this acceptance to expire. If the control still fails after the acceptance expires, it will trigger again. Use a default option, such as seven days, or set a custom time span.
Expiration Date: If you set a Custom expiration period, enter the desired expiration date here.
You can filter violations by Accepted status to address them or go to the Accept Risk management panel. A global accept appears on the Accept Risk management page under “Context” showing Where: All Resources.
Reasons for Accepting Risk
Owned: The risk falls within risk tolerance levels. No additional risk response action is needed except for monitoring.
Transferred: For risks that fall outside of tolerance levels, reduce them to an acceptable level by sharing a portion of the consequences with another party, such as cybersecurity insurance. While some of the financial consequences may be transferrable, there are often consequences that cannot be transferred, like the loss of customer trust.
Avoided: You have taken actions to eliminate the activities or conditions that give rise to risk. Avoiding risk may be the best option if there is no cost-effective method for reducing the risk to an acceptable level. The lost opportunity cost associated with such a decision should also be considered.
Mitigated: You have reduced a given risk’s threats, vulnerabilities, and impacts to an acceptable level. This could range from reducing the probability of occurrence, or limiting damage caused by occurrence.
Not Relevant: The risk does not pose a threat or impact that warrants any specific action or response. Organizations may decide that certain risks are outside the scope of their operations, or that the likelihood or potential impact of the risk is negligible compared to other priorities. However, it’s important to thoroughly assess and document the rationale behind deeming a risk Not Relevant to ensure comprehensive risk management.
Custom: This involves devising unique strategies to address risks that don’t align with standard response types. Tailored to fit the organization’s specific circumstances and risk tolerance, these responses may combine existing measures with innovative approaches to effectively mitigate identified risks.
Drill Down to the Control Pane
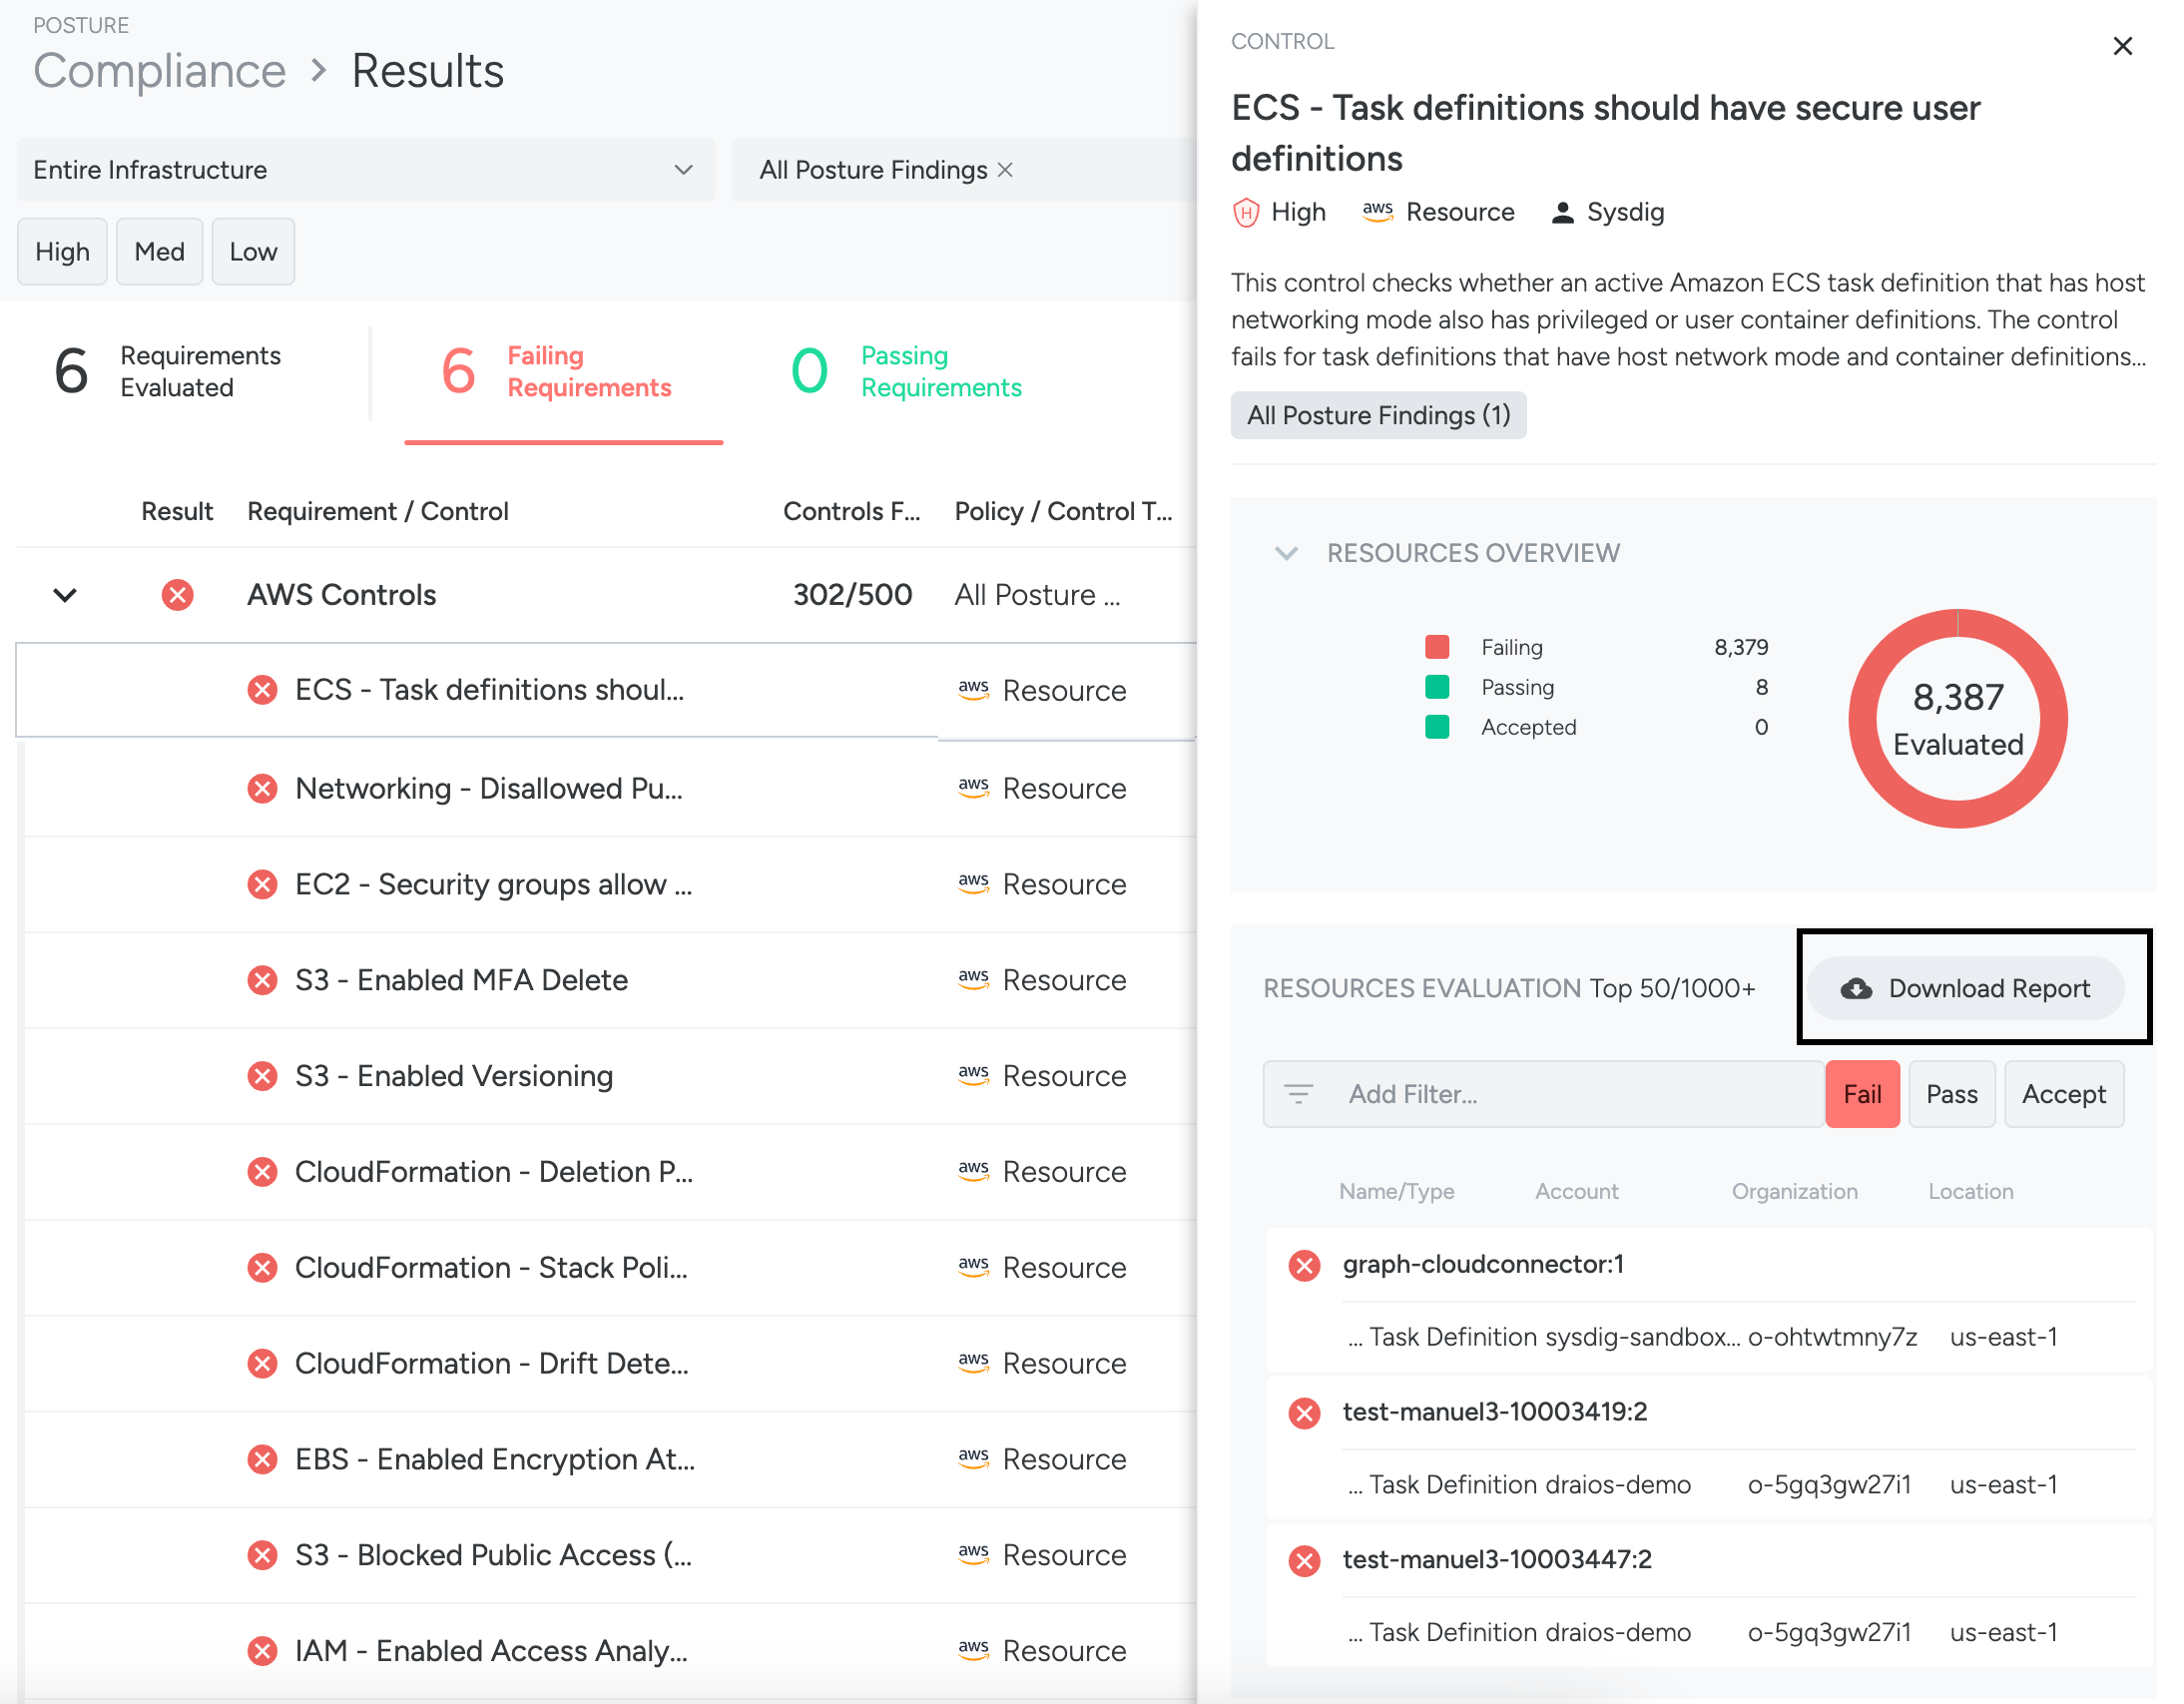
From the Findings page, click a control to open the Control pane on the right and review the resources that were evaluated by the control.
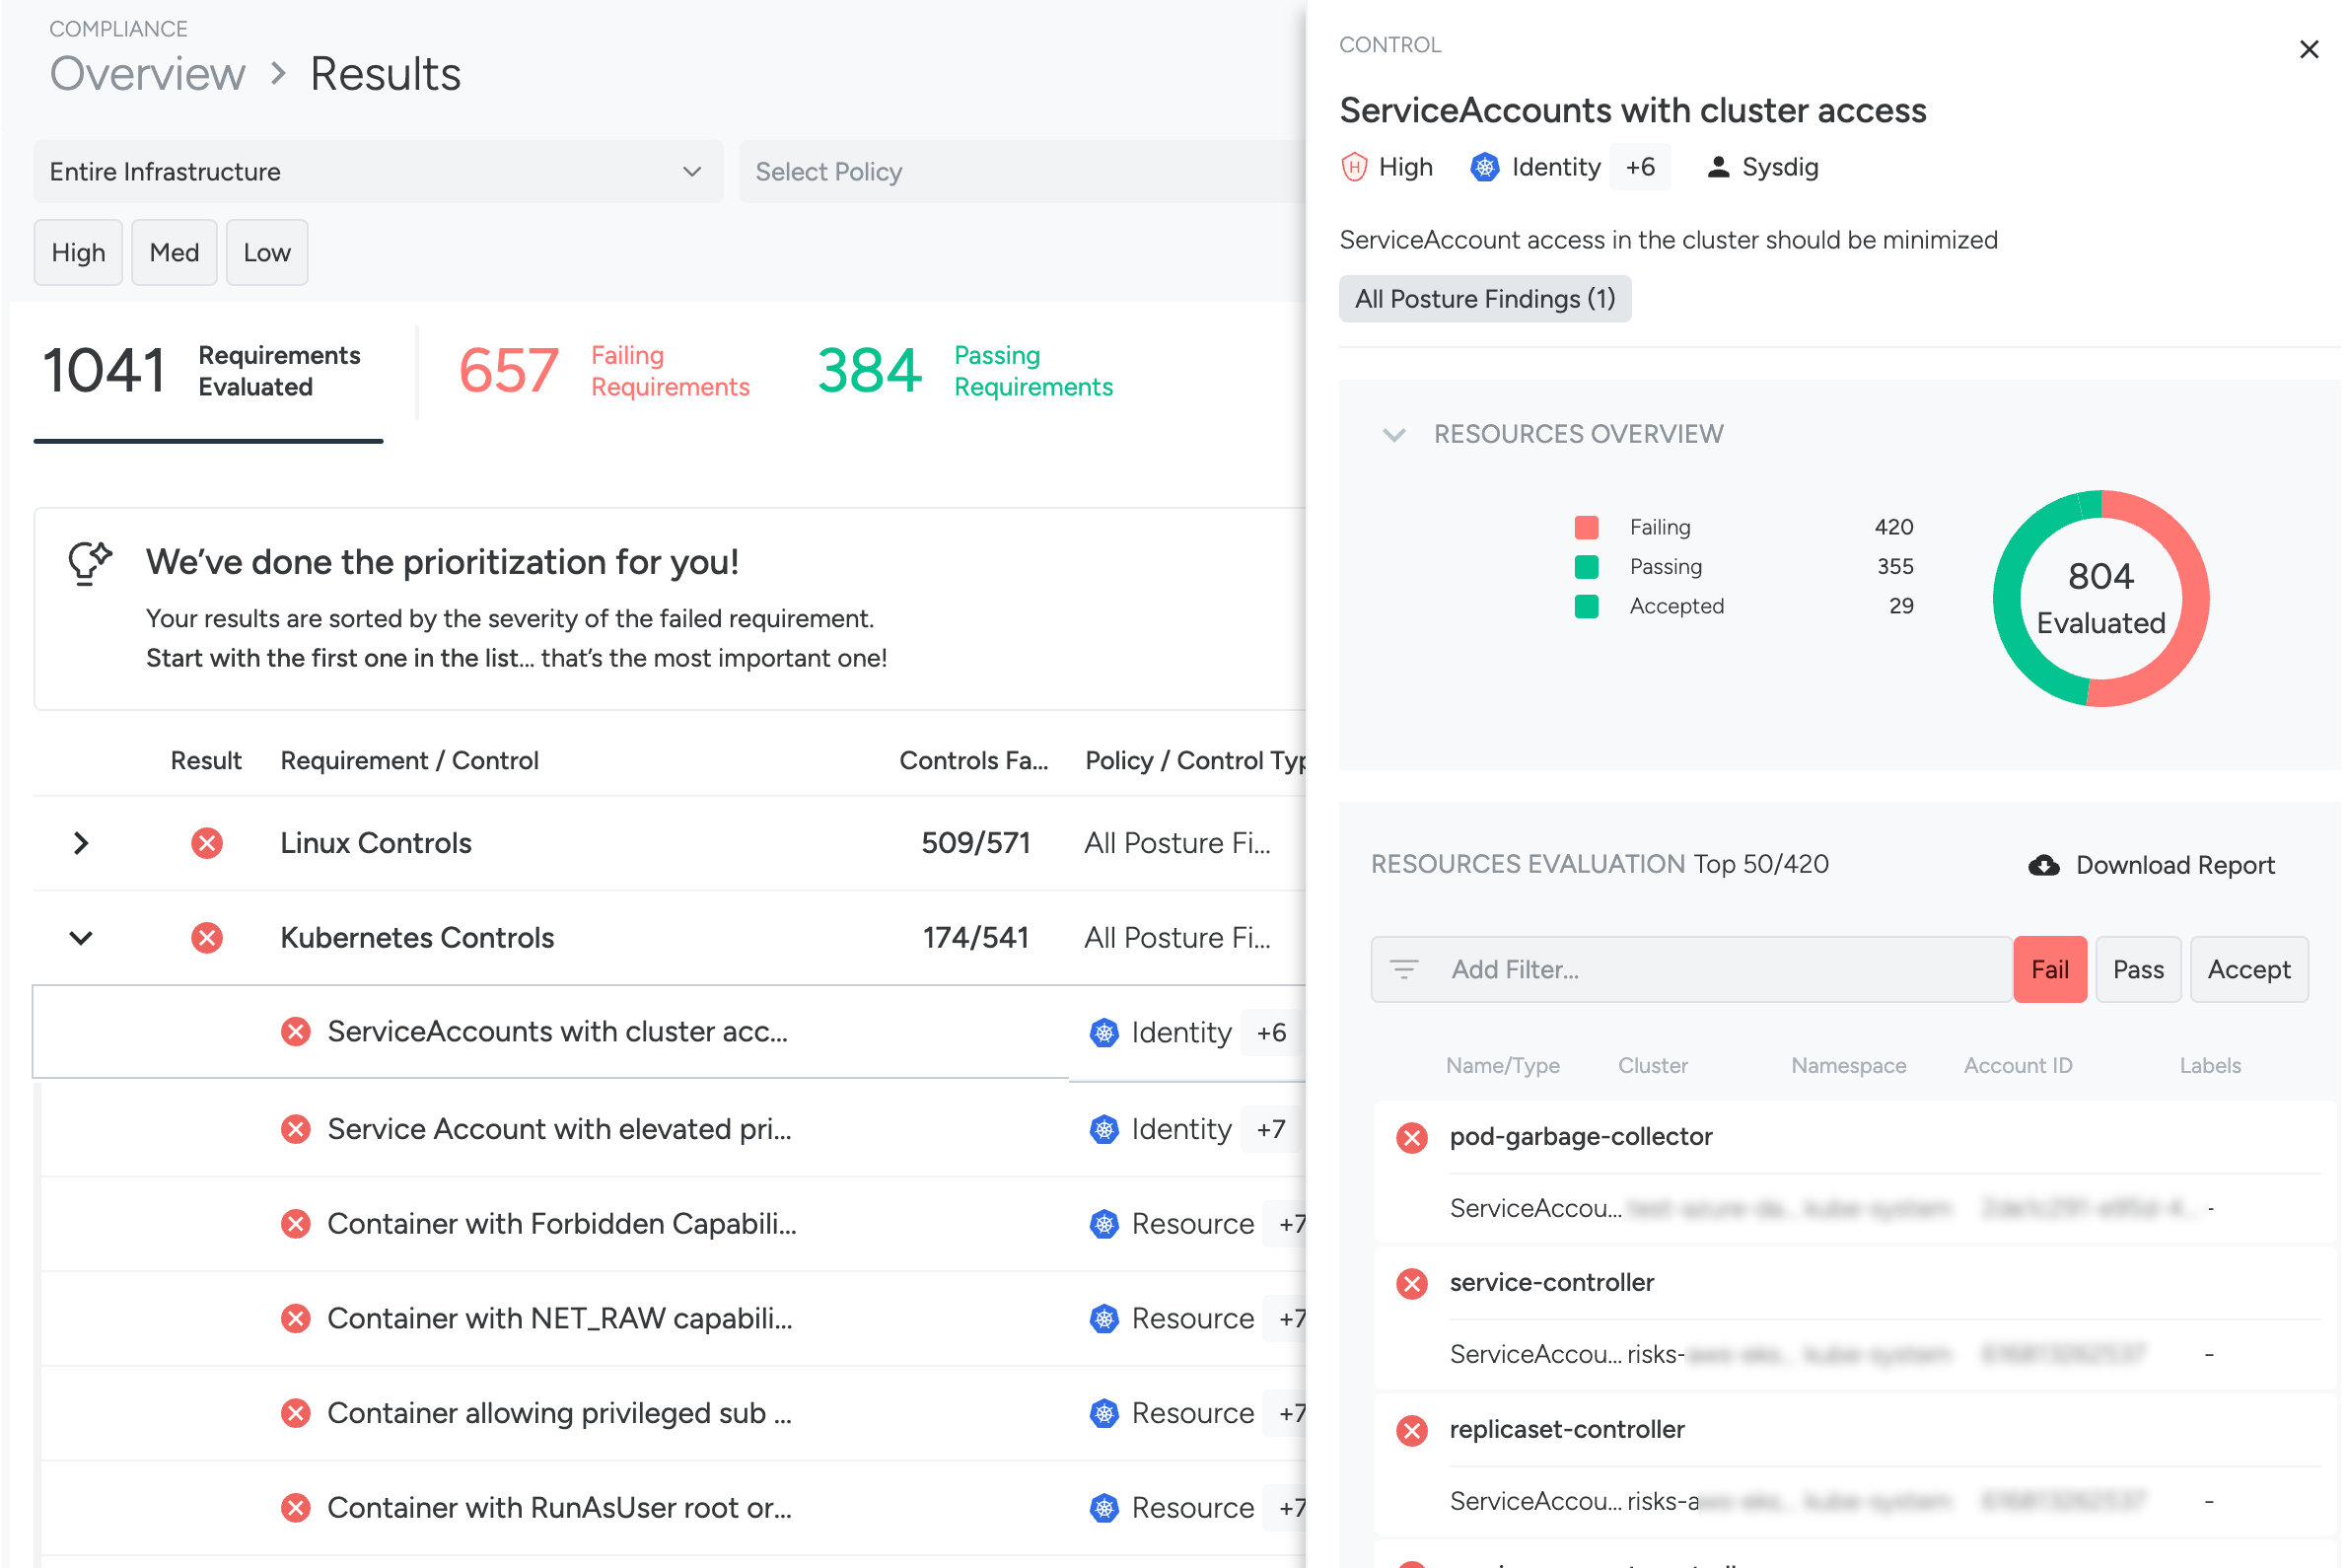
Here you can see:
- A description of the control
- An overview of all resources that have passed, failed, or had their risks accepted
Filters in the Control Pane
The Control pane shows a mini-inventory with the top 50 resources that were evaluated by the control.
Use filters to find additional resources. You can construct filter expressions in the Control pane on resource attributes:
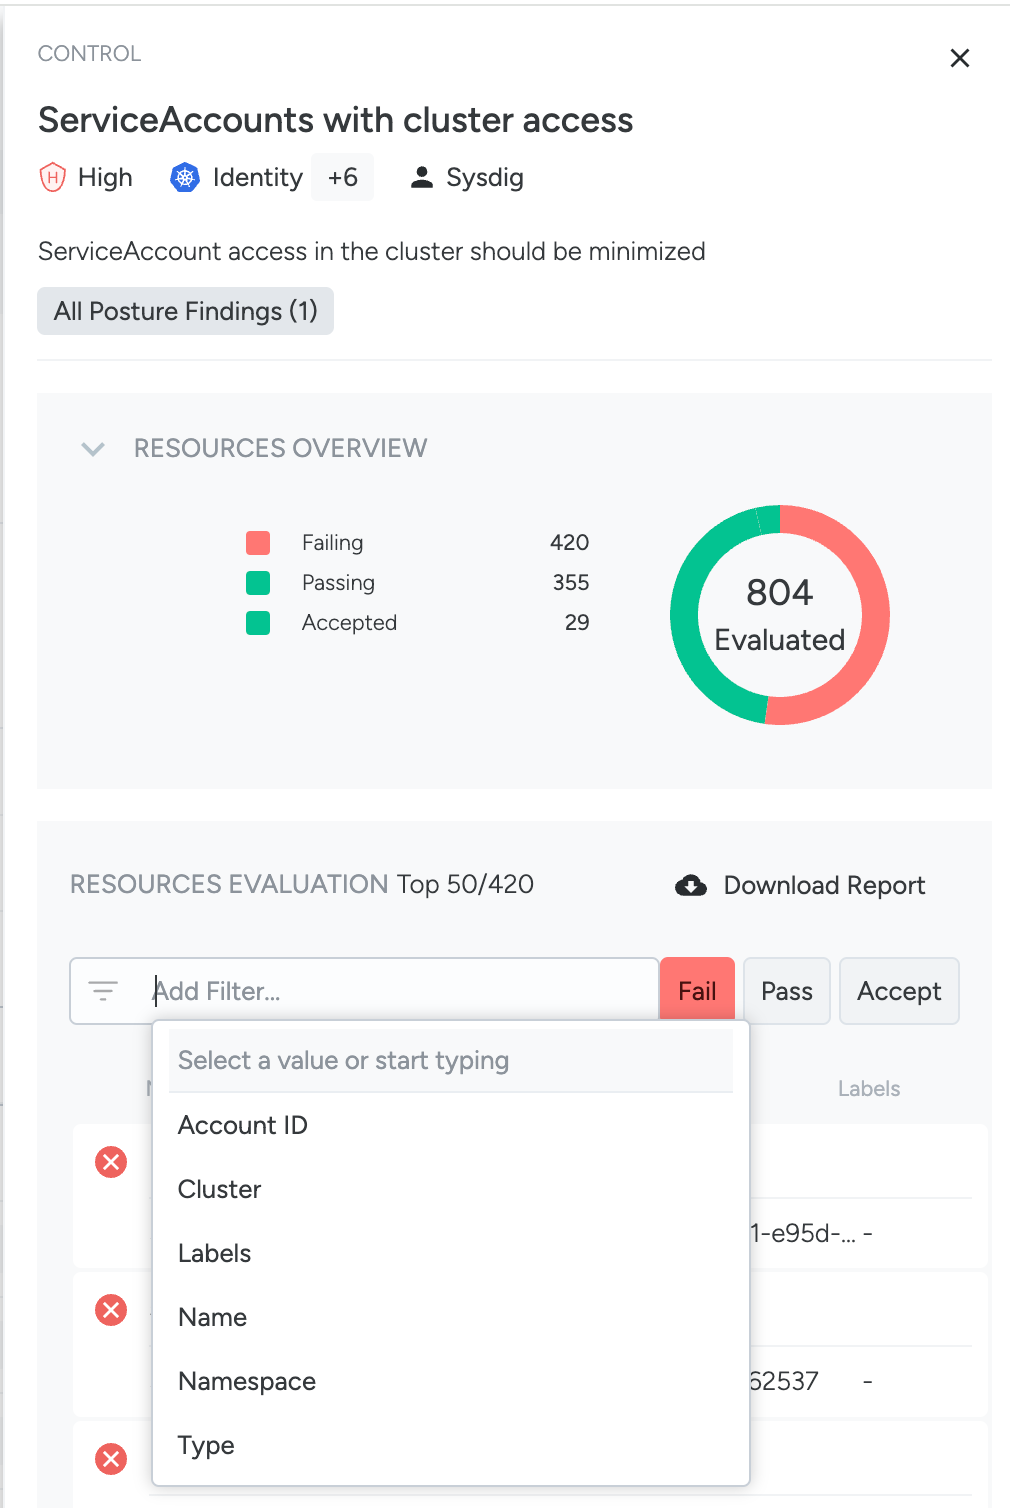
For each of the following Control Types, you can refine your search in the mini-inventory using the associated attributes:
Kubernetes Identity
- Cluster
- Labels
- Name
- NamespaceType (= Resource Type in Inventory) - ex: Group, ServiceAccount, User
Kubernetes Resource
Cluster
Labels
Name
Namespace
Type ( Resource Type in Inventory)
For example, Deployment, DaemonSet, StatefulSet, ReplicaSet, Pod, Job, CronJobHost (K8s, Linux, Docker)
Host (K8s, Linux, Docker)
- Cluster
- Name
- OS (Operating System in Inventory)
- OS Image
Managed Cloud Identity & Resource (AWS, GCP, Azure)
- Account
- Location (Region in Inventory)
- Name
- Organization
Select a failing resource to review its remediation guidelines and take action toward its remediation.
Evaluate and Remediate
The remediation solutions are under continued development in the product.
Some remediation flows are manual, while others offer different degrees of automation.
Sysdig can present a fix to be manually applied to production, or it can fix the resource via the creation of a Pull Request with the required changes directly in the Git repository that has been previously configured as an IaC integration.
Currently, most risk response actions are for a single resource for a single violation. Several types of risk responses are supported:
- Manual Remediation: Displays playbook text to remediate the violation.
- Automatically generate a patch (with or without user input): Displays patch code with an input field if new values are required - you can download the patch, copy and paste the patch application code.
- Set up an Automatic Pull Request (with or without user input): Displays patch code (with an input field if new values are required) - and you open a PR. Ensure that you have the required permission to use this feature.
- Accept the Risk on a resource.
- Note: You can Accept the Risk on an entire control as well. See Accept Risk Globally on a Control.
Remediation: How Do Source Detection and Fixing Work?
Source Detection
When applying remediation to a resource, Sysdig tries to identify the matching source file from your configured Git integrations. If there are multiple candidates, or if finding the matching source file is impossible, you can use the search field to manually explore and select the relevant file from the connected Git repositories.
Pull Requests (PRs)
When using Pull Request for remediation, Sysdig creates a branch directly in your Git repository, and fixes the offending resource with corrective changes. You can review all the suggested changes in the PR before you merge it.
For more information, see IaC integration configuration instructions.
Review the Remediation Pane
To access the Remediation pane:
Log in to Sysdig Secure, and select Compliance.
Select a policy/zone tile from the list to open Results.
Click a requirement from the list to see controls.
Select a control to open the Control pane.
From the Resource Evaluation list, select a resource to View Remediation.
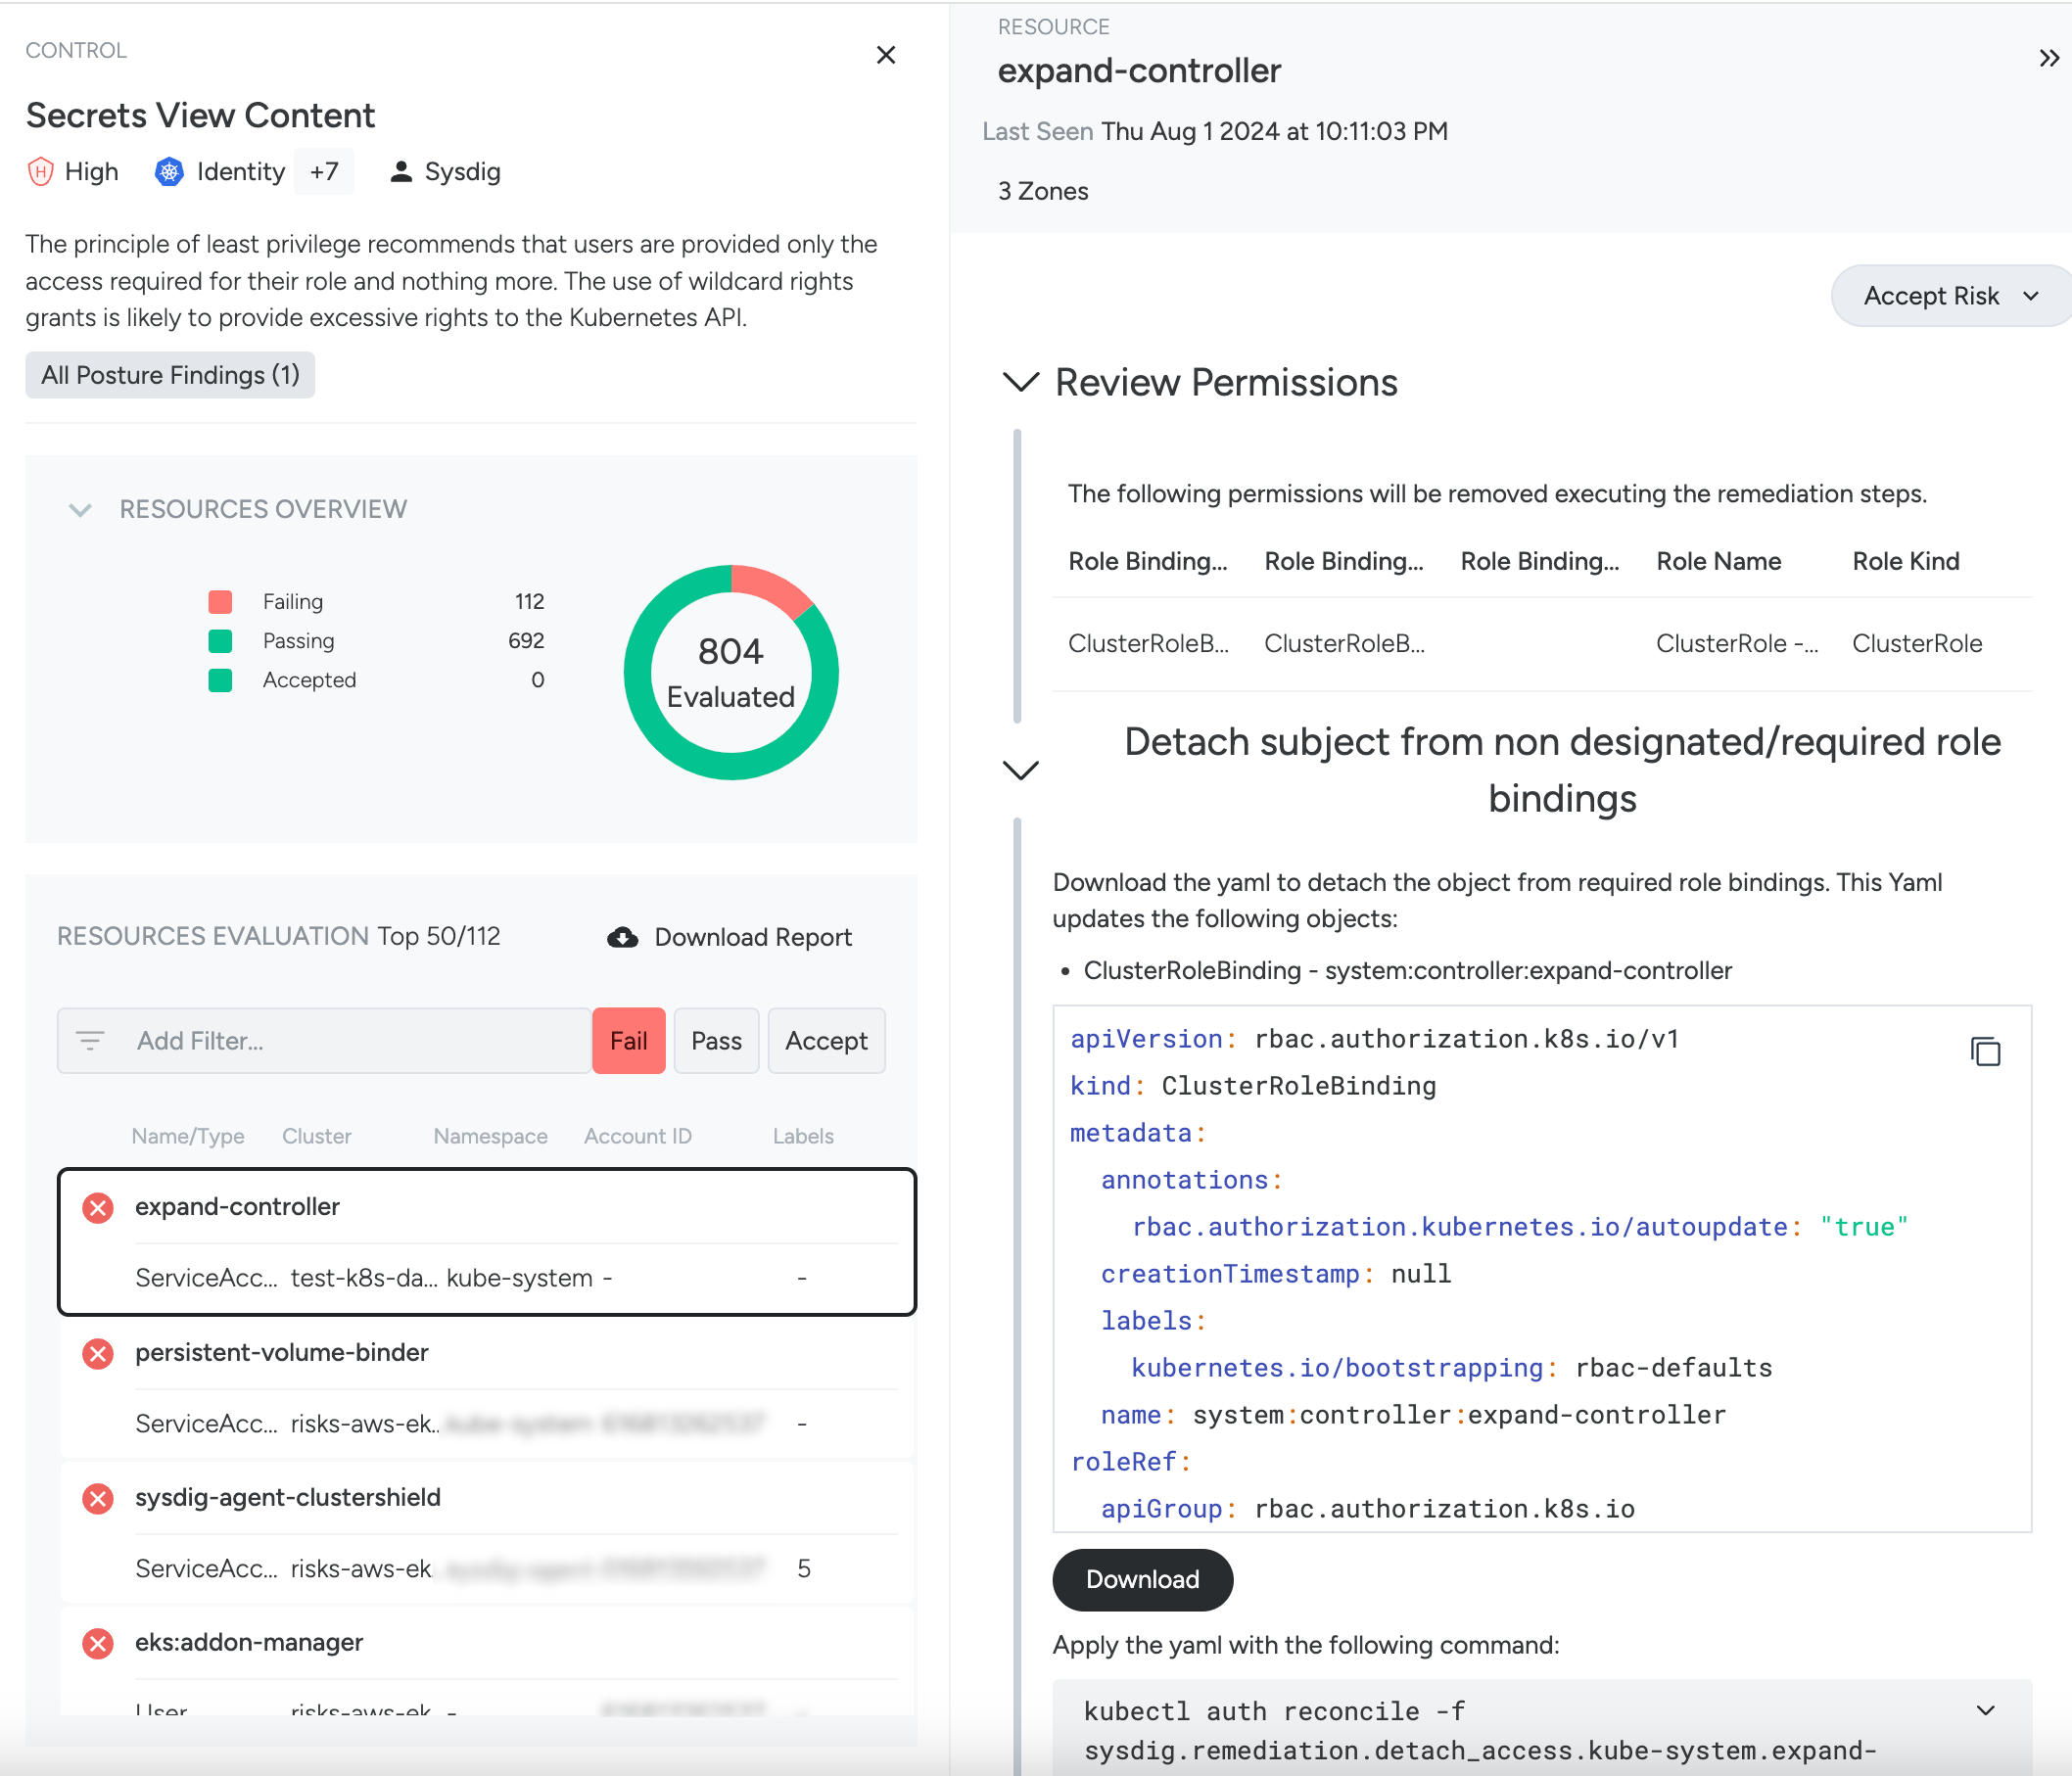
This pane will differ depending on the specific control and resource evaluation.
If remediation code is available, and Git integration has been set up, then the full remediation pane will be displayed.
If there is more than a single possible matching file for the resource, all the candidates are displayed as Suggested Sources.
If no candidates are displayed or you want to choose a different file, you can click the Search Source button to manually select from the list of possible files in the connected Git repositories.
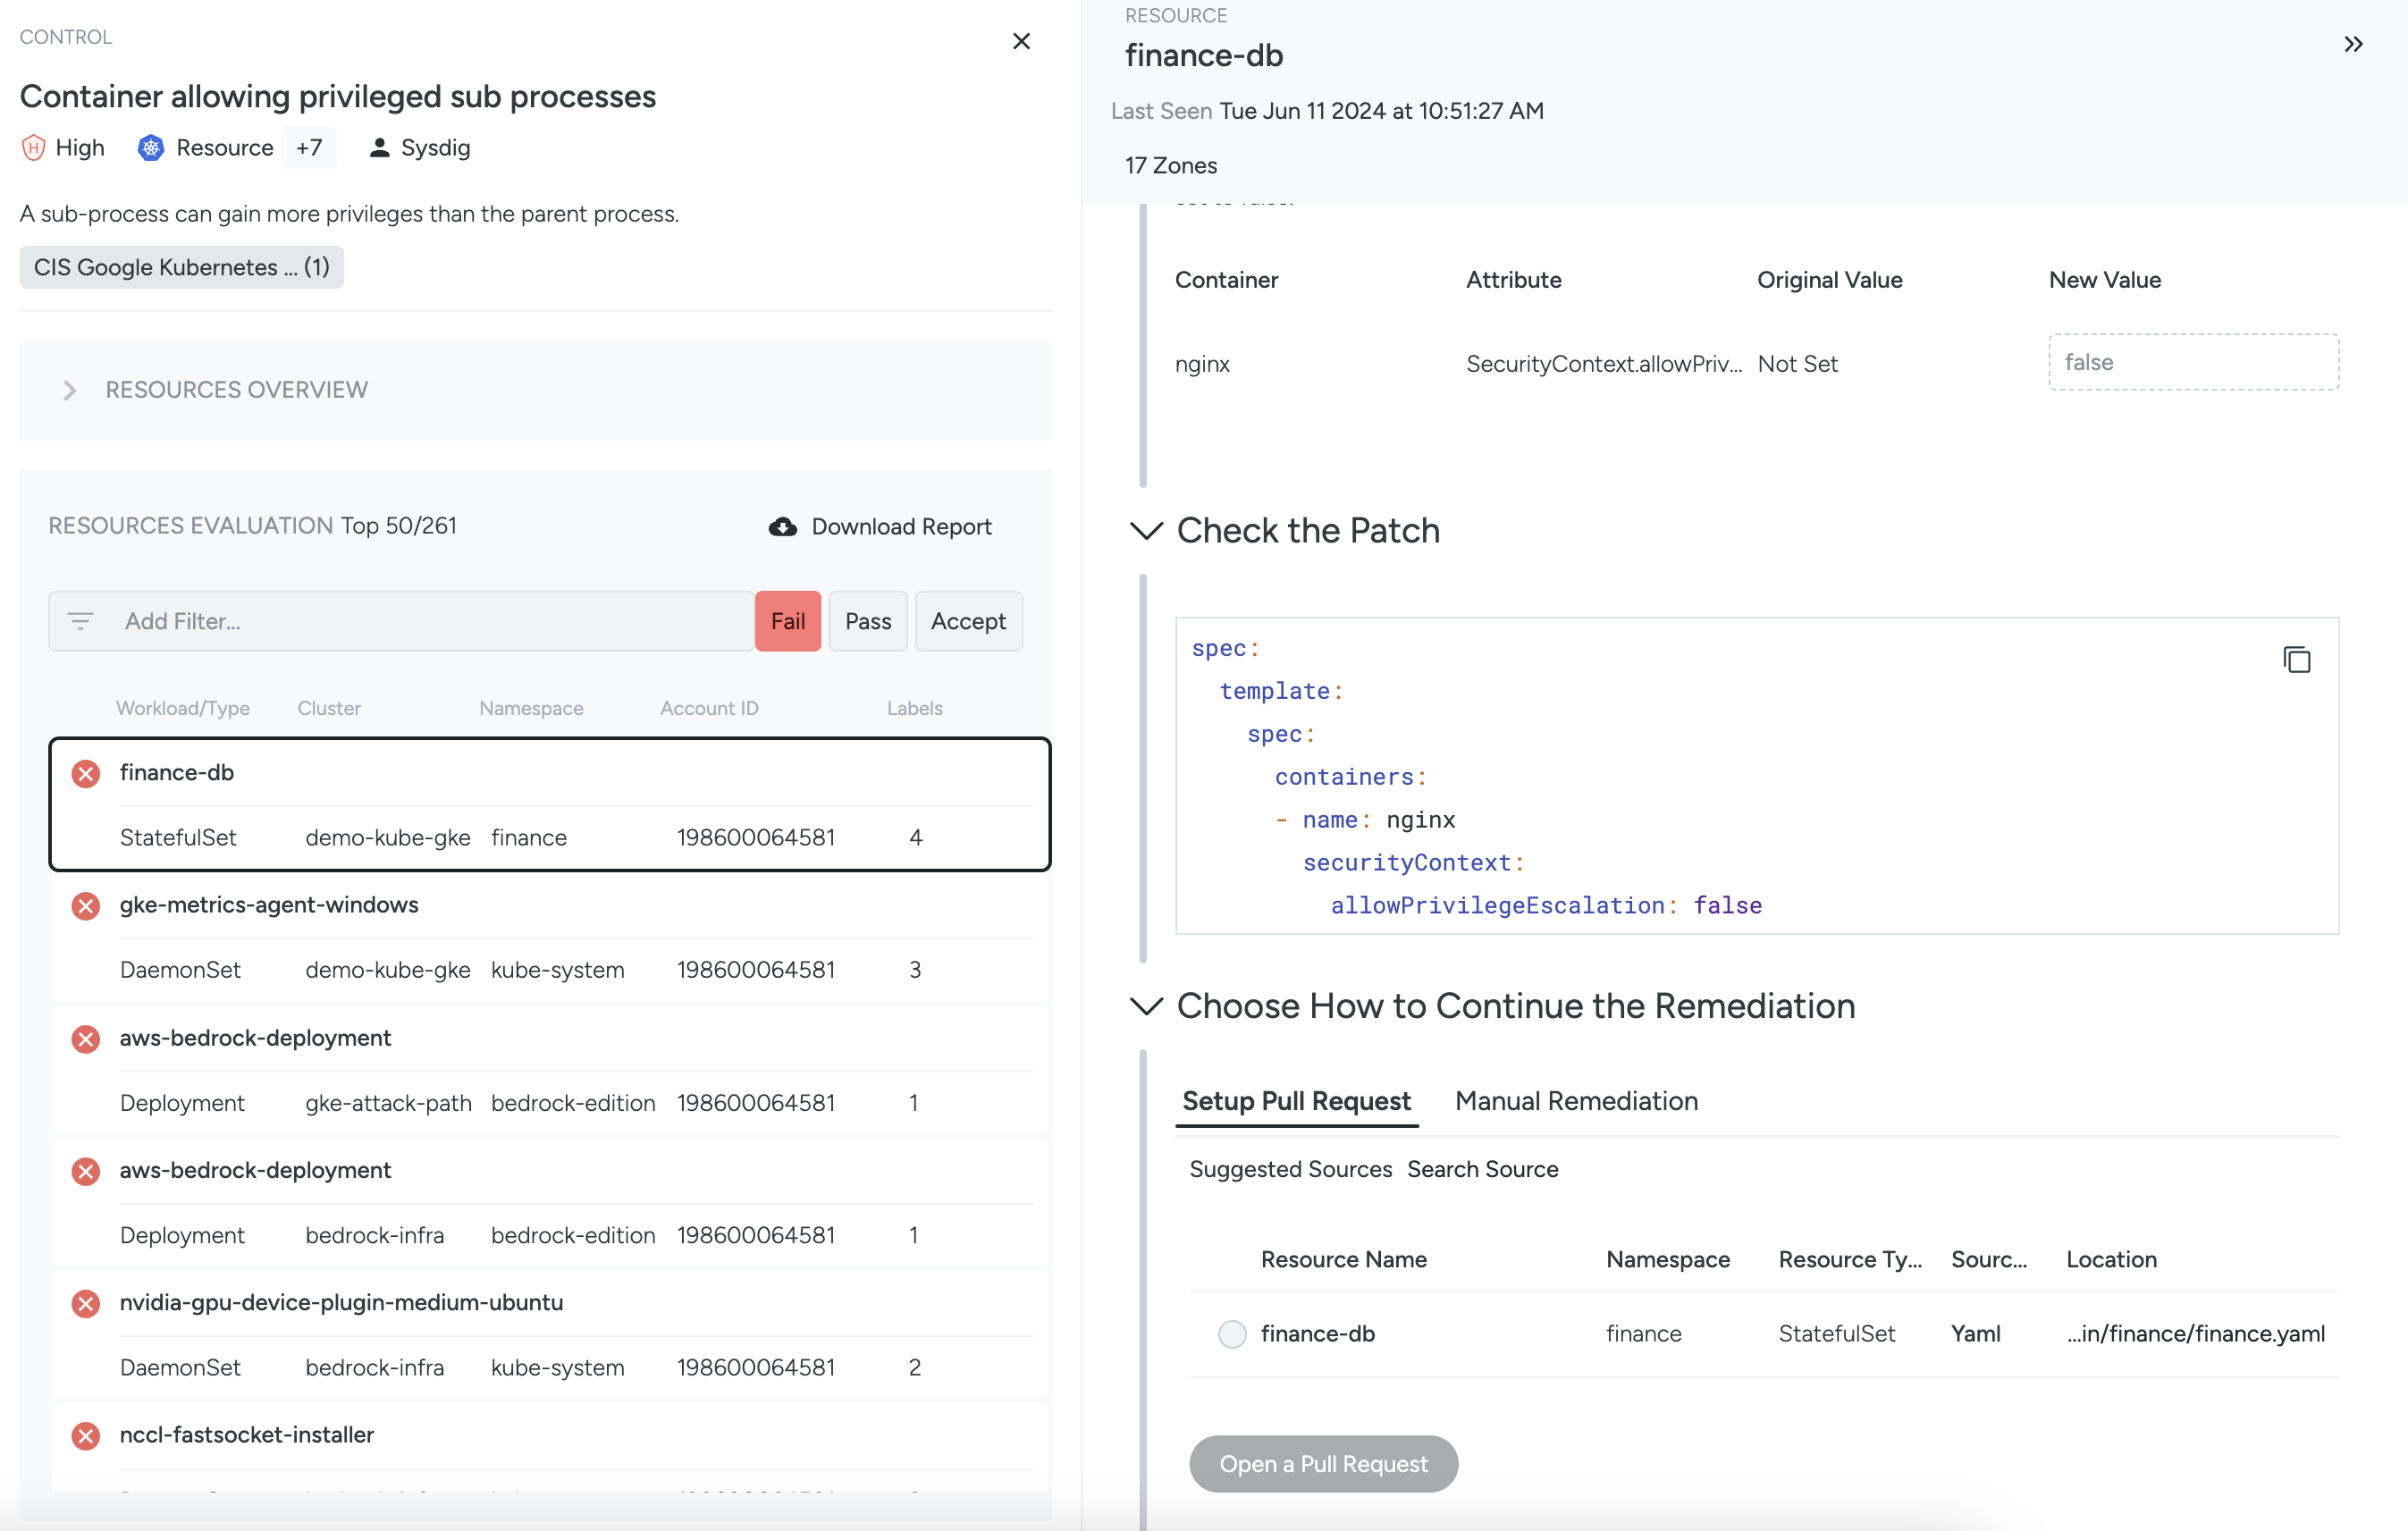
Review Issues
Here you see the impact of the remediation, review the resource attributes, and, if relevant, enter a necessary Value that will be incorporated into the patch code.
If a required value is detected, it will be automatically inserted and the Value input field will be read-only.
Remediate
The code is presented for review when there is a remediation that can be applied manually or used in a Pull Request to remediate the IaC file. In most cases, Sysdig recommends that you download the code in the Continue Remediation section, but you can also copy/paste it.
Continue Remediation - Manual
If you have not integrated your Git repository with Sysdig’s IaC Scanning, or if creating a pull request is not required in a particular resource failure, then you can perform remediation manually.
Use the button to download and apply the provided code.
Continue Remediation - Pull Request
Ensure that you have the required permission to use this feature.
After configuring IaC Scanning in your account, Sysdig scans and analyzes the manifests and modules from your defined Git sources, and scrapes resources declared in your source files. The scan process runs daily or whenever a new Git source is added.
Sysdig tries to match and identify the resources discovered from the IaC Scanning with the deployed and evaluated resources. The best matches under Suggested Sources in the Remediation pane when setting up a Pull Request.
You can also search manually for sources by their full URL path.
Use the button to Open a Pull Request.
Workflow Name Selector for Helm/Kustomize:
What is it: You select a source of type Helm/Kustomize. You can type a selector for the workload name. Why: In Helm, in most cases, workload names are derived from the release name, which means that they change with every new release. The selector is a regular expression that matches workloads by prefix/suffix (or a more complex pattern). With the selector in place, you can use the remediation for workloads generated from the same chart, regardless of the release.
Note that Sysdig will create a new Pull Request in your repository with the suggested fixes, and depending on your Git source configuration, Sysdig can run a Pull Request Policy Evaluation that might report other unfixed control violations.
See also: Pull Request Policy Evaluation.
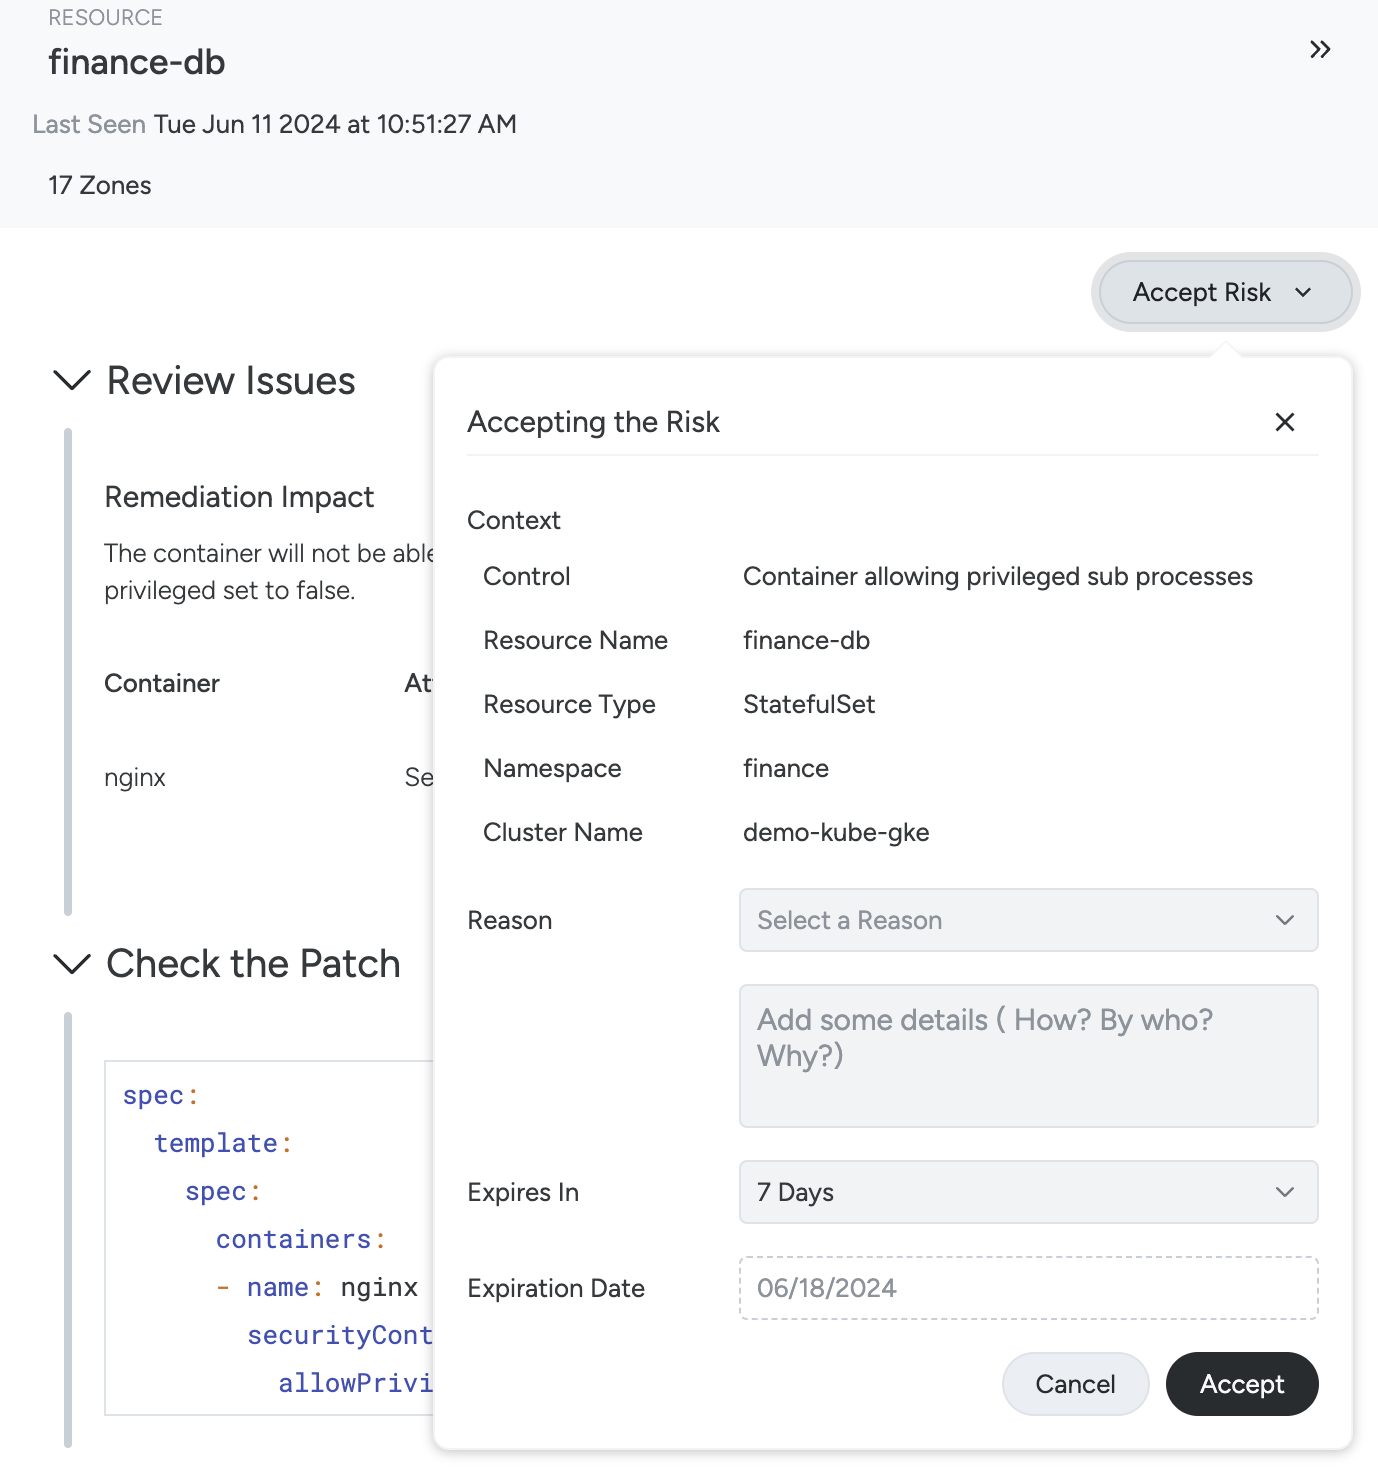
Option: Accept Risk on a Resource
Ensure that you have the required permission to use this feature.
Use the following steps to temporarily accept a failing control so the resource will pass and the compliance score will improve:
Click the Accept Risk button on the remediation pane.
Fill out the required fields, to comply with audit best practices, and click Save.
Reason: Risk Owned, Transferred, Avoided, Mitigated, Not Relevant, or Custom. See also: See also: Reasons for Accepting Risk.
Details: Explain to an auditor more details about the reason for accepting the risk.
Expires In: Select when you want this acceptance to expire and the resource to fail. Options: 7, 30, 60 or 90 days; Custom time frame; Never.
Expiration Date: If Expires In is set to Custom specify the date on which the acceptance expires, otherwise it is autocompleted.
Later, you can filter violations by Accepted status to address them or go to the Accept Risk management panel.
Create and Download a Report
To meet compliance goals, an organization may need to generate output to be shared with other stakeholders, such as executives or auditors, to show point-in-time compliance/violations.
You can use reports to share compliance results with your development teams. Download ad hoc reports as CSV files from the Compliance Results page or from an individual control.
To generate a report of Compliance results:
Select Compliance > Findings.
Select a tile of a requirement under one of your zones.
Optional: filter as desired. For example: by dates, by pass/fail status, by controls, and so on. You can select more than one policy for a single zone. The maximum report size of 10 MB.
Click Download Report.
A file is downloaded in a CSV (Comma-Separated-Values) format and can be used as a spreadsheet.
To generate a report from an individual control:
Select Posture > Compliance.
Select a tile of a policy under one of your zones.
Select a control to open the control pane, filter the resources if required, and click the Download Report button.
The maximum report size is 10 MB.
Also consider using APIs. For details, see CSPM APIs.
Feedback
Was this page helpful?
Glad to hear it! Please tell us how we can improve.
Sorry to hear that. Please tell us how we can improve.