Configure OneLogin for SAML
Prerequisites
Review SAML (SaaS).
To configure Sysdig Monitor and/or Sysdig Secure as a SAML application, use OneLogin’s article titled Use the OneLogin SAML Test Connector.
The notes below call out specific steps that require additional action.
Sysdig-Specific Steps for OneLogin Configuration
Adding the SAML Test Connector
At the step for Adding the SAML Test Connector, select SAML Test Connector (IdP w/ attr w/ sign response).
If you don’t intend to configure IdP-initiated login flow, uncheck the slider so it will no longer be Visible in portal.
Test Connector Configuration Page Settings
At the Test Connector Configuration Page, enter the values shown in the table below. If you wish to configure IdP-initiated login flow, replace CUSTOMER-ID-NUMBER with the number retrieved as described in the Find Your Customer Number article.
See SaaS Regions and IP Ranges and identify the correct URLs associated with your Sysdig application and region. For example, given below are the URLs for the US East region.
Field | Value for Sysdig Monitor | Value for Sysdig Secure |
|---|---|---|
RelayState (optional - only configure if you intend to use IdP-initiated login flow) | #/&customer= | #/&customer= |
Recipient |
|
|
ACS (Consumer) URL Validator |
|
|
ACS (Consumer) URL |
|
|
For other regions, the format is https://<region>.app.sysdig.com. Replace <region> with the region where your Sysidig application is hosted. For example, for Sysdig Monitor in the EU, you use https://eu1.app.sysdig.com/api/saml/auth. For other regions, see Saas Regions and IP Ranges.
Email and Name Values (Optional)
If you want the user’s First Name and Last Name to be included in the records created in the Sysdig platform’s database when new users successfully login via SAML for the first time:
Open the Parameters tab.
Click Add parameter and create each of two New Fields, checking the box each time to Include in SAML assertion.
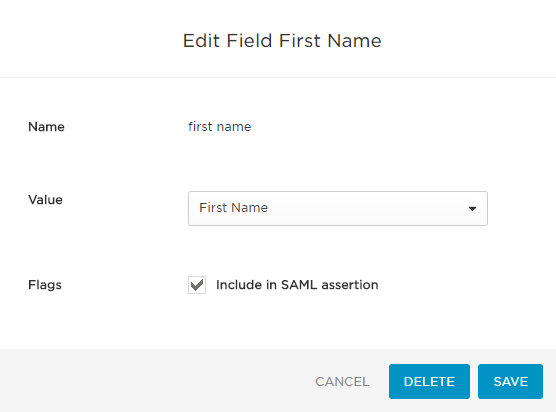
Click to Edit each field and select the Value shown from the drop-down menu. Note that the Field Names are case sensitive, so be careful to enter them as all lowercase.
Save your changes.
| Field Name | Value |
|---|---|
email | Email |
first name | First Name |
last name | Last Name |
The following shows an example of a correctly-configured field for First Name:

Issuer URL
Click to the SSO tab, copy the Issuer URL, and paste in the Metadata entry on the SAML Configuration page in the SAML connection settings.
Test Metadata (Optional)
To ensure the metadata URL you copy at the end of the IdP configuration procedure is correct, you can test it by directly accessing it via your browser.
When accessing the URL, your browser should immediately download an XML file that begins similarly to the example shown below. No entry of credentials or other security measures should be required to successfully download it. If this is not the case, revisit the IdP configuration steps.
<?xml version= "1.0" ?> <EntityDescriptor xmlns= "urn:oasis:names:tc:SAML:2.0:metadata" entityID= "https://app.onelogin.com/saml/metadata/680358" > `<IDPSSODescriptor xmlns:ds=` `"http://www.w3.org/2000/09/xmldsig#" ` `protocolSupportEnumeration=` `"urn:oasis:names:tc:SAML:2.0:protocol"` `>names:tc:SAML:` `2.0` `:metadata` `" entityID="` ` https://app.onelogin.com/saml/metadata/ ` `680358` `">` ... |
Feedback
Was this page helpful?
Glad to hear it! Please tell us how we can improve.
Sorry to hear that. Please tell us how we can improve.