Configure Microsoft Entra ID for SAML
Prerequisites
- Administrator privileges on Sysdig and Microsoft Entra ID.
- Get the Redirect URLs for Authentication.
Configure the Sysdig Application in Microsoft Entra ID
Log in to the Microsoft Entra ID portal.
Select Enterprise Applications.
The Enterprise applications - All application screen is displayed.
Click New Application.
On the Add an Application screen, select Non-gallery application.
Give your application a name, and click Add at the bottom of the page.
On the menu, select Single sign-on.
Choose SAML as the sign-on method.
Edit the Basic SAML Configuration as follows:
- In the configuration page, click the edit icon.
Specify the following:
Identifier (Entity ID): Uniquely identifies the Sysdig application. Entra ID sends the identifier to the Sysdig application as the audience parameter of the SAML token. Sysdig validates this as part of the SSO process.
Find the entity ID for your SaaS region in Redirect URLs for Authentication. For example, the identifier for Sysdig Monitor for the EU Central region is
https://eu1.app.sysdig.comand for Sysdig Secure ishttps://eu1.app.sysdig.com/secure/.If you are using multiple integrations, or are integrating with multiple tenants from the same Microsoft Entra ID, enable the option Unique Entity ID later when you Configure Sysdig.
Reply URL: Specifies where Sysdig expects to receive the SAML token.
Find the appropriate URL for your SaaS region in Redirect URLs for Authentication. For example, the identifier for Sysdig Monitor for the EU region is
https://eu1.app.sysdig.com/api/saml/authand for Sysdig Secure ishttps://eu1.app.sysdig.com/api/saml/secureAuth.Relay State: Specifies to the application where to redirect the user after authentication is completed. Typically, the value is a valid URL for Sysdig. If you are configuring SSO for SaaS, change the relay state to reflect the customer number associated with your Sysdig application.
The format is:
#/&customer=1234If you have defined an integration name or are using multiple integrations, include the integration name in the Relay State parameter using the following format:
&integrationName=<INTEGRATION_NAME>This combines to result in:
#/&customer=1234&integrationName=<INTEGRATION_NAME>
For more information on configuration parameters, see the Microsoft documentation page Configure SAML-based single sign-on to non-gallery applications.
To enable Signed Assertion and Validate Signature, select Edit on SAML Certificates. In the Signing Option drop-down, select Sign SAML response and assertion.
Select Save.
Configure Sysdig
To configure Sysdig for Microsoft Entra ID, ensure you have the correct parameters to hand, then proceed to the steps below.
| Parameters | Description |
|---|---|
| Metadata | Under SAML Signing Certificate, copy the App Federation Metadata URL.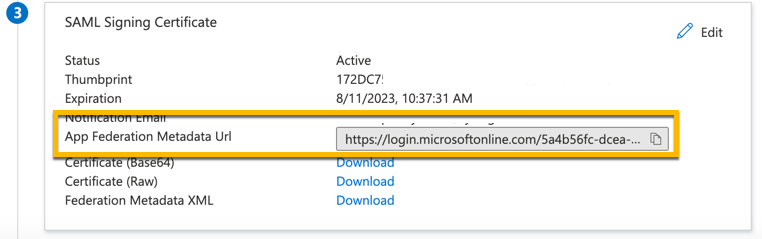 |
| Email Parameter | Copy the Full claim URL, including the Name and Namespace. For example, http://schemas.xmlsoap.org/ws/2005/05/identity/claims/email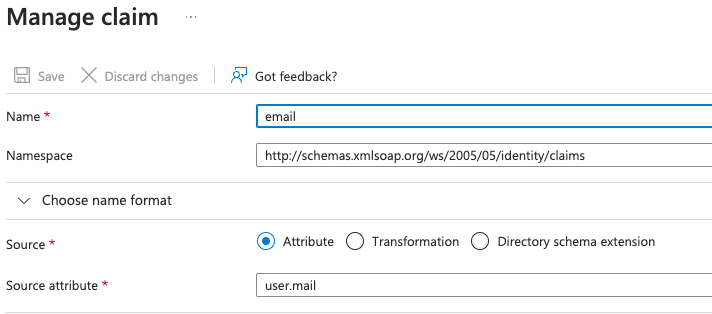 |
Once you have the necessary parameters, proceed with configuration in the Sysdig UI:
Log in to Sysdig Monitor or Secure.
Navigate to Settings via the user menu icon at the bottom of the left navigation bar.
Under Access & Secrets, select Authentication (SSO).
Edit existing or create a new SSO integration (type: SAML).
In Metadata Enter the App Federation Metadata URL you copied.
In Email Parameter Set the value to the full claim URL. Ensure that the claim fully matches the Email parameter used in Sysdig UI.
The rest of the fields and toggles can be left as default.
If using multiple tenants or multiple integrations from the same Microsoft Entra ID, enable Unique Entity ID option and copy the Entity ID value.
Select Save Settings.
Enable the integration by selecting the option from the Enabled column in the integration
Create a User in Microsoft Entra ID Domain
Log in to the Microsoft Microsoft Azure portal.
Click Entra ID, and note down the domain name.
Select Entra ID, then Users.
The Users - All Users screen is displayed.
Select New Users .
You can either create a new user or invite an existing one.
Enter name, username, and other details, then click Create.
In the Profile page, add the Email and Alternate Email parameters.
The values can match.
Assign the User to the Sysdig Application
Navigate to the Sysdig application.
Click Users and Group, then click the Add user button.
Select the Users and Groups checkbox, then choose the newly created user to add to the application.
Click Select, then Assign at the bottom of the screen.
Enable Authentication Settings in the Sysdig Instance
Ensure the flag to enable/disable create user on login is enabled. Typically this setting is enabled by default.
If you are using both Sysdig Monitor and Secure, ensure that the user accounts are created on both the products. A user that is created only on one Sysdig application will not be able to log in to another through SAML SSO.
If you are on Sysdig Platform versions 2.4.1 or prior, contact Sysdig Support to help with user creation.
(Optional) Configure Sysdig as a New Application
If Microsoft Entra ID does not allow you to create Sysdig as a Non-Gallery application, perform the following:
In Entra ID, click Enterprise Applications > New Application.
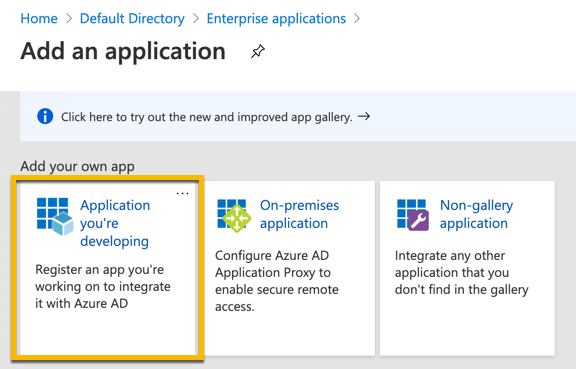
Select Application you’re developing.
You will be taken to the app registration page:
Select New Registration:
Provide a name for the application you are registering.
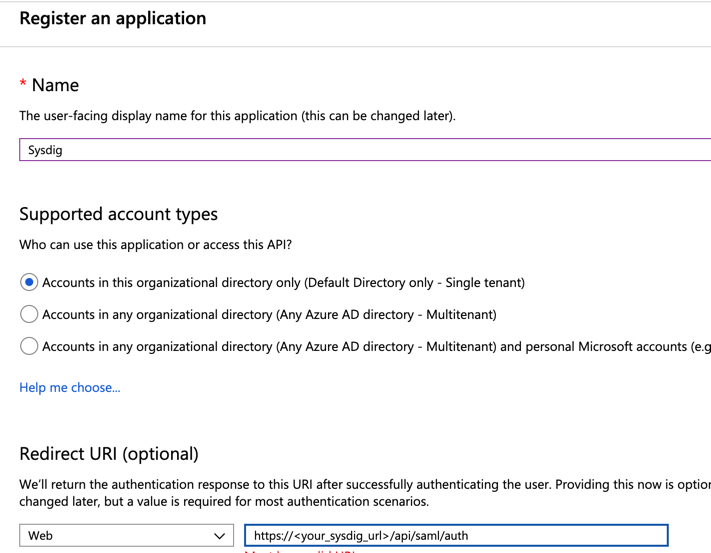
Enter the redirect URI. Find the redirect URL in Redirect URLs for Authentication. For example, the redirect URI for Sysdig Monitor for the EU region is
https://eu1.app.sysdig.com/api/saml/authand for Sysdig Secure ishttps://eu1.app.sysdig.com/api/saml/secureAuth.Click Register to complete the registration.
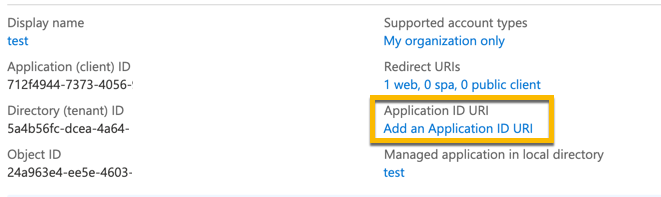
In the Overview tab click Add an Application ID URI:
Click Add a scope.
Add the application ID URI as follows:
https://<your_sysdig_url>:443Replace
<your_sysdig_url>with the URL appropriate to your application and region. You can find the correct URL in SaaS Regions and IP Ranges.In the Overview tab, click Endpoints, and copy the Federation Metadata URL.
Log in to Sysdig, navigate to SAML Authentication screen, and enter the Federation Metadata URL.
You will still need to ensure that the user creation on the login option is enabled.
Save the settings.