S3 Capture Storage
For Sysdig Secure, this functionality was deprecated on 16 July 2026. We recommend Custom Storage, which supports multiple buckets and a dedicated UI.
Sysdig stores captures and Rapid Response logs. Captures let you record detailed system trace data via remote connection. Rapid Response allows you to execute commands.
- In Monitor SaaS, Sysdig stores captures and Rapid Response logs in Sysdig’s Amazon S3 buckets.
- In on-premises installations, Sysdig stores captures and Rapid response logs in a Cassandra database.
- Sysdig stores captures for 90 days.
The following alternative storage options are available for Monitor SaaS:
- Custom AWS S3: Use your own custom AWS S3 bucket for storage.
- Through the UI
- AWS-Compatible: Use AWS-compatible storage, such as GCP, Minio, or IBM Cloud Object Storage.
- Through the API (for all users)
To set up alternative storage options for on-prem deployments, see (On-Prem) Configure Custom S3 Storage.
(SaaS) Configure Custom AWS S3 Storage
If you want to use your own AWS S3 bucket, you must append some code to the Identity Access Management (IAM) Policy you created in AWS for Sysdig integration.
Prerequisites
Your AWS account must be integrated with Sysdig. Ensure there is a valid account visible in Settings > S3 Capture Storage.
Have an AWS bucket set up. Have your bucket name ready.
Set Up Your AWS Bucket
Log in to AWS, and add the following code snippet in your Identity and Access Management (IAM) page:
{
    "Version": "2012-10-17",
    "Statement": [
        {
            "Action": [
                "s3:Put*",
                "s3:List*",
                "s3:Delete*",
                "s3:Get*"
            ],
            "Effect": "Allow",
            "Resource": [
            "arn:aws:s3:::BUCKET_NAME",
            "arn:aws:s3:::BUCKET_NAME/*"
            ]
        }
    ]
}
Replace
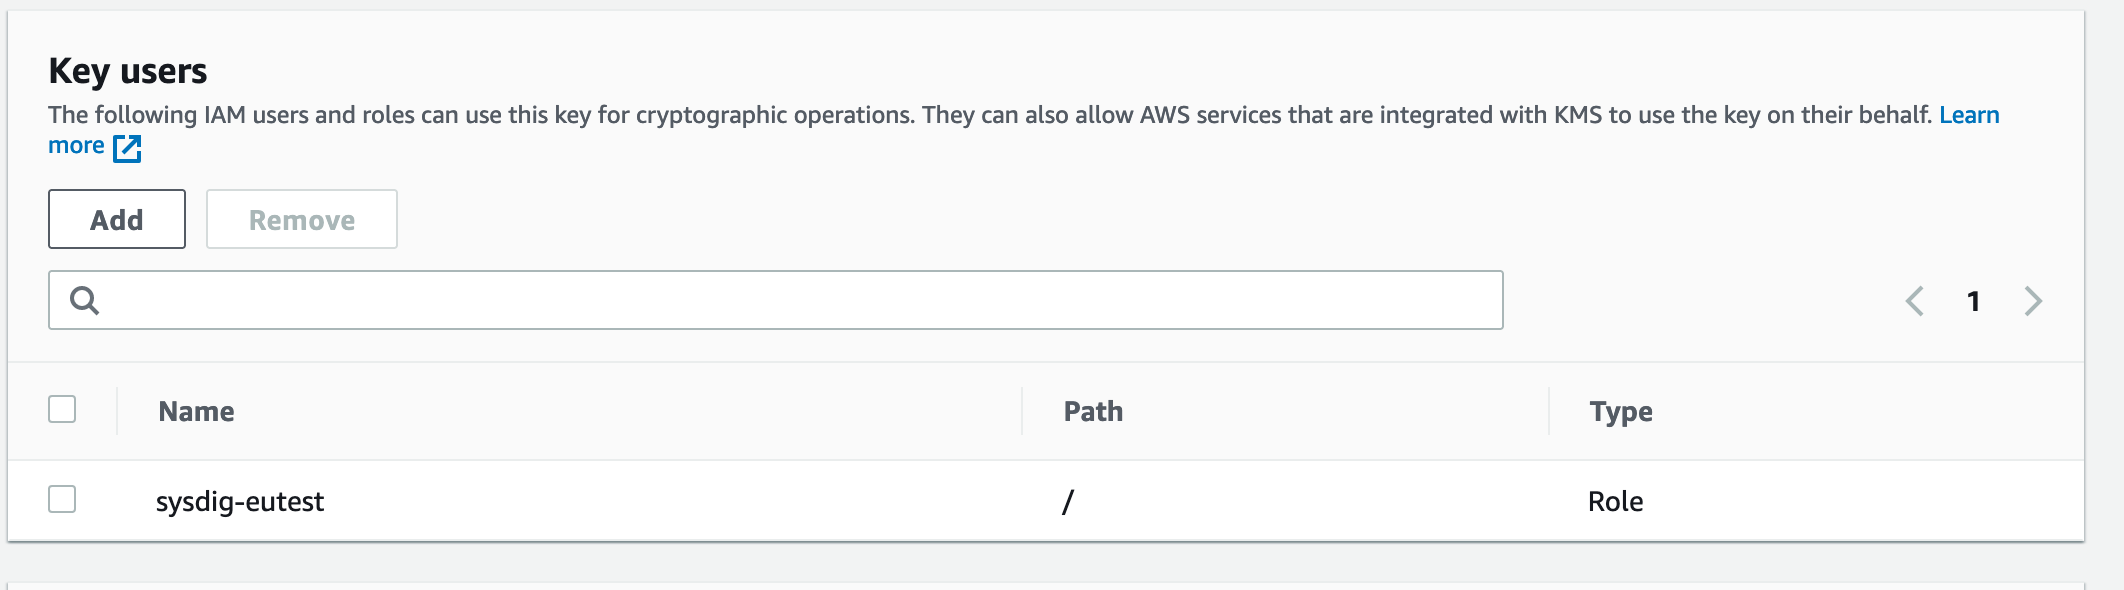
BUCKET_NAMEwith the bucket name you chose.If you are using AWS Key Management Service (KMS) for AWS S3 encryption, ensure that necessary privileges are given to the Sysdig Account or Role to use the custom key.
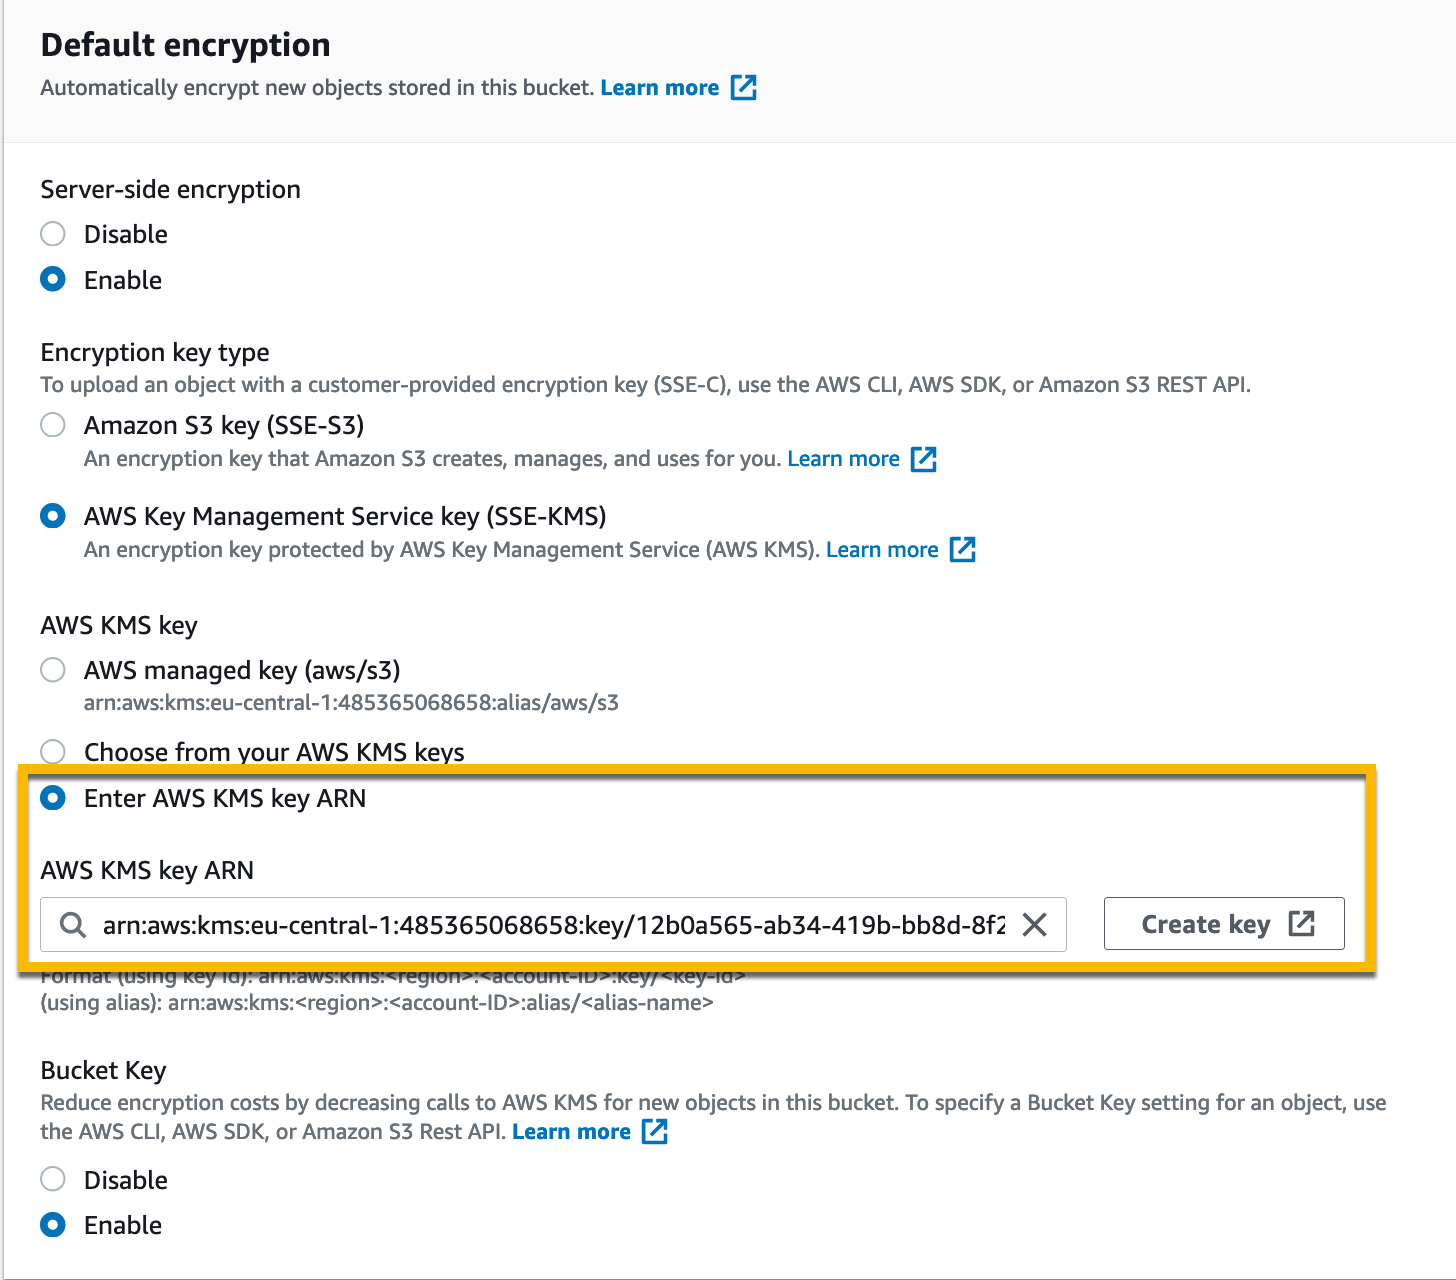
Use the Key users option to do so:
Log in to Sysdig Monitor, and navigate to the S3 Capture Storage page via Settings or Integrations.
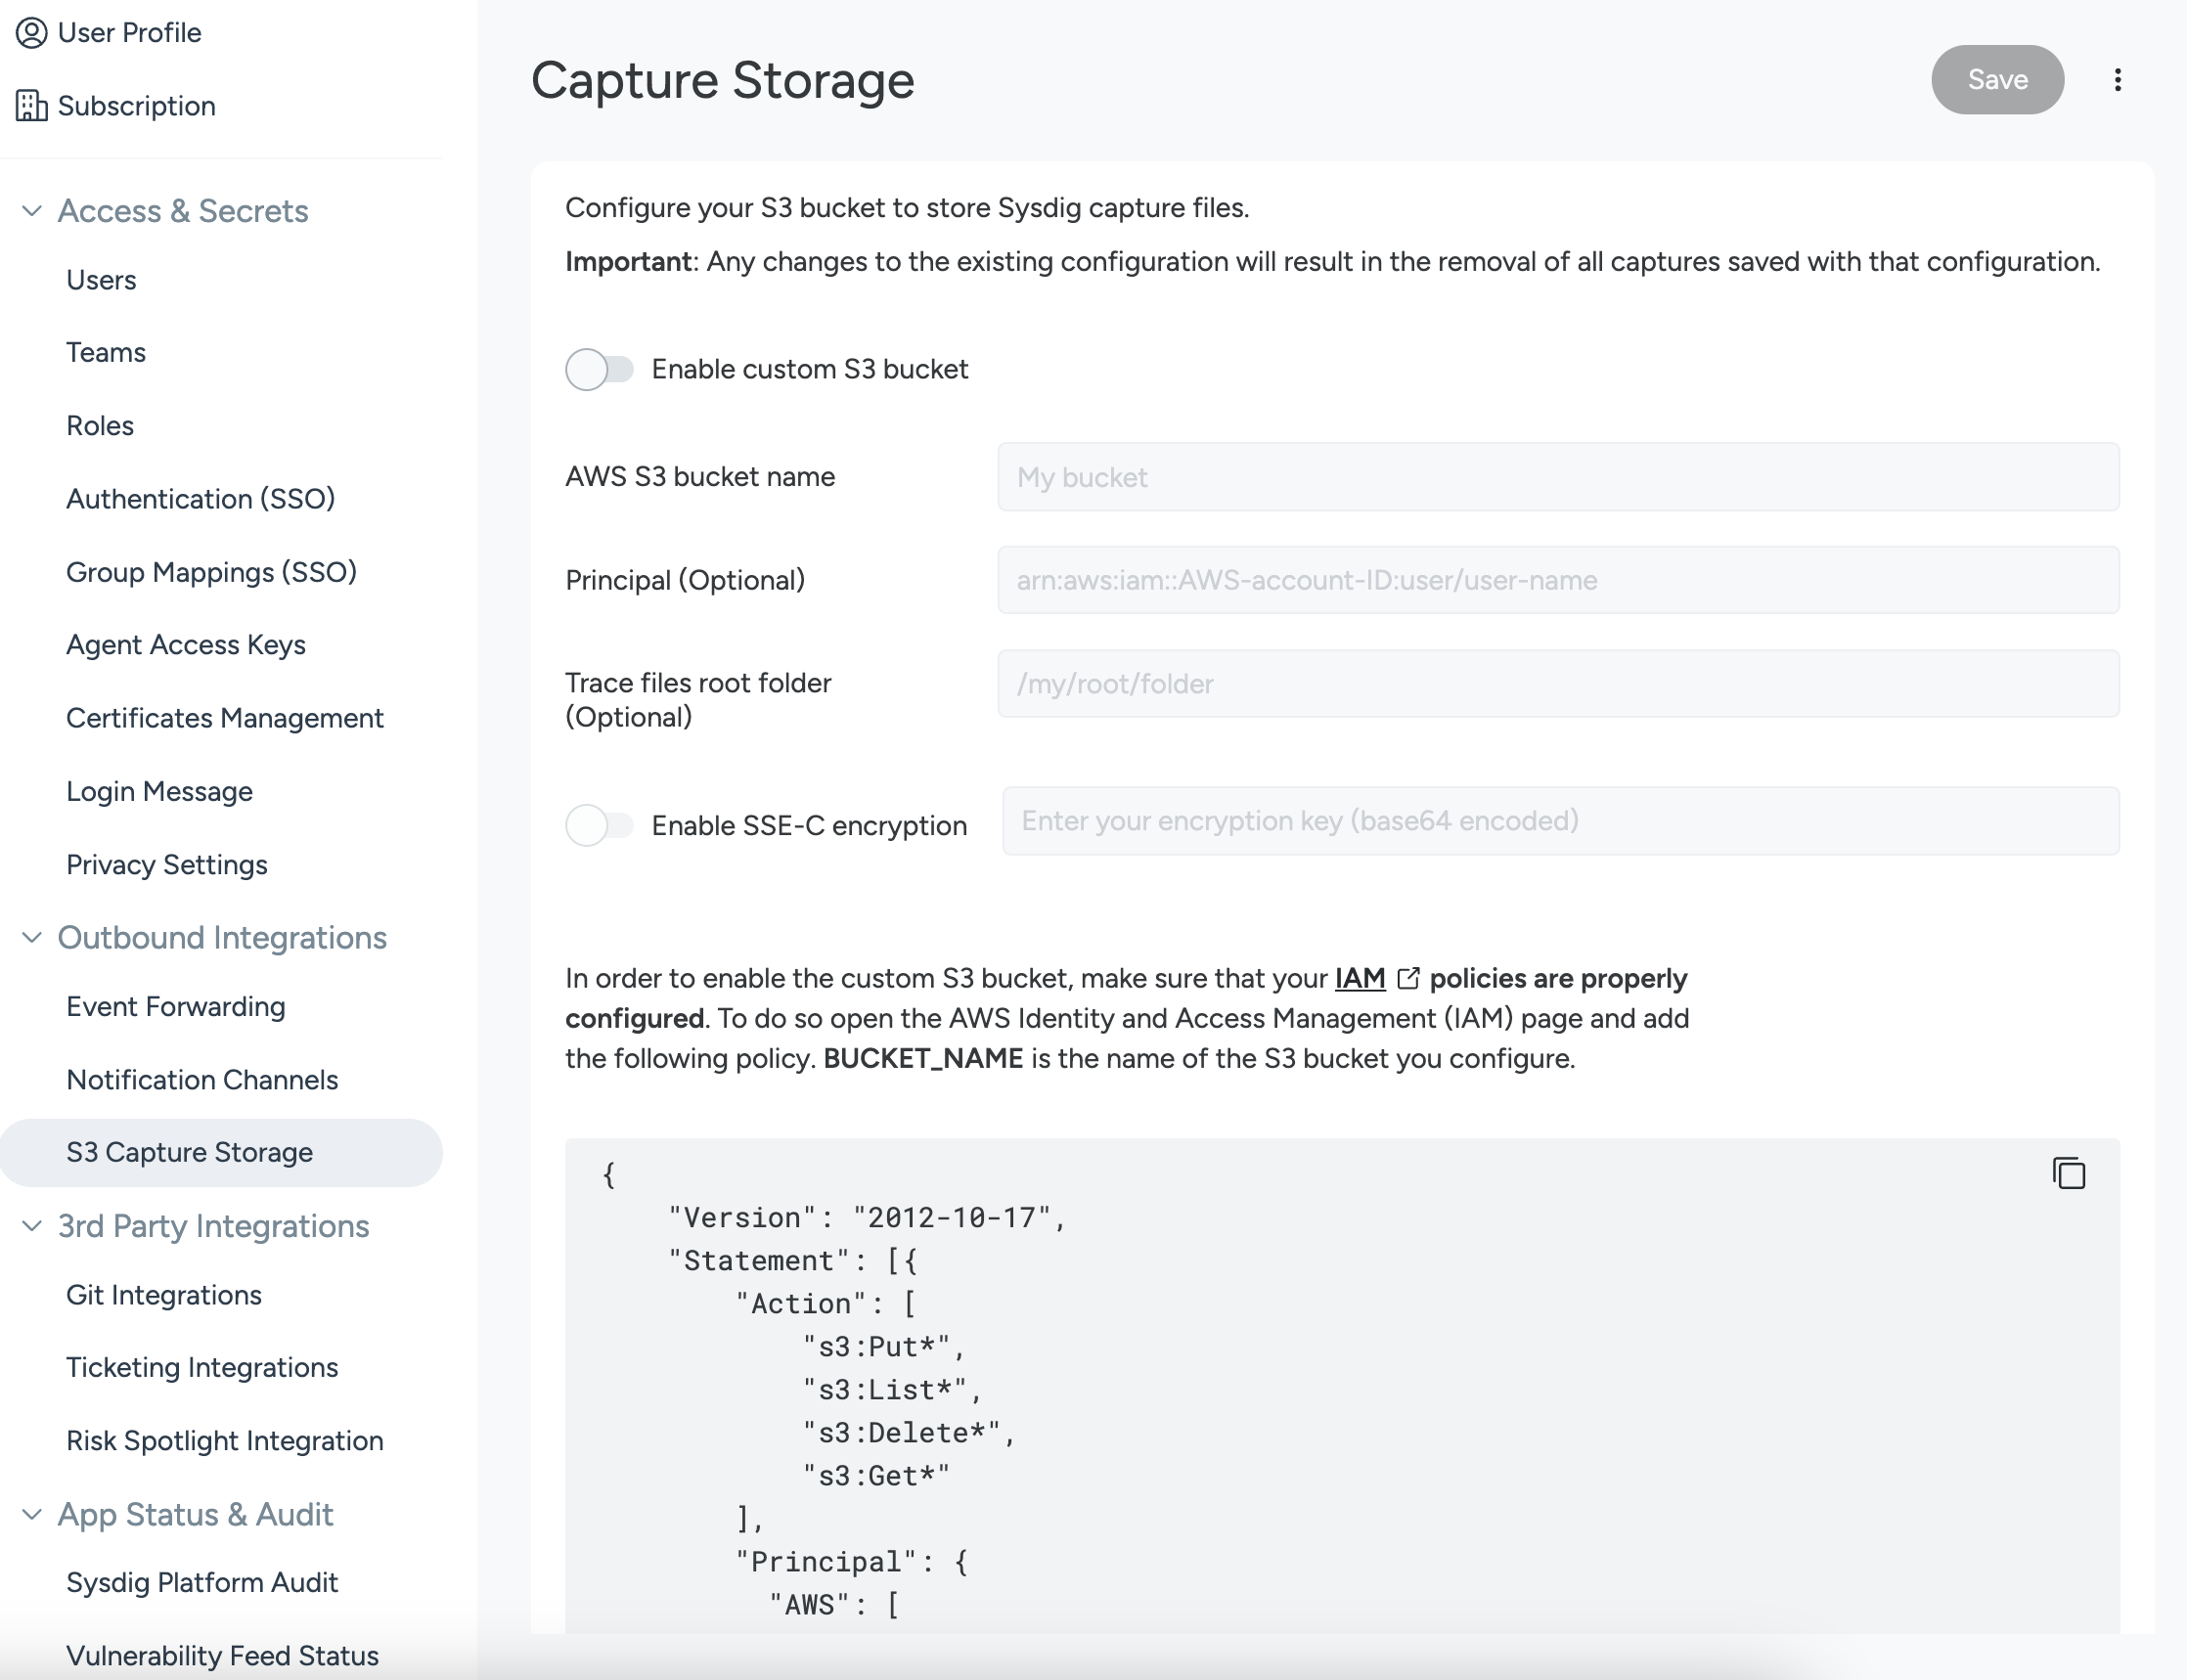
Toggle to Enable custom S3 bucket and enter your AWS S3 bucket name.
Ensure that you enter the exact name you’ve used earlier.
Ignore the optional fields Principal and Trace files root folder.
Ignore the optional code snippet generated on this page.
Code snippet might result in an error.
Enable SSE-C encryption if needed.
The key must be AES-256 and Base64 encoded. When this option is enabled, all data is stored and read by using the provided key. Use the correct key to avoid loosing access to the data.
Upon setting or changing the SSE-C key, the old data will become unreadable. Sysdig does not provide tools for migrating the data.
To Test: Capture a Trace File in Sysdig Monitor UI
When configured successfully, you will have the option to select between Sysdig Monitor Storage or your own storage bucket when configuring a capture.
S3 Storage API Description
The endpoint for configuring S3 Storage is /api/sysdig/settings.
The endpoint takes the following parameters as part of the payload:
enabled: Boolean. Specifies if this S3 bucket enabled or not.enabledSSE: Boolean. Specifies if Server Side Encryption should be enabled (default on for AWS).enabledSSE_C: Boolean. Specifies if the user Provided Server-Side Encryption key should be used.customerEncryptionKey: String. The Base64-encoded AES256 encryption key to be used. Applicable only ifenabledSSE_Cis used.bucketsproviderKeyId: Integer. The API provider key ID. Retrieved from the call to/api/providers.name: String. A unique name to identify your S3 bucket.description: String. A description about the S3 bucket.region: String. A label that identifies where the S3 bucket is located.endpoint: String. The endpoint label.folder: String. The folder path. For example: “/”.pathStyleAccess: Boolean. Specifies if the Path Style Access should be forced.true: Force path style access.falseornull: Try to infer. If the endpoint contains an IP, use path style access. If the endpoint contains a DNS name, use virtual host style access.
awsKey: String: Obsolete; not used any more.
Not all parameters are required and required parameters depend on the use case. See below for specific use cases.
(SaaS) Configure Custom S3 Storage
You can set up a custom AWS-S3-compatible storage, such as GCP, Minio, and IBM Cloud Object Storage, for storing Captures and Rapid Response logs. This is an API-only functionality and currently no UI support is available.
If Google Cloud Storage is used as the S3-compatible storage, you will not be able to bulk delete captures due to compatibility issues with Google’s S3 API implementation. You can delete captures one by one or delete them directly from the Google console.
The example below is for GCP, but is easily adaptable to Minio and IBM Cloud Object Storage.
To configure a Custom S3 bucket via the Sysdig API, follow these steps:
Get hold of an
idandkey. In GCP, for example, this is found in the Interoperability tab of the GCP Storage settings.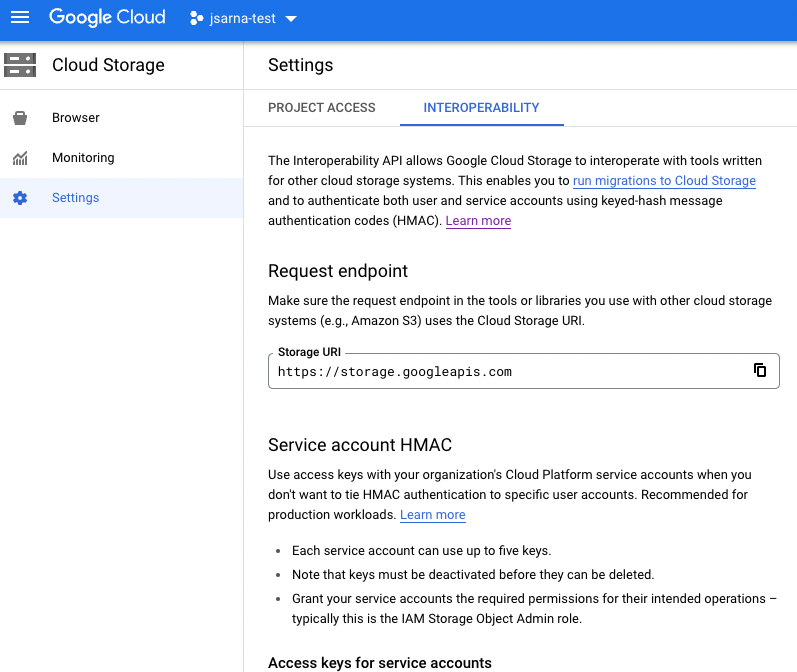
Create a new customer provider key setting with
POSTendpoint:/api/providers, using the parameters you’ve generated in step 1.curl $HOST \ -k -X POST \ -H "Content-Type: application/json" \ -H "Authorization: Bearer $TOKEN" \ -d "{ \"name\": \"aws\", \"skipFetch\": true, \"credentials\": { \"id\": \"${ID}\", \"key\": \"${KEY}\" }}"Create a new storage configuration with
POSTendpoint:/api/sysdig/settings, using the database id you generated in step 2 for theproviderKeyIdparameter.curl $HOST \ -k -X POST \ -H "Content-Type: application/json" \ -H "Authorization: Bearer $TOKEN" \ -d "{ \"enabled\": true, \"buckets\": [{ \"folder\":\"/\", \"name\": \"$BUCKET_NAME\", \"providerKeyId\": $PROVIDER_KEY, \"endpoint\": \"$ENDPOINT\" }] }"
In the case of GCP, the endpoint parameter should be set to
https://storage.googleapis.comWhen including a folder name, omit any prefix slashes. For example,
“test-folder”is acceptable, but not"/test-folder".
(On-Prem) Configure Custom S3 Storage
You can set up a custom Amazon-S3-compatible storage, such as Minio or IBM Cloud Object Storage, for storing Captures and Rapid Response logs in a Sysdig on-premises deployment. This is an API-only functionality and currently, no UI support is available.
In the steps below, you will configure values.yaml in accordance with your Sysdig installation.
Prerequisites
Your on-premises installation is Installer-based. If you have installed Sysdig Monitor manually and you want to configure custom S3 buckets to store your files, contact your Sysdig representative.
Ensure that AWS-client compatible credentials used for authentication are present in the environment.
Ensure that the
list,get, andputoperations are functional on the S3 bucket that you wish to use. Confirm this by using the S3 native tools, for example, as described in AWS Command Line Interface (CLI) for IBM Cloud.
Configure Installer
Configure the following parameters in the values.yaml file so that collectors, workers, and the API server are aware of the custom endpoint configuration.
sysdig.s3.enabledRequired: true Description: Specifies if storing Sysdig Captures in S3 or S3-compatible storage is enabled or not. Options:true|false Default:falseFor example:
sysdig: s3: enabled: truesysdig.s3.endpointRequired: true Description: The S3 or S3-compatible endpoint for the bucket. This option is ignored if sysdig.s3.enabled is not configured.For example:
sysdig: s3: endpoint: <your S3-Compatible custom bucket>sysdig.s3.capturesFolderRequired: false Description: Name of the folder in S3 bucket to be used for storing captures, this option is ignored if sysdig.s3.enabled is not configured.For example:
sysdig:
  s3:
    capturesFolder: my_captures_folder
The path to the capture folder in the S3 bucket will be
{customerId}/{my_captures_folder}. For on-prem deployments, the customerID is1. If your capture folder is namedfinance, the path to the folder in the S3 bucket will be1/finance.sysdig.s3.bucketNameRequired: true Description: The name of the S3 or S3-compatible bucket to be used for captures. This option is ignored if sysdig.s3.enabled is not configuredFor example:
sysdig: s3: bucketName: <Name of the S3-compatible bucket to be used for captures>sysdig.accessKeyRequired: true Description: The AWS or AWS-compatible access key to be used by Sysdig components to write captures in the S3 bucket.For example:
sysdig: accessKey: <AWS-compatible access key>sysdig.secretKeyRequired: true Description: The AWS or AWS-compatible secret key to be used by Sysdig components to write captures in the s3 bucket.For example:
sysdig:
  secretKey: <AWS-compatible secret key>
Starting from on-premise version 7.4.0 the values.yaml schema has changed. See the release notes for more details.
Updated Configuration (version 7.4.0 and later)
global:
    legacyS3:
        s3:
            enabled: true
            endpoint: <your S3-Compatible custom bucket>
            bucketName: <Name of the S3-compatible bucket to be used for captures>
            capturesFolder: <my_captures_folder>
    accessKey: my_awesome_aws_access_key
    secretKey: my_super_secret_secret_key
The following AWS CLI command uploads a Sysdig Capture file to a Minio bucket:
aws --profile minio --endpoint http://10.101.140.1:9000 s3 cp <Sysdig Capture filename> s3://test/
In this case, the endpoint is http://10.101.140.1:9000/ and the name of the bucket is test.
When you finish the S3 configuration, continue with the instructions for on-premises installation by using the Installer.
